

 April 6th, 2017
  CryptoBadger
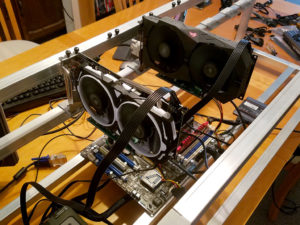
Building an open-frame GPU miner.
It’s finally time for an update to my popular 2013 Litecoin mining guide! It’s four years later, and Ethereum mining is where it’s at for GPU miners, so that’s what I’ve focused on. I’ve kept the same format and detail level as my old guide, so if you were around back then, you’ll know what to expect.
If you’re new to the world of crytocurrency mining, this guide should give even an absolute beginner all of the knowledge needed to put together an efficient Ethereum (or other GPU-minable altcoin) mining rig using readily-available consumer hardware.
This guide will be broken into several parts, each focusing on a different aspect of building your first mining rig. First, let’s take a look at what you’ll need in terms of hardware to put a respectable Ethereum miner together.
Build your own Ethereum Mining Rig, part 1: Hardware
Here is the list of hardware that I recommend. Don’t worry if you’re not able to get exactly what’s on this list, I provide some excellent alternatives below the table.
| Motherboard | 1 x Asus B250 Mining Expert | $180 |
| Processor | 1 x Intel Celeron G3900 CPU | $45 |
| Memory | 1 x 4GB DDR4 DIMM | $40 |
| Power Supply | 1 x 1200w Platinum PSU | $260 |
| GPUs | 3+ Radeon RX 570 video cards (*see below) | ~$200 each |
| Boot Device | 1 x 60GB SSD -or- USB stick (Linux) | $5 – $35 |
| Case | 1 x build your own (see bottom) -or- open frame case | $30 – $200 |
Some explanations and alternatives for each item:
Motherboard
Generally, any motherboard with PCIe slots on it is suitable for mining—typically one GPU per PCIe slot. The PCIe slots don’t need to be full-length, as we can attach GPUs to 1x slots with the help of risers. With that said, there are potentially some limitations when you start to pack a large number (4+) of GPUs onto one motherboard, even if that board has enough PCIe slots to physically accommodate them. That’s why picking a suitable motherboard is probably your biggest hardware headache if you want to run as many GPUs as possible in your rig.
My top choice is currently the Asus B250 Mining Expert board. It’s literally made for mining, with support for up to 19 (!) GPUs and 3 power supplies right out of the box. Even if you don’t intend to initially run more than a few GPUs, the included mining-centric diagnostic features and ability to expand later probably make the price premium over less-robust boards worth it.
The ASRock H110 Pro BTC+ is another excellent choice for mining, with support for up to 13 GPUs. However, it currently costs about the same as Asus’s mining board, and for the money I’d rather stick with Asus. If you know that you’ll definitely stick to a single PSU and a small handful of GPUs (e.g.: the majority of us), this is a fine choice, especially if you find a deal on it.
Finally, the Biostar TB250-BTC is also aimed at miners, and costs considerably less than the Asus and ASRock offerings. The Biostar board “only” supports 6 GPUs, but that’s likely all that the majority of us need. If price is your primary consideration, the TB250-BTC should be at the top of your list for 6 GPU rig builds.
If you only want to use 3-4 GPUs in your rig, then you’ll have a much easier time. Most boards with up to four PCIe slots should accommodate a GPU in each. Keep in mind that you can use old hardware that you have sitting around—the board doesn’t have to be recent. I dug out an old ASRock 970 Extreme4 that I used four years ago for litecoin mining, and it still works fine today for up to 4 GPUs (5 is possible with some work). So it’s possible to pick up an ancient board on eBay/Craigslist for nearly nothing and mine with less than 6 video cards.
CPU / Processor
This one is easy: buy the cheapest CPU that works with whatever motherboard you pick. When it comes to mining, the GPUs do all the work. Your CPU will essentially sit idle, so there is no reason to waste money on anything other than the bare minimum.
All of the motherboards that I recommended based on Intel’s LGA 1151 socket, so that means the Celeron G3900 is probably the best choice.
If you go with an AMD motherboard, a Sempron CPU will do nicely.
Memory
4GB is fine. Overkill really, at least for Linux. If you have an old 2GB stick (or even 1GB!) sitting around and plan to run Linux, you’re good to go. If you want to run Windows, then 4GB is probably a realistic minimum.
While Ethereum mining is pretty memory-intensive, everything happens on the GPUs. System memory will be pretty much unused, so there is no reason to spend money here, especially with DDR4 prices so high.
PSU / Power Supply
The power supply is extremely important—don’t skimp on it! A good, efficient PSU will keep your electricity costs to a minimum and more than pay for itself over the long run. Seasonic, EVGA, and Corsair are all generally top brand choices. The 1200W unit that I’ve linked may seem like overkill, but power supplies are most efficient when they’re not running near their rated maximum load. A 6 GPU rig will draw about 750 watts (assuming 6x RX 570 cards, properly optimized), which means a 1200W PSU will have sufficient headroom to perform efficiently.
If you’re planning on running only 3-4 GPUs, you can save a bit of money and go for their 850 watt model instead.
GPUs / Video Cards
The top Ethereum mining choice is currently the Radeon RX 570 / RX 580 line*. The RX 570 delivers nearly the same performance as the RX 580 (within 4-7% or so) for a bit less power consumption—they’re essentially equal from an efficiency standpoint. The RX 570 is usually significantly cheaper than the 580, so generally the 570 is the best choice.
Which model to pick, though? While literally any RX 570/580 card will do, the most important thing to look for is memory speed if you want the best performance. Cards with a higher memory clock speed will generally perform a bit better while mining ETH (and can generally be overclocked more). Memory capacity isn’t really important beyond 4GB, so all other things being equal, there is no reason to shell out extra cash for the 8GB version of a card. It’s true that every GPU needs to be able to hold Ethereum’s DAG file in memory, and that file is slowly increasing in size—but it won’t surpass 4GB until late 2019 (and ETH’s switch to PoS will likely occur before then, anyway).
With all of that said, the 8GB versions of the cards tend to have faster-clocked memory than most of the 4GB cards, so if the price difference isn’t too large, spring for whatever is the fastest. Most of the cards fall between 1650 Mhz (6600 Mbps effective) to 2000 Mhz (8000 Mbps effective). The slower 1650 Mhz memory GPUs will hash at 21-23 Mh/s, and the fastest 2000 Mhz ones will do 25-28 Mh/s (both can potentially be pushed higher with BIOS mods and good luck).
The best advice is usually to just pick up whichever 570/580 card you can get your hands on for the least money, as mining speed differences between brands/models are pretty small after optimization. These 8GB MSI RX 570 cards are $220 each as of 11/29/2017, and I’m running mine at 28 Mh/sec without pushing them too hard.
If you can still find old RX 470/480 cards on the secondary market, they’re just as good the RX 570/580 cards that replaced them.
*While my guides deal with setting up and optimizing AMD’s GPUs, nVidia’s 1060 / 1070 video cards are also excellent for mining. Generally these days I tend to recommend whichever is cheaper (and right now, that’s AMD). But if you find a deal on some nVidia 1070 GPUs, don’t hesitate to grab them—they perform just as well as AMD’s offerings, and are arguably easier to set up (just remember to install nVidia drivers instead of AMD’s if you follow the rest of my guide!).
Boot Device
If you plan to run Linux, you can use pretty much anything, including a ~$5 16GB USB stick (we’ll be using Claymore miner, which doesn’t write Ethereum’s DAG file to disk, so we don’t need to worry about wearing a USB stick out due to constantly writing to it, like with the stock ethminer). With that said, SSDs are pretty cheap nowadays and it might be nice to have one in case you want to try Windows at some point.
If you plan to run Windows, then a cheap 60GB+ SSD is your best bet. If you have an old mechanical hard drive laying around, that’ll work fine too.
The Case
I highly recommend against trying to cram a bunch of GPUs into a conventional PC case. You have two realistic options here: buy a purpose-built mining frame, or build something yourself.
The first option is straightforward, if not a bit more expensive. Here is an example of an open-air frame that will accommodate up to 6 GPUs. Here’s another option. You’ll pay a premium going this route, but it’ll save you some time and effort.
Building your own is much cheaper, and (arguably) more fun! If you’re handy, you can put together a simple aluminium frame yourself for a fraction of the cost of buying one. If you don’t have the necessary skills or tools for that, I popularized building mining rigs inside plastic crates back in 2013, and that still works fine today (for up to 4 GPUs or so, anyway). At the bottom of this post, you’ll find instructions on how to build a plastic crate “case”.
Risers & Miscellaneous Stuff
If you’re building your own case (whether it’s from a plastic crate, or aluminium, or something else), you’ll need risers to connect your GPUs to your motherboard. If you’re buying a mining frame, most include risers. Risers tend to be pretty misunderstood among new miners, so here is what you need to know:
- Risers can be powered or unpowered. A riser is unpowered if it simply connects a GPU to a motherboard PCIe slot. A riser is powered if it additionally accepts power from the PSU (generally via a molex-type connector). Unpowered risers allow GPUs to receive up to 75 watts of power through the motherboard’s PCIe bus, just as if they were plugged in directly. Powered risers will take that additional power directly from the PSU instead, bypassing the motherboard.
- You may mix unpowered and powered risers, but the total number of unpowered risers should not exceed two (this includes GPUs plugged directly into the motherboard)! Motherboards are generally not designed to deliver more than 150 watts of total power through the PCIe bus, so two GPUs on unpowered risers is the safe maximum (2 x 75 watts).
- The newer USB-style powered risers often include SATA-to-molex power adapters. Throw these adapters away! SATA plugs are not designed to deliver 75 watts safely, and these can get hot enough to potentially be a fire risk (admittedly, 99% of the time you’ll be fine, but it’s not worth the risk). Instead, connect the molex plugs on the riser directly to your PSU (no more than two risers per PSU plug). Newer versions of these USB risers forego the molex adapter and instead use a PCIe connector for power.
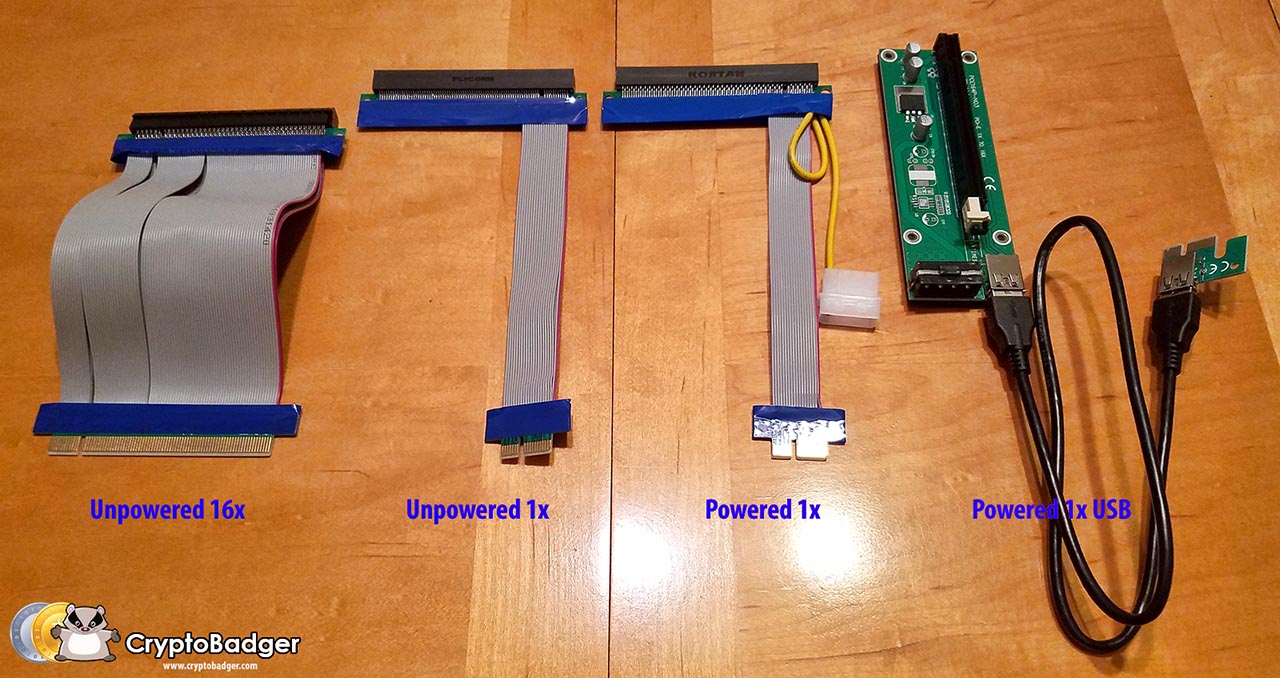
PCIe risers: click to enlarge.
I do think the newer USB-style risers are the way to go—they’re longer and easier to work with than the old ribbon-style cables. Here is a 6-pack of USB risers with the newest (and safest) PCIe connectors. It’s always smart to buy an extra or two, as defects are relatively common. If you have older ribbon-type risers laying around, or can get them cheaply, they’ll work just fine.
If you’re building or buying a large frame, you might need extenders for some of your molex plugs and PCIe power plugs.
You’ll also need a power button, unless your motherboard has one built in (which is fairly rare). This will do the trick, or you can build one into your plastic crate if you plan to go that route (see below).
Some people have reported that their rigs won’t boot unless they have a monitor connected, although this seems to be fairly rare (my own rig boots fine without a display attached). If this happens to you, you’ll need a dummy plug.
Building your Mining Rig “Case” from plastic milk crates
(I’ve copied the instructions from my original 2013 guide here and updated them slightly.)
Here is what you’ll need to create a simple DIY plastic crate housing for your miner:
| Plastic milk crate (can stack two and put your PSU in the lower one) | $10 each |
| Plastic stand-offs | $3 |
| 6 x #4 3/8″ wood or metal screws | $1 |
| Brace to rest GPUs on (1″ PVC pipe works great!) | $2 |
| a few cable ties (8″ or so) | $2 |
| power switch & LED (optional) | $5 |
You can get plastic crates in most home improvement stores if you don’t want to ship it from Amazon (it’ll be cheaper, too!). I picked mine up at Lowe’s for under $5 each. You should be able to get everything else on the list at Lowe’s if you happen to have one near you, too. As far as tools go, you’ll need a drill and a knife capable of cutting into whatever plastic crate you buy.
Assembly Steps:
First, attach your CPU & heatsink/fan to your motherboard, and place your RAM into the memory slot(s). Then follow the general steps below to mount everything into your plastic crate.
Click the images for a close-up look at each step.
 Place plastic standoffs on the bottom of your plastic crate, and rest your motherboard on top of them. Make sure that all of the essential ports are accessible (SATA, USB, keyboard, mouse, etc). Use your knife to cut away pieces of the crate if necessary so that all ports you plan to use are exposed. Then plug your riser cables into the PCI-E slots of your motherboard.
 Place your brace (1″ PVC pipe is really ideal and won’t flex over time) so that it is sitting above the motherboard, high enough for your GPUs to rest on. Cut the brace so that an inch or two sticks out on either end of the crate.
 Drill holes in your brace so that you can secure it with cable ties (see image). Do not simply rest the brace on the crate! An accidental bump can cause it to fall into the crate, along with ~$1000 worth of GPUs if you do that!
 Connect each GPU to it’s corresponding riser cable, resting the bracket end on the lip of the crate and the other end on your brace.
 Screw each GPU down into the lip of the crate. If you drill small pilot holes ahead of time (mark where to drill with a sharpie), this is much easier.
 If you have a power switch and LED, mount them into one of the crate’s corners. I was pretty sloppy with mine, but it’s functional.


You’re done! Simply connect everything to your power supply and you should be ready to power your rig on for the first time. If you have a second crate, you can put your power supply in there (along with your harddrive if you’re using Windows), and stack it under your main crate to save some space.
In the next part of this guide, I’ll show you everything you need to do to start mining under Linux (or skip to the Windows section if that’s more your thing)!
 Posted in
  Tags:
Tags: 


what’s your opinion on custom OS like ethosdistro?
I haven’t used ethOS myself, but it seems like a quick way to get up and running with linux if you don’t want to install from scratch. There is still some command-line stuff that you’ll need to mess around with, so it doesn’t shield you from the linux experience entirely.
That said, I just released my linux install guide for ETH, and the process is really pretty straightforward if you stick to copying & pasting.
How much can I expect to make off of one of these machines if I mine with a pool? I’ve found calculators online but they only seem to work for mining individually.
You’ll make the same with a pool as you would solo over the long run, minus the pool’s fee (typically around 1%). A pool just smooths out your earnings and makes them predictable – mining solo is subject to massive variance and not recommended unless you have a huge farm of miners at your disposal.
I like this calculator as far as estimating profitability goes – 150 Mh/s @ 750 watts is about what you’d expect for an optimized rig of 6x RX 470 GPUs. Just make sure to plug in your own electricity cost.
Thanks for this guide. It’s easy to follow. I will use your amazon referral links if possible.
A quick question. So, if you toss the SATA to Molex adapters, then the GPUs need to be powered straight from the PSU, right? And, so are there extra cords needed for that? Just trying to map out the whole thing in my head before buying anything.
As for the power supply. Any reason you chose the SeaSonic over the EVGA?
Yes, you’ll be connecting the PSU directly to each riser. The 1200 watt Seasonic I recommended is fully modular (all of the high-end PSUs I mentioned are, including the EVGA) and comes with two molex power cables. One end of each cable plugs directly into the PSU, and the other end has 3 molex connectors. You can use 2 of the 3 molex connectors on each cable to safely power risers (so you can power a total of 4 risers directly from the PSU – two on each of the two included cables). If you’re going for more GPUs, remember you can leave up to two on unpowered risers safely, so you’re covered for up to 6 GPUs with the cables in the box. But if you’re ever in a situation where you need extra modular cables, you can always contact Seasonic directly – they’ve sent me replacements on more than one occasion for free (you’ll just need to provide proof of purchase).
If you’re mounting everything in a particularly large frame, then some of the molex cables (and PCIe cables too) might be too short. In that case, you can just pick up a few extenders to cover the extra distance (here are cheap options for molex and PCIe extenders). If you’re doing a plastic crate build for 3-4 GPUs, I doubt you’ll need them.
As far as choosing between the Seasonic vs the EVGA: I believe the Seasonic is slightly more efficient under high loads, but they’re both fine choices. It’s doubtful you’d notice any real-world difference unless your electricity rate is extremely high.
Thanks for your guide. It is very informative. I am busy setting up my first rig and wanted to know if using different types of GPU’s would cause any stability issues?
I have 2 x PowerColor RX 480 RED Devil 8 GB currently. I am currently having difficulties in sourcing more of these. Can I use 4 other RX 480 cards together with these or possibly the new RX 580 cards when they are released?
Short answer: no, it shouldn’t cause you any problems.
I actually have several different brands of RX 470 cards, plus one RX 480 card in my testbed at the moment, and I haven’t experienced any weirdness at all. For maximum performance/efficiency, you’ll likely want to flash each GPU with an appropriate custom BIOS (which I’ll cover in part 4 of my guide – probably sometime next week), but other than the extra work of creating a GPU BIOS for each different card, it’s pretty much the same as running a rig composed of homogeneous GPUs.
If you just plan to run at stock clock speeds and voltages, then running a bunch of 470/480 cards from different manufacturers together shouldn’t be any different than setting up a rig composed of many uniform GPUs. They’ll all run individually at whatever default clock speeds/voltages their manufacturers defined.
Cryptobadger. Wow. Thanks for the clear, quick, and helpful reply.
Paul, Newegg has the PowerColor RX 480 RED Devil 8 GB (limit 3) on sale right now for 219.99. I know that they might be cheaper after the 580s come out, but they might also just go out of stock. I picked up one and may pick up another. There is also a $30 mail-in rebate, but that is probably limit one per household.
I built a Litecoin miner from your 2013 guide. I am not great on computer stuff, know just barely enough to be dangerous I like to say. I had fun building and mining with it and had some days I was pulling my hair out. Anyway, I am not mining Litecoin any longer and was wanting to know if any of the equipment from the Litecoin miner would work for the ethereum miner or is the equipment listed in your new guide the only option for ethereum miner?
You should be able to re-use everything, except your GPUs (it’s possible to mine ETH on the old 7950 GPUs, but you’ll only get about 10 MH/s per card, which generally isn’t worth it considering the amount of power they require). I actually have a Linux rig running a few new RX 470 cards on the exact motherboard and CPU that I recommended back in 2013. I get the same performance as I do on rigs with a modern motherboard and CPU. Definitely use your old equipment if you still have it sitting around – it’ll work fine!
One further question regarding the old Litecoin miner equipment. Will it support 6 cards or would I have to upgrade the motherboard as well to get that many going? I only ever ran 3 cards on the old equipment as your guide showed so I don’t know enough about the rig to know if it will support 6 cards.
The ASRock board that I recommended in my 2013 guide has 5x PCIe slots, so it should support 5 GPUs. Getting the system to recognize the fifth card might involve some fiddling with BIOS settings, though.
Thanks for the feedback CryptoBadger. I will look out for part 4 of your guide.
M, Thanks for the info. Unfortunately NewEgg doesn’t ship to my country. I was planning to buy 6 from Amazon but they have a limit of two per customer.
Great guide, building my first rig now a bit late to the game. Hope to see more will be keeping tuned for info and share what I can.
My parts are slowly arriving! can’t wait to get it all put together! Looking forward to the Bios modding info.
HI,
Sorry im a bit new to this.
I was wondering though, at what point do you add a monitor to the set up, and do you not need a keyboard and mouse also?
You’ll need a monitor & keyboard during your initial OS installation and setup, but once your rig is up and running you can remove them and monitor/maintain it remotely (via SSH on Linux or VNC on Windows).
Most people just borrow the monitor & peripherals from another PC during setup, and then unplug everything and run their mining rig headless after everything is working properly.
Thanks for the article really found it useful! However I came here from your old article: the one about mining Litecoin rather than Ethereum. I got two questions actually.
1. I’m wondering if the algorithm used by Ethereum is the same as Litecoin? In another word, if I could get 150mh/s mining Ethereum with this rig, would I get roughly the same mh/s when mining Litecoin? Did you try mining Litecoin with this setup?
2. I’m pretty new to this field, maybe you could share with us why you switched your focus to Ethereum from Litecoin? Would you advice me to make the switch as well?
Thanks a lot in advance, and thanks again for this article!
Hey Jason – Ethereum and Litecoin use different algorithms for mining, so your performance in ETH wouldn’t translate to a comparable number in LTC. There has been ASIC mining hardware available for litecoin/scrypt for the past couple years, which essentially makes GPU mining completely obsolete for litecoin. For example, this ASIC miner hashes at over 500 MH/sec – about a hundred times faster than a GPU-based rig at the same price point.
I tend to prefer GPU mining, because the hardware can be easily re-purposed and/or sold whenever you decide to exit mining, whereas ASIC hardware essentially becomes worthless. I believe ETH has the brightest future among current GPU-minable cryptocoins, hence my focus on it – if you’re interested in GPU mining, I think ETH is the best option.
What is the average amount of ethereum this machine mines in a month via using a pool like ethermine.org?
The amount that you mine is constantly changing based on rising/falling difficulty (which is essentially tied to how popular ETH mining is). Here is a good calculator that will show you how much you can mine based on current conditions, pre-filled for 150 MH/s hashrate (an average 6x RX 470 GPU rig). Basically, right now each RX 470/480/570/580 GPU will mine a bit less than 1 ETH per month, so a 6 GPU rig will get you nearly 6 ETH monthly.
CRYPTOBADGER – Vry, very,very big thanks for wonderfull description. I have a question how big noice does this monster produce? Could you please make audio recording and attach it to your article?
A properly undervolted and ventilated rig is surprisingly quiet.
Not exactly scientific, but using a free sound meter app, I held my phone about 2-3 inches from the GPUs in my rig and got 47 decibels (roughly the level of noise that a refrigerator makes). From 5-6 feet away, the noise level drops to ~37 decibels, which is barely noticeable (for reference, the sound meter reads about 22 decibels in what I consider to be a completely quiet room).
This is for my open-air test rig that’s currently running 4 GPUs with a 58C temperature target set. I could lower the noise level pretty significantly by raising the temp target, which would allow the fans to spin at a lower RPM, but it’s already pretty quiet.
I may make a video at some point, but it’s really difficult to get a feel for how loud something sounds via a recording. Hopefully the decibel level measurements are helpful!
Hi CryptoBadger!
I just found out that the RX470 cards are not widely available for now. I gotta wait for a few weeks till I get them if I order now. Do you have any other recommendations? I personally prefer newer cards such as RX570, more easily obtainable, mine more efficiently, and can be sold easier afterwards. (I suppose if I get into the field a few weeks earlier the profits could even make up the extra dollars spent on 570)
But just two concerns:
1. Is 1200W power supply sufficient to hold 6 RX570s?
2. If I use 570 instead, can I still follow your guide in the setup phase?
Thanks!
By the way I heard many people saying that they mix different GPUs on the same motherboard such as 390x 470 480 and so on. Just wondering if you do this do you need to install different drivers for them or not? I suppose if the driver is the same I could still use your guide even if I use all 570 instead. I’m planning to run Linux so I realize the driver installation phase might be tricky and a detailed step-by-step guide is certainly helpful in that case.
You can mix GPUs as long as the driver you’re using supports all of them. In Windows, you can mix RX 470 and RX 480 cards together, but you can’t then add a RX 5xx card because the driver is different (although if you really wanted to, you could mod GPU BIOS so that the OS will recognize a 5xx card as a 4xx card, or vice-versa).
In Linux, I’m pretty sure that the latest AMD driver supports all RX 470/480/570/580 cards, so you should be able to mix a bunch of different GPUs together in a single rig without any issues.
Yes, you can use RX 570 cards instead of RX 470s. If you go with Linux, the setup process should be exactly the same, since the latest AMD driver for Linux supports both 4xx and 5xx GPUs (on Windows, there is a different driver for each line of cards). As long as you plan to mod the GPU BIOS for undervolting (see part 4 of my guide), there isn’t much difference between the RX 470 & RX 570 – they’ll both mine at about the same speed, and use the same amount of power (the 570 will use more if you don’t undervolt).
A 1200 watt PSU is definitely enough for 6x RX 570 cards, even if you don’t undervolt (but you definitely should as long as you feel comfortable doing so!).
I have a questions about risers. Does it mean that f.e. RX 470/480 video card which is supposed to be inserted to PCI-Ex16 slot on motherboard could be connected to PCI-Ex1 using mentioned risers? As far as I know PCI-Ex16 slot is for devices with high throughout. So if RX 470 connected to PCI-Ex1 instead of PCI-Ex16 wouldn´t it degrade its performance?
Yup, you can connect your GPUs to 1x PCIe slots on your motherboard with no loss of mining performance.
For most applications (eg: gaming), attaching a 16x PCIe GPU to your motherboard with a 1x riser would absolutely cripple performance, but mining doesn’t require much system bandwidth at all.
What would you suggest: to use 1x1200W power supply or 2x750W power supplies assuming that their cost is the same? What are the pros and cons of using two PSU instead of one?
I’d pretty much never recommend using two PSUs in a single rig unless absolutely necessary (eg: you’re building some kind of monster where a single PSU wouldn’t be able to supply enough juice to power it). Setting up a dual-PSU rig improperly is probably one of the leading causes of mining hardware death.
Even if you know what you’re doing, there just really isn’t any reason to use more than a single PSU these days. One high-quality 1200 watt PSU is more than enough power for a 6 GPU rig.
Do you plan on offering more custom pre built cases on amazon?
If you mean this frame, it tends to go in and out of stock pretty frequently (it’s not my product). Here is an alternative, although it doesn’t include risers and only holds GPUs. It’s generally much cheaper to build your own frame (it’s more fun, too!).
am I able to have 2 RX470 radeon and 2 Radeon NITRO+ Rx 470 on the same rig? I ask because amazon will only let me buy 2 of the 2 RX470 radeon
Absolutely! You can mix different brands of RX 4xx cards in the same rig; they’ll work fine together.
Thanks so much! Im excited to buy this! Im reading your part 5 guide and forgot to buy the power switch! i sure as hell would have been standing there thinking…how do i turn this thing on..hahah..thanks again..also ive been using your amazon direct links
Thanks – glad I could help!
I’ve been mining with ethos using the old litecoin miner (3 x 7950, Seasonic 860) that I built per your instruction from way back. But I’ve been stuck not being able to get a payout on ethpool.org because of not enough hashing power (I’m about 3/4 the way to the next payout which will give me ~4.5 eth), so I just ordered 4 Sapphire Radeon NITRO+ Rx 470 8GB from Amazon. They might not get here until July 1, but I figure it will be worth the wait.
I know I wrote, “I figured it will be worth the wait”, but how faulty is that logic? In other words, is it better to buy available cards now, and if so what should I buy with a $900 budget?
Those Sapphires are considered top tier cards for mining, but honestly if you’re comfortably with the idea of GPU BIOS mods, even the cheapest 4GB RX 470 cards get pretty close. Realistically, you’re looking at a difference of maybe 2-3 MH/s between the best and worst cards, given similar voltage levels.
I’d probably go for whatever was available right now, assuming you weren’t getting gouged on the price – 6 weeks is a long time to wait; you can mine nearly 5 ETH in that time if you started today. Browsing through Amazon, it looks like nearly all of the RX 470/480/570/580 cards are currently sold out, however.
Amazon does have a few of these in stock right now (I have one in my own rig). It’s one of the few cards with dual BIOS, which is nice if you’re modding. And they’re typically stable at 30-31 MH/s if you feeling like clocking them aggressively (mine does just over 30 MH/s, although I clocked it back to 28 MH/s to save some power).
Don’t forget to check eBay and other secondary markets, too!
How about these XFX RX 480 RS 8GB:
https://www.amazon.com/gp/product/B01MYOD9AU/ref=oh_aui_detailpage_o00_s00?ie=UTF8&psc=1
I actually already ordered 4 and they’ll be delivered on May 26th. But I know that time is money when it comes to mining.
Quick question: do all of these cards have Samsung memory?
I can always cancel this order for the next couple of days and order those PowerColors. As I said above I’m 3/4 of the way to getting a ~4.5 eth payout on ethpool.org. Is 10 days waiting for cards vs 3-4 days too long?
Nah, 10 days is no big deal. I wouldn’t stress about it too much either way – either option makes sense. =)
I wasted valuable time and lost money not taking care of this a month or two ago, not to mention those PowerColors had a $50 rebate if I would have ordered them before May 1st. Both the PowerColor Radeon RX 480 8GB and the XFX RX 480 RS 8GB look like great cards
I’m not going to beat myself up too much, about not upgrading my miner sooner rather than later. I’m glad I got in when I did, and that CryptoBadger is putting out Ethereum Guides. It’s all good as long as I get myself to Hodl:)
Im still figuring out how all the slots and everything works so any more guides is immensly helpful. I see people screwing there motherboard on a piece of plastic but im not sure what kind or where to get it, and any tips for running minersgate and any good guides on uploading and running the software?
Thanks again, Cryptobadger. I’ve got two rigs up and running, 11 GPUs in all. One running windows and one using ethos. I’m wondering if anyone can throw me a bone on the windows machine.
I been through different faqs and forums and tried about every relevant setting in the bios on the Windows machine, and tested all the cards with different risers and in different PCI-e slots, but I can’t get the 6th card to work. I’ve gotten windows to see the card, but every time it sends me into a BSOD cycle.
This rig is built on the MSI Z270 Pro-A https://us.msi.com/Motherboard/Z270-A-PRO.html#hero-specification
I’ve got 3x MSI 480 RX 4GB stock and 3x MSI 580 RX 8GB. Right now, I’ve got it running without one of the 4GB cards. Just using Wattman, I’m getting about 28 MH/s out of the 8GB cards and 24.5 MH/s out of the 4GB cards, and with these 5 cards it pulls about 750 watts at the wall. But, if anyone has suggestions about how to get that 6th card working, I’d love to hear them.
Thanks again, Cryptobadger.
Unfortunately my experience with Windows is pretty limited. I have read a lot of stories from others that have considerable difficulty getting Windows to recognize all of their GPUs, and many times it boils down to playing with BIOS settings. If you haven’t already tried disabling everything you don’t need in BIOS, that’s a good place to start (also try forcing PCIe to Gen 1).
If you’ve already tried fiddling with BIOS settings, and you have a spare USB stick or SSD to use as a boot device, you may want to give Linux a try. I find that most of the common mining headaches that people have with Windows never come up with Linux. Good luck!
if your TOLUD set to auto , change it to 3GB, may working fine .
Is there formula to figure out what the hash rate is for a GPU? Those 470s are in limited stock is why I ask. Is it just a gamble figuring out what GPU works best?
I’d honestly just go for whatever is cheapest and available at this point. If you’re planning to mod your GPU BIOS, the difference between the best and worst cards is only a couple MH/s. They all perform well once they’re modded.