This fourth installment of our Ethereum mining guide will focus on optimizing your rig’s performance via GPU clock speed and voltage setting tweaks to achieve maximum efficiency.
The tweaks that I outline in this article are applicable whether you’re using Linux or Windows. If you’re using the hardware that was recommended in the first part of this guide (or very similar hardware), you should expect to achieve Ether mining performance gains of 20-25%, compared to stock settings! At the same time, you’ll reduce power consumption by 10-15% (and consequently, lower GPU temperature and fan noise).
More speed for less power—how is that possible? Click “read more” to find out, in our mining performance optimization guide!
Build an Ethereum Mining Rig, part 4: Optimization
Let’s get the bad news out of the way up front: achieving these levels of performance gain require flashing your GPU BIOS with custom replacements. Doing this incorrectly may leave you with a non-working GPU that can be difficult or (sometimes) impossible to restore to factory settings. The steps that I outline in my guide will show you how to minimize the risk that you end up with a bricked GPU, but always remember that messing around with BIOS settings can potentially result in unstable hardware.
Disclaimer: Installing a custom BIOS and/or changing factory clock speed & voltage settings on your graphics card(s) may cause system instability, may harm your hardware, and probably invalidates your warranty. I assume no responsibility for hardware damage if you choose to follow this guide!
With that said, I’ve flashed probably close to a hundred GPUs, and I haven’t destroyed any hardware yet. =) If you proceed, just make sure to follow the steps in order, don’t take any shortcuts, and stop if there is anything that you’re confused or unsure about.
What you’ll need
There are ways to create and flash custom BIOS mods to your GPUs without some of these things, but I believe this method is by far the most user-friendly:
- A computer running Windows
You’ll flash your GPUs with this computer. My mining rigs run Linux, but I keep a small/cheap SSD loaded with Windows 10 handy for testing/BIOS flashing purposes (I simply swap the SATA connector between disks when I want to switch OSes). Any version of Windows 7, 8, or 10 will work fine (note that you don’t have to activate Windows to install it). Or, you can simply temporarily move your GPUs to another computer running Windows to flash them. - ATIFlash / ATIWinFlash
You can download the latest version of ATIFlash here (v2.74 at the time of this article). We’ll use this to read and write BIOS files to our GPU hardware. - Polaris BIOS editor
You can download the latest version of Polaris BIOS editor here (v1.4.1 at the time of this article). We’ll use this to modify BIOS files. - ATI Pixel Clock Patcher
You can download the latest version of ATI Pixel Clock Patcher here (v1.4.5 at the time of this article). We’ll need this to get AMD’s Windows driver to recognize a modded BIOS. - A Kill-a-Watt electricity usage monitor (or similar device)
Not strictly required, but I highly recommend this—it’ll pay for itself! I have two of these and consider them invaluable in dialing in the performance of my mining rigs. When doing optimization tests, I often find that the last few percentage points of speed gain come at a much larger cost in power consumption (and thus, a decrease in overall profitability)—having an electricity monitor allows me to find the efficiency sweet spot between raw speed and electricity usage. - Some baseline information on each of your GPU’s factory performance to compare your modifications against. If you haven’t already, let each GPU run for 5+ of mining and record its speed, temperature/fan speed, and power consumption at the wall (assuming you have a Kill-a-Watt). This will be immensely useful later when trying to figure out if your mods are beneficial or not.
From this point on, I’m going to assume that you’re following directions on a Windows computer with the above software available, ideally with a Kill-a-Watt connected for testing. I’m also going to assume that you have a single GPU installed. If you have multiple GPUs, I highly recommend that you disconnect all but one, and work on them one at a time. All of the software does support multiple GPUs, but you’ll keep confusion and the potential for mistakes to a minimum by only connecting one video card at a time. The times that I’ve made mistakes with BIOS flashing, it has always been because I flashed the wrong card due to having multiple GPUs connected!
Step 1: Make a backup of your factory GPU BIOS
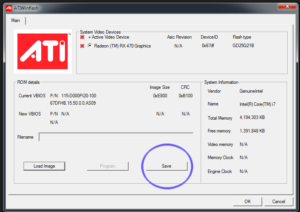 Before we start, open your Radeon Settings and disable any overclocking/undervolting that you have set up through WattMan (if you followed my Windows setup guide, you’ll need to temporarily disable the “EthDcrMiner64” profile that you created in step 12). After that:
- Open ATIWinFlash (extract the .zip file you downloaded and double-click ATIWinflash.exe).
- You should see your GPU detected at the top under “System Video Devices”. Again, I highly recommend that you have only a single GPU connected for this entire process!
- Click “Save” to make a backup of your GPU’s BIOS data. Don’t lose this file!
Your computer might appear to freeze for a few seconds while your GPU BIOS data is being saved—this is normal. When ATIWinFlash is done, you can close it for now.
Step 2: Open your GPU’s factory BIOS with Polaris BIOS editor
Here is where we’re going to be making all of our modifications. Editing the BIOS data gives us access to a few values that we normally wouldn’t have any control over—most importantly, the memory timing values.
- Open Polaris BIOS Editor (extract the .zip file you downloaded and double-click PolarisBiosEditor.exe).
- Click “OPEN BIOS” in the top left, then browse to where you saved your GPU’s factory BIOS in step 1, and double-click it to open it.
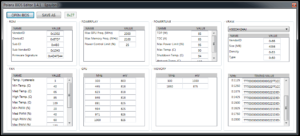
You should see something like the image below (click for full-size). I’ve highlighted the areas that we’ll be modifying in blue—if you stick to these areas, you’ll generally be safe from getting yourself into too much trouble, as the GPU doesn’t enter these states until it’s mining or otherwise working hard. Note that the first entries in the “GPU” and “Memory” section are outside of the blue area and should never be touched unless you absolutely know what you’re doing. Likewise, the memory timings at 1500mhz and below should usually be left at default settings.
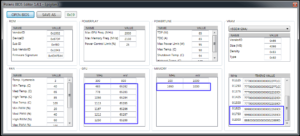
My screenshot shows the default BIOS from an Asus 1650mhz factory-clocked RX 470 4GB GPU. If you have a 4GB RX 470, it should look pretty similar, although many of the values will likely differ by a small amount. At these factory settings, I get around 20 Mh/s in Claymore’s Ethereum miner, which isn’t spectacular.
If you don’t see memory timing values for your card, try this version of Polaris instead (click the “clone or download” button, then “Download ZIP”).
When you’re comfortable, let’s move on and start modifying some values.
Step 3: Modify BIOS memory timing values
At this point, you should still have Polaris BIOS editor open, with your GPU’s factory default BIOS loaded. We’re going to focus on the lower-right corner area containing memory timings.
If you have a RX 470/480 that has memory clocked at 1750mhz or less (eg: most 4GB cards), you may have noticed that it’s really easy to overclock past 1750mhz via the driver (in Windows, anyway). You probably also noticed that mining performance immediately tanks as soon as you do so: a 1751mhz overclock results in much slower performance than 1750mhz. You may have wondered why, and these memory timings are the answer. On most 4GB cards, the GPU switches over to less aggressive memory timings at clock speeds beyond 1750mhz, which results in slower performance even though the absolute clock speed is higher. We’re aiming to fix that.
This isn’t an exact science, and some experimentation may be necessary for you to achieve optimal results, but what follows is a good starting point and should work for 99% of you:
- If you have a RX 470/480 that is factory clocked at 1750Mhz or less (eg: nearly all 4GB cards):
Copy the value in the 1500Mhz field, and then paste it into all of the fields after it (1625mhz, 1750mhz, 2000mhz). The easiest way to do this is to click anywhere inside the 1500mhz value, then press CTRL+A to highlight the entire string, and then press CTRL+C to copy it. Then you can simply click into the remaining fields and press CTRL+A followed by CTRL+V to paste over the existing value. - If you have a RX 470/480 that is factory clocked at 2000Mhz or more (eg: nearly all 8GB cards):
This is a bit trickier, but generally most cards will be most stable by simply copying the value in the 1750mhz field into the 2000mhz field. The easiest way to do this is to click anywhere inside the 1750mhz value, then press CTRL+A to highlight the entire string, and then press CTRL+C to copy it. Then you can simply click into the 2000mhz field and press CTRL+A followed by CTRL+V to paste over the existing value.
Once you’ve made the edit that is appropriate for your GPU, click on the “SAVE AS” button located at the top left. Save your modded BIOS with a new name (don’t overwrite your factory BIOS!), and then close the Polaris editor when you’re done.
Step 4: Flash your modified BIOS back to your GPU
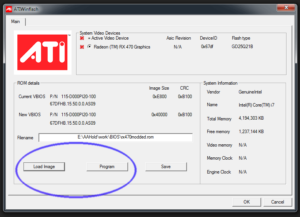 Now it’s time to write your custom BIOS back to your hardware. This can be a little scary if you’ve never attempted anything like this before, but generally if you’ve followed the steps as written, you shouldn’t have any issues. Again, there are no absolute guarantees, so proceed at your own risk!
- Open ATIWinFlash back up.
- Click on the “Load Image” button and select the modded BIOS that you created in step 3.
- Click on the “Program” button to write the BIOS to your GPU. Your computer may appear to freeze for what might seem like a long time—this is normal.
- You’ll be prompted to reboot when ATIWinFlash finishes. Don’t reboot yet—we have one more thing to do. Go ahead and close ATIWinFlash, though.
- Unzip the ATI Pixel Clock Patcher utility that you downloaded and double-click atikmdag-patcher.exe. It should offer to apply a patch, let it. You only need to do this step once per GPU, even if you flash it multiple times. If you skip this step, when your computer reboots, the AMD display driver will refuse to load because it’ll detect that your GPU BIOS has been tampered with it.
- Go ahead and reboot after the patch is applied.
If you’ve done everything correctly, your computer should boot normally, and you’ll arrive back at the Windows desktop, ready to test your changes.
Step 5: Test your modified GPU BIOS
Now is a great time to fire up your miner and see what kind of difference your changes made.
If you have a 4GB card, the timing change alone should be enough to get you from ~20 Mh/s to ~24 Mh/s. If you have a 8GB card, you likely went from ~24 Mh/s to ~28 Mh/s. We can do better, but that’s a pretty good start!
Power consumption will be unchanged (or even up slightly, due to the more aggressive timings), but we haven’t touched voltages yet.
Once you’ve recorded your GPU’s new metrics (speed, temperature/fan speed, power usage), we can move on.
Step 6: Find appropriate clock speed and voltage values for your GPU
Before we head back into Polaris BIOS editor to increase memory clock speed settings, it’s a good idea to have an idea of how high we can push them. It’s a lot easier (and faster) to make these tweaks in Windows via the driver (Radeon Settings/WattMan), and then once we’re confident on the proper values, write them to BIOS.
So if you haven’t already, read step 12 of my Windows guide to get an idea of the process around overclocking and undervolting via driver-level edits. If you’ve already gone through the process, you’ll need to repeat it, as your new more-aggressive memory timings invalidate all of your previous data—you won’t be able to push the memory clock speed as high as you previously could (but performance will be much better).
Using Radeon Settings/WattMan in the manner that I describe in my Windows guide:
- Increase memory clock speed slowly until you see signs of system instability (incorrect share warnings in your miner, artifacts on screen, crashes)
- Decrease core clock speed slowly until it starts to significantly negatively impact performance
- Decrease memory voltage slowly until you see signs of instability (you may not be able to significantly lower memory voltage, depending on your card)
- Decrease core voltage slowly until you see signs of instability
Don’t rush; make sure that your system is stable before moving on. It’s possible to reach speeds of nearly 29 Mh/s with 4GB cards, or over 31 Mh/s with 8GB cards, but watch out for power consumption and stability issues—it’s not always worth running at higher speeds. I’ve found that 25-26Mh/s for 4GB cards, and 27-29Mh/s for 8GB cards is right around the sweet spot for maximum efficiency and stability. When you feel confident that you have good clock speed and voltage values, then move on to the next step where we’ll write them to the BIOS.
Step 7: Write new clock speed and voltage values to GPU BIOS
Note that this step is not strictly necessary if you plan to use Windows for your miners long-term. You can certainly just dial in whatever values you found in the previous step at the driver/WattMan level and call it a day. I prefer to have everything done at the BIOS level, as then I don’t have to worry about software configuration, and can move GPUs between environments with ease.
If you’re running Linux, this is the only way (currently, at least) to overclock and undervolt.
- Open Polaris BIOS Editor back up.
- Load the modified BIOS that you created in step 3 (click “OPEN BIOS” in the top left and browse for your modded .rom file).
- In the “Memory” area, carefully input your values for memory clock speed and voltage in the bottom row.
- In the “GPU” area, carefully input your values for core clock speed and voltage in the bottom row. You’ll probably be overwriting a 65xxx value in the voltage column—that’s ok.
- Still in the “GPU” area, fill in the table between the bottom row and the first row (but do not touch the first row!) with values that ramp up to whatever you entered in the bottom row. It isn’t super important to get these values “right”; you can look at the original table and see what percentage adjacent rows vary by, and just calculate new values that way.
Here is my finished, modded BIOS for my Asus RX 470 4GB (click for full size):
The original factory BIOS is shown in step 2 for reference. Note that I’ve made absolutely no edits outside of the area I originally outlined in blue. I get over 25 Mh/s after the modifications (+25%), while using ~15% less power compared to stock. These changes are fairly conservative; I’m stable at nearly 27 Mh/s on this card with more aggressive settings, but the increase in power consumption isn’t worth it at my electricity rate.
If you’re looking for a good starting point, the settings pictured here should be stable in just about every 4GB card (in the timings section, just copy the 1500mhz value to every row below it).
When you’re done making your edits in Polaris, save your final BIOS (click “SAVE AS”) as a new file. Then open up ATIWinFlash and write the new .rom to your GPU (same as step 4). Reboot and test!
Step 8: Repeat steps 1-7 for each of your remaining GPUs
Yes, it’s a little tedious. But it goes quite a bit faster after your first one. Don’t be tempted to simply take the first BIOS that you create, and flash that to all of your other cards—every GPU is different, even between cards that are the same brand/model. It’s quite possible (likely, even, if you have a lot) that some of your cards will be capable of stable speeds 25+ mhz higher than others. Test them all; it’ll save you headaches later.
Analyzing the cost/benefit of different setups
If you’re stuck on whether or not an extra 1-2 Mh/s is worth 25 watts of additional power consumption, remember that you can use an online calculator to help simplify things. For example, here is a GPU hashing at 25 Mh/s @ 100 watts vs another GPU at 26 Mh/s @ 125 watts (assuming $0.15 per kWh, remember to plug in your own rate!). At the time that this was written, the slower GPU is slightly more profitable.
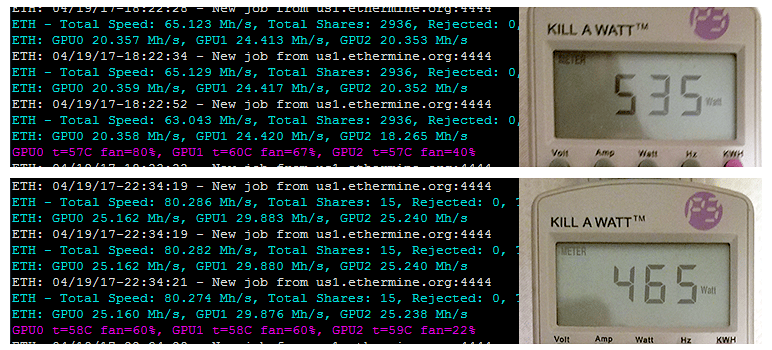
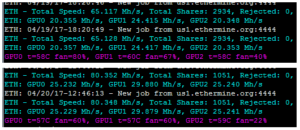
My test rig, running two RX 470 4GB cards, and one RX 480 8GB card, mining ETH in Linux. Top is stock factory settings, bottom is after BIOS mods outlined in this guide. From 65 to 80 Mh/s, using 70 watts less power!
In the next and final installment of this Ethereum mining guide, I’ll post a mining FAQ and some other tidbits that didn’t quite fit anywhere else. Until then, thanks for reading, and feel free to leave questions or comments!


 April 20th, 2017
  CryptoBadger
 Posted in
  Tags:
Tags: 


Thanks for this guide!
Yet I have one problem I can’t seem to fix. In Windows 10 I managed to get about 28.5 Mh/s for each of my 3 Gigabyte RX 580’s. However, when I run Claymore in Ubuntu 17.10 with the amd blockchain driver 17.40 the cards only get about 19.2 Mh/s.
I feel like I’m missing something somewhere even though I believe I’ve followed every step.
This is what I’ve done so far:
-Flashed bios which gets me 28+ Mh/s in Windows 10
-Installed AMD 17.40 Driver
-Usermod command
-ROCm commands
-Grub commands
-Rebooted
I checked my drivers with: dpkg -l amdgpu-pro, also: lshw -c video; shows ‘driver=amdgpu’ for each gpu. I guess this means my driver is correctly installed, right?
Is there anything I have to change in Ubuntu to fix the timings or clockspeeds even when they’re flashed in the bios of the cards? I check my current clock and memory speed with:
sudo watch -n ‘0.1’ cat ‘/sys/kernel/debug/dri/0/amdgpu_pm_info’
That file clearly shows my card is running at my preferred speeds.
I’m a bit clueless and I’m thinking about going back to Windows even though I love the stability Linux offers.
I hope anyone sees what I’m doing wrong. Thanks in advance.
Might it be related to recent intel cpu vulnerability patch in Linux? I think you can somehow cancel it.
Thanks for your answers, however I already checked this before posting and I was at kernel 4.13.0-21 when the hashrate was this low.
Tomorrow I’ll try Lubuntu 14 as someone on Reddit used that succesfully. I’ll post here if it helped.
This issue is discribed in FAQ section.
http://www.cryptobadger.com/2017/05/build-ethereum-mining-rig-faq/#kernal_update
did you see the fix at the bottom
OK, had more problems with the newer Ubuntu versions, decided to use 14.04LTS with the amdgpu-pro 17.40 blockchain drivers installed with –compute mode. Just started it and it runs at around 27.9 Mh/s per card! I’m gonna leave it and see how stable it is.
Thanks for all your replies, hope I helped someone with this info.
Having the same issue. I’ll post if I find a fix. I have my amd 470s bios modded with over clocks build in. Only getting 20.5 in linux, on windows 29.5. Tried both the gpupro drivers and block chain no difference. Tried ethmine and claymore no difference. I feel like im missing something as well
You may want to check what other people are getting under EthOS, a Linux distro.
Other comments RE Low linux hash rates have been posted earlier on this thread.
Fix found
Ubuntu 16.04 LTS
a. Edit /etc/default/grub as root and modify GRUB_CMDLINE_LINUX_DEFAULT in order to add “amdgpu.vm_fragment_size=9″ (without the quotes). The line may look something like this after the change:
GRUB_CMDLINE_LINUX_DEFAULT=”quiet splash amdgpu.vm_fragment_size=9”
b. Update grub and reboot as root
update-grub;reboot
Does this optimization work for Nvidia GPUs? Or if not, any ideas on optimizing on Nvidia via Linux?
Successfully tweaks bios of all 8 sapphire nitro+ 580 8G cards and make the average hashrate around 30Mhs (memo varies between hynix, samsung and micro)for ETH+SIA dual mining through claymore 10.4. I used xubuntu 16.4 but later switch to Win10 for better performance, mainly undervolt. Have been looking for undervolt tool for linux forever but no luck.
Is there a way to determine memory name in linux? I am going to try mod. bios but for this i have to know memory name/manufacturer.
Do you have any experience with Asus Strix rx470 4gb elpida?
Thanks
“If you have a 8GB card, you likely went from ~24 Mh/s to ~28 Mh/s”
But it doesn’t 🙁
Out of the box my MSI RX580 armor 8GB (micron memory) cards give ~17.3 Mh/s on Xubuntu in a rig and ~18.2 on windows 10 in desktop.
Is there a way to increase that?
Tried above but in step 5, I don’t see improvements.
Hi everyone,
After months of generally trouble free mining, for some weird reason my rig is saying, ‘Cuda error, cannot allocate big buffer for dag’ My cards are all GTX 1070 8g. I’ve been running it on claymore but also on nicehash for the past few months. All ok, until a few days ago then it just went off, any ideas?
Yes, assuming you are using Win10 you need to allocate more virtual memory. Something with the last Win10 update caused it to need a bump. I went form 20GB to 30GB and it fixed the problem.
Hi Paul,
Yep, I’m using windows 10, I’ll check out my virtual memory later and see how we get on, will post the results.
Ah, ok, I am using windows 10, I’ll check out the virtual memory later and post the results.
All sorted, expanded my virtual memory to 32GB and all back in business, thanks for the help..