

 April 6th, 2017
  CryptoBadger
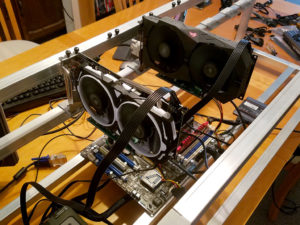
Building an open-frame GPU miner.
It’s finally time for an update to my popular 2013 Litecoin mining guide! It’s four years later, and Ethereum mining is where it’s at for GPU miners, so that’s what I’ve focused on. I’ve kept the same format and detail level as my old guide, so if you were around back then, you’ll know what to expect.
If you’re new to the world of crytocurrency mining, this guide should give even an absolute beginner all of the knowledge needed to put together an efficient Ethereum (or other GPU-minable altcoin) mining rig using readily-available consumer hardware.
This guide will be broken into several parts, each focusing on a different aspect of building your first mining rig. First, let’s take a look at what you’ll need in terms of hardware to put a respectable Ethereum miner together.
Build your own Ethereum Mining Rig, part 1: Hardware
Here is the list of hardware that I recommend. Don’t worry if you’re not able to get exactly what’s on this list, I provide some excellent alternatives below the table.
| Motherboard | 1 x Asus B250 Mining Expert | $180 |
| Processor | 1 x Intel Celeron G3900 CPU | $45 |
| Memory | 1 x 4GB DDR4 DIMM | $40 |
| Power Supply | 1 x 1200w Platinum PSU | $260 |
| GPUs | 3+ Radeon RX 570 video cards (*see below) | ~$200 each |
| Boot Device | 1 x 60GB SSD -or- USB stick (Linux) | $5 – $35 |
| Case | 1 x build your own (see bottom) -or- open frame case | $30 – $200 |
Some explanations and alternatives for each item:
Motherboard
Generally, any motherboard with PCIe slots on it is suitable for mining—typically one GPU per PCIe slot. The PCIe slots don’t need to be full-length, as we can attach GPUs to 1x slots with the help of risers. With that said, there are potentially some limitations when you start to pack a large number (4+) of GPUs onto one motherboard, even if that board has enough PCIe slots to physically accommodate them. That’s why picking a suitable motherboard is probably your biggest hardware headache if you want to run as many GPUs as possible in your rig.
My top choice is currently the Asus B250 Mining Expert board. It’s literally made for mining, with support for up to 19 (!) GPUs and 3 power supplies right out of the box. Even if you don’t intend to initially run more than a few GPUs, the included mining-centric diagnostic features and ability to expand later probably make the price premium over less-robust boards worth it.
The ASRock H110 Pro BTC+ is another excellent choice for mining, with support for up to 13 GPUs. However, it currently costs about the same as Asus’s mining board, and for the money I’d rather stick with Asus. If you know that you’ll definitely stick to a single PSU and a small handful of GPUs (e.g.: the majority of us), this is a fine choice, especially if you find a deal on it.
Finally, the Biostar TB250-BTC is also aimed at miners, and costs considerably less than the Asus and ASRock offerings. The Biostar board “only” supports 6 GPUs, but that’s likely all that the majority of us need. If price is your primary consideration, the TB250-BTC should be at the top of your list for 6 GPU rig builds.
If you only want to use 3-4 GPUs in your rig, then you’ll have a much easier time. Most boards with up to four PCIe slots should accommodate a GPU in each. Keep in mind that you can use old hardware that you have sitting around—the board doesn’t have to be recent. I dug out an old ASRock 970 Extreme4 that I used four years ago for litecoin mining, and it still works fine today for up to 4 GPUs (5 is possible with some work). So it’s possible to pick up an ancient board on eBay/Craigslist for nearly nothing and mine with less than 6 video cards.
CPU / Processor
This one is easy: buy the cheapest CPU that works with whatever motherboard you pick. When it comes to mining, the GPUs do all the work. Your CPU will essentially sit idle, so there is no reason to waste money on anything other than the bare minimum.
All of the motherboards that I recommended based on Intel’s LGA 1151 socket, so that means the Celeron G3900 is probably the best choice.
If you go with an AMD motherboard, a Sempron CPU will do nicely.
Memory
4GB is fine. Overkill really, at least for Linux. If you have an old 2GB stick (or even 1GB!) sitting around and plan to run Linux, you’re good to go. If you want to run Windows, then 4GB is probably a realistic minimum.
While Ethereum mining is pretty memory-intensive, everything happens on the GPUs. System memory will be pretty much unused, so there is no reason to spend money here, especially with DDR4 prices so high.
PSU / Power Supply
The power supply is extremely important—don’t skimp on it! A good, efficient PSU will keep your electricity costs to a minimum and more than pay for itself over the long run. Seasonic, EVGA, and Corsair are all generally top brand choices. The 1200W unit that I’ve linked may seem like overkill, but power supplies are most efficient when they’re not running near their rated maximum load. A 6 GPU rig will draw about 750 watts (assuming 6x RX 570 cards, properly optimized), which means a 1200W PSU will have sufficient headroom to perform efficiently.
If you’re planning on running only 3-4 GPUs, you can save a bit of money and go for their 850 watt model instead.
GPUs / Video Cards
The top Ethereum mining choice is currently the Radeon RX 570 / RX 580 line*. The RX 570 delivers nearly the same performance as the RX 580 (within 4-7% or so) for a bit less power consumption—they’re essentially equal from an efficiency standpoint. The RX 570 is usually significantly cheaper than the 580, so generally the 570 is the best choice.
Which model to pick, though? While literally any RX 570/580 card will do, the most important thing to look for is memory speed if you want the best performance. Cards with a higher memory clock speed will generally perform a bit better while mining ETH (and can generally be overclocked more). Memory capacity isn’t really important beyond 4GB, so all other things being equal, there is no reason to shell out extra cash for the 8GB version of a card. It’s true that every GPU needs to be able to hold Ethereum’s DAG file in memory, and that file is slowly increasing in size—but it won’t surpass 4GB until late 2019 (and ETH’s switch to PoS will likely occur before then, anyway).
With all of that said, the 8GB versions of the cards tend to have faster-clocked memory than most of the 4GB cards, so if the price difference isn’t too large, spring for whatever is the fastest. Most of the cards fall between 1650 Mhz (6600 Mbps effective) to 2000 Mhz (8000 Mbps effective). The slower 1650 Mhz memory GPUs will hash at 21-23 Mh/s, and the fastest 2000 Mhz ones will do 25-28 Mh/s (both can potentially be pushed higher with BIOS mods and good luck).
The best advice is usually to just pick up whichever 570/580 card you can get your hands on for the least money, as mining speed differences between brands/models are pretty small after optimization. These 8GB MSI RX 570 cards are $220 each as of 11/29/2017, and I’m running mine at 28 Mh/sec without pushing them too hard.
If you can still find old RX 470/480 cards on the secondary market, they’re just as good the RX 570/580 cards that replaced them.
*While my guides deal with setting up and optimizing AMD’s GPUs, nVidia’s 1060 / 1070 video cards are also excellent for mining. Generally these days I tend to recommend whichever is cheaper (and right now, that’s AMD). But if you find a deal on some nVidia 1070 GPUs, don’t hesitate to grab them—they perform just as well as AMD’s offerings, and are arguably easier to set up (just remember to install nVidia drivers instead of AMD’s if you follow the rest of my guide!).
Boot Device
If you plan to run Linux, you can use pretty much anything, including a ~$5 16GB USB stick (we’ll be using Claymore miner, which doesn’t write Ethereum’s DAG file to disk, so we don’t need to worry about wearing a USB stick out due to constantly writing to it, like with the stock ethminer). With that said, SSDs are pretty cheap nowadays and it might be nice to have one in case you want to try Windows at some point.
If you plan to run Windows, then a cheap 60GB+ SSD is your best bet. If you have an old mechanical hard drive laying around, that’ll work fine too.
The Case
I highly recommend against trying to cram a bunch of GPUs into a conventional PC case. You have two realistic options here: buy a purpose-built mining frame, or build something yourself.
The first option is straightforward, if not a bit more expensive. Here is an example of an open-air frame that will accommodate up to 6 GPUs. Here’s another option. You’ll pay a premium going this route, but it’ll save you some time and effort.
Building your own is much cheaper, and (arguably) more fun! If you’re handy, you can put together a simple aluminium frame yourself for a fraction of the cost of buying one. If you don’t have the necessary skills or tools for that, I popularized building mining rigs inside plastic crates back in 2013, and that still works fine today (for up to 4 GPUs or so, anyway). At the bottom of this post, you’ll find instructions on how to build a plastic crate “case”.
Risers & Miscellaneous Stuff
If you’re building your own case (whether it’s from a plastic crate, or aluminium, or something else), you’ll need risers to connect your GPUs to your motherboard. If you’re buying a mining frame, most include risers. Risers tend to be pretty misunderstood among new miners, so here is what you need to know:
- Risers can be powered or unpowered. A riser is unpowered if it simply connects a GPU to a motherboard PCIe slot. A riser is powered if it additionally accepts power from the PSU (generally via a molex-type connector). Unpowered risers allow GPUs to receive up to 75 watts of power through the motherboard’s PCIe bus, just as if they were plugged in directly. Powered risers will take that additional power directly from the PSU instead, bypassing the motherboard.
- You may mix unpowered and powered risers, but the total number of unpowered risers should not exceed two (this includes GPUs plugged directly into the motherboard)! Motherboards are generally not designed to deliver more than 150 watts of total power through the PCIe bus, so two GPUs on unpowered risers is the safe maximum (2 x 75 watts).
- The newer USB-style powered risers often include SATA-to-molex power adapters. Throw these adapters away! SATA plugs are not designed to deliver 75 watts safely, and these can get hot enough to potentially be a fire risk (admittedly, 99% of the time you’ll be fine, but it’s not worth the risk). Instead, connect the molex plugs on the riser directly to your PSU (no more than two risers per PSU plug). Newer versions of these USB risers forego the molex adapter and instead use a PCIe connector for power.
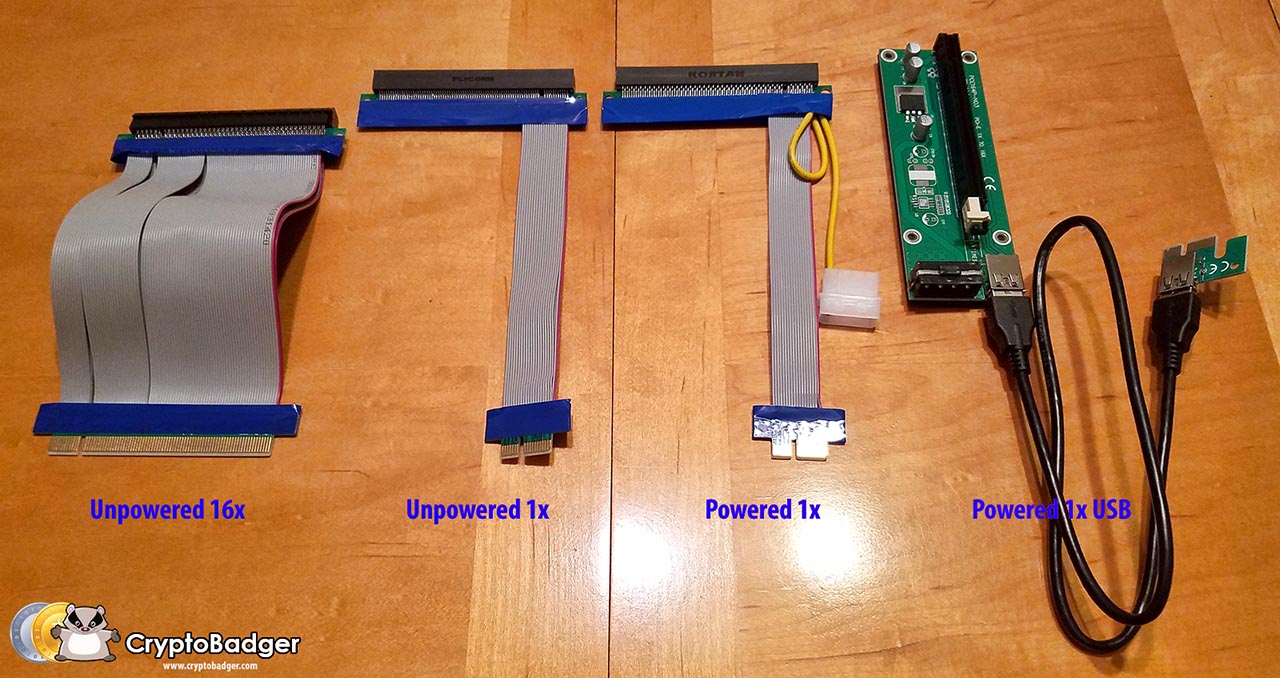
PCIe risers: click to enlarge.
I do think the newer USB-style risers are the way to go—they’re longer and easier to work with than the old ribbon-style cables. Here is a 6-pack of USB risers with the newest (and safest) PCIe connectors. It’s always smart to buy an extra or two, as defects are relatively common. If you have older ribbon-type risers laying around, or can get them cheaply, they’ll work just fine.
If you’re building or buying a large frame, you might need extenders for some of your molex plugs and PCIe power plugs.
You’ll also need a power button, unless your motherboard has one built in (which is fairly rare). This will do the trick, or you can build one into your plastic crate if you plan to go that route (see below).
Some people have reported that their rigs won’t boot unless they have a monitor connected, although this seems to be fairly rare (my own rig boots fine without a display attached). If this happens to you, you’ll need a dummy plug.
Building your Mining Rig “Case” from plastic milk crates
(I’ve copied the instructions from my original 2013 guide here and updated them slightly.)
Here is what you’ll need to create a simple DIY plastic crate housing for your miner:
| Plastic milk crate (can stack two and put your PSU in the lower one) | $10 each |
| Plastic stand-offs | $3 |
| 6 x #4 3/8″ wood or metal screws | $1 |
| Brace to rest GPUs on (1″ PVC pipe works great!) | $2 |
| a few cable ties (8″ or so) | $2 |
| power switch & LED (optional) | $5 |
You can get plastic crates in most home improvement stores if you don’t want to ship it from Amazon (it’ll be cheaper, too!). I picked mine up at Lowe’s for under $5 each. You should be able to get everything else on the list at Lowe’s if you happen to have one near you, too. As far as tools go, you’ll need a drill and a knife capable of cutting into whatever plastic crate you buy.
Assembly Steps:
First, attach your CPU & heatsink/fan to your motherboard, and place your RAM into the memory slot(s). Then follow the general steps below to mount everything into your plastic crate.
Click the images for a close-up look at each step.
 Place plastic standoffs on the bottom of your plastic crate, and rest your motherboard on top of them. Make sure that all of the essential ports are accessible (SATA, USB, keyboard, mouse, etc). Use your knife to cut away pieces of the crate if necessary so that all ports you plan to use are exposed. Then plug your riser cables into the PCI-E slots of your motherboard.
 Place your brace (1″ PVC pipe is really ideal and won’t flex over time) so that it is sitting above the motherboard, high enough for your GPUs to rest on. Cut the brace so that an inch or two sticks out on either end of the crate.
 Drill holes in your brace so that you can secure it with cable ties (see image). Do not simply rest the brace on the crate! An accidental bump can cause it to fall into the crate, along with ~$1000 worth of GPUs if you do that!
 Connect each GPU to it’s corresponding riser cable, resting the bracket end on the lip of the crate and the other end on your brace.
 Screw each GPU down into the lip of the crate. If you drill small pilot holes ahead of time (mark where to drill with a sharpie), this is much easier.
 If you have a power switch and LED, mount them into one of the crate’s corners. I was pretty sloppy with mine, but it’s functional.


You’re done! Simply connect everything to your power supply and you should be ready to power your rig on for the first time. If you have a second crate, you can put your power supply in there (along with your harddrive if you’re using Windows), and stack it under your main crate to save some space.
In the next part of this guide, I’ll show you everything you need to do to start mining under Linux (or skip to the Windows section if that’s more your thing)!
 Posted in
  Tags:
Tags: 


[…] Build your own Ethereum Mining Rig, part 1: Hardware […]
[…] La mayoría de las guías orientadas al ensamblaje de ordenadores para minar Ethereum recomienda procesadores Celeron, pero es probable que algunos entusiastas hayan decidido dar un poco de margen extra al CPU. Por el […]