

 October 10th, 2013
  CryptoBadger
Before VBE7: Creating custom vBIOS files meant manually editing hex and hoping for the best—yuck!
For a long time, I’ve held off on writing a guide about modifying your video BIOS for the purpose of lowering voltage. Undervolting has the potential to reduce power draw by about 50 watts per GPU, so it’s easy to understand the appeal—you’ll see a significant savings on your electricity bill if you’re running a 3×7950 rig (like the one in my guide) 24/7. Unfortunately, the AMD Radeon drivers in linux don’t allow voltage control, so the only current way to lower voltage below manufacturer-specified levels in linux is to modify your video card’s BIOS.
In the past, such a hack involved manually editing your vBIOS file by hand, using a hex editor. Most folks hesitate to make such a modification, as performing the edit can be tricky if you’re not familiar with hexadecimal—and a mistake can mean a bricked GPU. Due to the potential danger I had decided not to post a guide about manually modifying your vBIOS ROMs. After all, nobody wants to be left with a $300 paperweight after inadvertently trashing their video card.
Enter VBE7, a GUI-based vBIOS editor for Radeon 7xxx series GPUs. Now anyone can easily make changes to their vBIOS without having to muddle around in a hex editor, praying they get things right. I’ve been testing VBE7 for a few days now, and it appears to work brilliantly. Read on for my guide on creating your own custom power-saving vBIOS!
Creating your custom undervolted video BIOS
First, let’s get the disclaimer out of the way: while a tool like VBE7 takes a lot of the guesswork out of this process, modifying your video card’s BIOS can potentially damage your hardware and void your warranty. Follow this guide at your own risk!
Step 1: Create a bootable DOS USB flash drive
If you don’t already have a bootable DOS USB stick, you can follow the instructions here to create one. The size of the flash drive doesn’t much matter, so even an ancient USB stick should work fine.
Step 2: Download ATIFlash to your USB stick
You’ll need a program called ATIFlash to read the vBIOS ROMs from each of your rig’s video cards:
- Download ATIFlash here.
- Now unzip it into the root directory of your bootable DOS USB flash drive.
Step 3: Boot your mining rig using the DOS flash stick
Shut your mining rig down if it’s running. Insert the flash drive into one of your rig’s USB ports and turn it on. After a few seconds, you should be looking at a DOS command prompt (if not, ensure that booting from USB is enabled in your motherboard’s BIOS settings).
- At the DOS command prompt, type the following:
atiflash -s 0 0.romThis will save a copy of the vBIOS stored in your primary video card as a file named “
0.rom” on your flash drive. - Repeat for each additional video card that you have in your rig. For example, if you have a total of three GPUs, you’d additionally type:
atiflash -s 1 1.rom
atiflash -s 2 2.rom
You should now have a number of .rom files on your USB stick that corresponds to the number of GPUs on your rig, each containing the vBIOS for one video card.
Go ahead and power down your rig and take the USB stick back to your desktop computer (or any Windows computer).
Step 4: Use VBE7 to modify each vBIOS file
Plug the USB stick containing the saved vBIOS files back into your Windows computer.
-
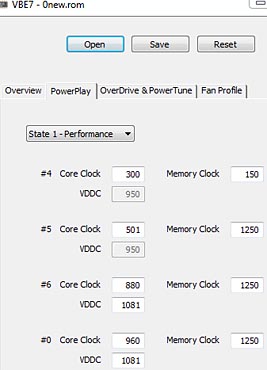
VBE7: Modify the voltage table for the #6 and #0 entries to set whatever voltage you want. Clock speeds are handled in cgminer so no need to touch them.
Download the latest version of VBE7 here. I’ve been using 0.0.7b but if there is something newer feel free to get that instead.
- When the download completes, double-click the VBE7 executable to launch it.
- In VBE7, click on the “Open” button and then browse to the “
0.rom” file that you saved on your flash drive and load it. - If you see some descriptor text in the ROM message area of the “Overview” tab, your vBIOS file loaded successfully. If not, make sure that your GPU is supported (most R7xxx series cards other than the 7790).
- Click on the “Powerplay” tab.
- Make sure that “State 1 – Performance” is selected on the drop-down list. We’re interested in the last two entries: #6 and #0. Change the VDDC setting for both of these entries to your desired voltage level. If you have a Radeon 7950 GPU (like I recommend), then 1081 (for 1081 mV) is a good value for both.
- Click the “Save” button, and save your edited vBIOS file as “
0_new.rom” onto your flash stick. - Repeat for each of your GPU vBIOS files—when you’re finished you should have a corresponding
*_new.romfile for each of the original vBIOS files that you saved with ATIFlash on your flash drive.
Step 5: Flash the modified vBIOS file(s) into your GPU’s video ROM
Head back to your rig, put your bootable flash drive back into a USB port, and boot up. Now we’re going to save the modified files into video memory.
-
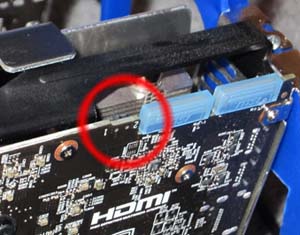
The dual BIOS switch on the MSI TF3 7950 card. Placement is similar on other 7xxx cards.
Each of your GPUs should have a tiny switch somewhere on it (usually on the top). This is the BIOS selector switch—most Radeon 7xxx cards should have one (I’ve never found a 7950 or 7970 card that doesn’t, and I’ve used nearly all of them). Locate this switch, and then flip it (this can be done while your rig is powered on) so that it is now in the other position. This is extremely important and acts as your safety net if anything should go wrong! If you’re unable to boot up after completing the BIOS flash, simply flip the switch back to restore your original BIOS. If you can’t locate the switch, or your video card doesn’t have one, I’d strongly urge you to abort the rest of the process.
- After switching all of your video cards to their secondary BIOS, type the following at the DOS prompt:
atiflash -f -p 0 0_new.romWait for the flashing to finish and make sure that there are no error messages. If successful, ATIFlash will tell you that you need to reboot to complete the process, but it’s safe to go ahead and flash your remaining cards first.
- Repeat for each of your other GPUs. For example, if you have a total of three video cards, you’d additionally type:
atiflash -f -p 1 1_new.rom
atiflash -f -p 2 2_new.rom
Power down and remove the flash drive—you’re done!
Next time your power your rig on, you should note a substantial power savings. Using exactly the hardware that I recommend in my guide, I measured a total power savings of 140 watts (850 watts to 710 watts at the wall, according to my kill-a-watt) when undervolting each GPU to 1081 mV. In addition, your GPUs will run much cooler, and your fans won’t have to work nearly as hard. You can experiment with even lower voltage settings (1054mV is popular as well, and some people even venture into sub 1000mV territory), just be aware that depending on how aggressive your cgminer settings are, you may experience some instability and crashing if you lower voltage too far (just bump voltage back up a bit if that happens).
 Posted in
  Tags:
Tags: 


Brilliant, worked for me, thanks!
Hi there,
I am lucky to have two R9 290X
I’d like to undervolt them and run my rig in Linux
However altering the card bios seems risky
Could’ nt it be possible to undervolt them in windows, which has lots more “clicking” and bench marking tools ???? And then simply run them in Linux ???
Thanks !!!
Oh. Wow. Running a 3-card Rig using MSI 270s (OC) at 1050/1500MHz. Was hitting 625W at the wall. Lowered the cards to 1100 mV. Dropped the power down to 550W!! I’ll be experimenting over the next couple of days stepping the voltage down to a stable value. Thanks Cryptobadger!!
Phhil, That is good if you can stabilize at that wattage draw at the wall. I am running 3 Sapphire HD 7950 cards OC at 1050/1250Mhz. I tried lowering the voltage to the recommendations here on CrytoBadger at 1.081Mv and one card got “sick” so I upped it to 1.125 and all 3 cards are stable but I am only hashing around 580Khs/s on each card. Still have to run a fan with air from a window tunneled to the rig to keep the temps down below 80. One card is always about 10 degrees hotter than the other two and it is the one that got “sick” when I lowered the voltage to 1.081 and even 1.094, the I tried 1.113 with similar results. Will try to tweak it more today.
Edwardf,
I have a “weaker” card as well. I lowered the voltage again to 1.013 and within an hour had a card go sick. Everything seems stable at 1.063 so I’m testing 1.050 and 1.038 on the weak card before applying to all three. Still exciting, though. I have another 6 cards arriving on Friday to build a second rig (one with 5 cards, and adding one card via x1-x16 riser on my current rig) with the hopes of hashing at around 4MH/s at 1500W before the weekend in out. 😀
Brilliant, worked for me to, thanks, have u gone any lower then 1137 /1131
on the R9 280x cars ??
from original to the new 1131 i did 120-140w with to cards.
Thanks for this great article!
I’ve had success doing this on my 280X rig but when trying on my 290 rig I get the error “adapter not found” in response to >atiflash -s 0 0.rom
Maybe they’re not supported yet? Does anyone know how to get around this?
Thats because the 290 and 290x are using a new hardware platform… the rest of the r9 and r7 cards are simply updated from the 7xxx card line… the 280x is an updated 7970 for instance. the 290 and 290x are fresh platforms and are thus not fully compatible with tools meant for earlier cards. try running afterburner (MSI) or tweakit (Asus) in windows and then burn the modified settings to the bios using those apps. the settings should hold if you burn them and dont just apply them. then you can load up linux and the settings should remain.
Could you elaborate on how to “burn” the reduced undervolt settings from MSI Afterburner or Asus TweakIt? I have two XFX R9 270’s..
great website and guide but still i don’t know how i can get my Gigabyte 2×7990 running on Xubuntu, temp is going up like crazy after couple second.
Xubuntu 13.10
Catalyst 13.8b
ADL 2.9
Stock 7990 cards with open case and 2 fans.
PSU 1500W
AmdOverideCtrl is an option or it will not give me anything?
Thanks,
When I run VBE7 I just get the following hash numbers: #1 #2 #3 #0. There is no #6. Is this going to be a problem. Card is 7950 Sapphire.
Ok it seems I’m unable to use this utility to change voltages. When I switch to BIOS 2 there is no #0 or #6 when using VBE7. The card came with a free utility to change settings but unfortunately only runs in Windows.
My card is:
Sapphire AMD Radeon HD 7950 model number 11196-19-20G
Simon:
Try editing the other video BIOS on the cards. I just got two Sapphire Dual-X 7950 cards.
For me, when I try to edit the BIOS that is on the system with the button switch pushed in (with the light on) then the options don’t appear to edit the VDDC in VBE7, the BIOS on the other option (button out/light off) then the BIOS is editable.
I’m not sure but I’m guessing this is something to do with the ‘pre-overclocked’ nature of the card.
I’ve got 5 different types of 7950, and these were the first that behaved like this.
Simon,
I have the same Sapphire HD 7050 cards and I had a similar or same picture as you described. If I remember correctly there were only 3 numbers on mine, #1, #2, #3 ( I could look to make sure if needed) but I noticed that the bottom voltage setting (vddc) was 1.169 and was slightly highlighted. When I clicked on it there was a drop down menu of all the voltage choices. I tried 1.081 but my cards were unstable so I increased it until I finally settled at 1.125. However, after an hour or so, the rig shuts down so I am back to the main bios setting for now.
Be sure not to try to change both bios on the card or you may not be able to recover. The blue lighted button is the bios switch if you don’t know. I pushed the switch on each card to turn the light off before I tried to change the voltage settings so I would always know that lighted one was the original setting to go back to if there was a problem. Hope this helps.
Edwardf:
Sounds kinda of familiar to me (see my previous post above). The weird thing with mine is that the BIOS (what’s the collective noun for many BIOSeses? :D) on each different setting (light on/off) were actually different. That’s why I figured there was a ‘factory overclocked’ setting, and a ‘normal’ setting.
Anyhow…
Seem stable at 600kh with 1.081, OR, stable at 650kh but factory settings (with which each card is different.. one is clocked to 1.256 and the other 1.169)
Happy mining.
Thanks for your help guys. Have got my cards running at 1.169. Makes a huge difference in temps and fan. My GPU’s don’t seem so stressed out anymore. Thanks Cryptobadger.
I have 2 sapphire 280x’s and like a few people on here as well its a blue button that turns on/off. Is that switch how you go back and forth between the 2 BIOS or does that do something else? Does anyone know if it should be on or off to undervolt? Also does anyone know if the 2 bios settings are setup as 1 readonly and 1 read/write or are they both read/write?
Thanks!
Yes, that fancy button Sapphire 280x’s does swich between two BISEes. And they are had different settings. When the button light blue – the chosen BIOS had EFI image as well. ))
My strong advise for anyone who want to play flashing BIOSes – prior to do it download BOTH original BIOSes from you card and store it somewhere for the feature, you may need it!
Besides many cards had diffrent BIOSes on each switch position with different settings and features – so download one BIOS from one switch position, save it to some file named liek Saphere-R9290-leftswitch.rom, the flip the switch (you don’t need to reboot) and download the second BIOS from the same video card, and save it under name like xxx-rightswitch.rom
Then open both bioses via VBE7 and see the differences.
Good luck!
I’ve moved my toxics to 1161vddc and they seem all happy, will go lower tonight and see what happens (they run at 1150/1800 – 800khs). The blue button has to be turned on for the bios flashing to work. The default option is locked and cant be flashed (legacy bios), the activated button, like the other commenter stated is for uefi. The program will flash it but it removes/dissables the uefi component which is fine.. But best save to original bios for a rainy day or if u ever plan on selling the gpu etc
Hi does this work with r9 290 series GPu?
Tried this on XFX R9 290 and it did not work.
The “atiflash -s 0 0.rom” command retured “No GPU found” or something like that.
Same result as Steele. XFX 290 will display “Adapter not found”
Used successfully to undervolt sapphire r9 270x 2GB.
I have two of these cards. Which settings did you use? Are you mining with these?
Hi, what voltage did you usse for your cards? and how much did you save on wattage?
Thanks for a very helpful article.
I flashed my two Asus 280x DC2T with a BIOS that sets the voltage to 1031mV at the highest clock rates. Now I’m getting 730kh/s at 1050 GPU / 1500 memory clocks with a lot less power draw. Very nice!
A few notes regarding flashing.
atiflash on Linux is somewhat unreliable – it might have to do with timing, it might have been because I forgot -unlockrom sometimes. In case it’s timing, use schedtool -F or -R -e atiflash in order to run atiflash under real-time scheduling, which means it basically has the CPU to itself and can execute without interruption.
It does not work to set very low voltages and high clock because the driver seems to switch to a high power profile at some point during X startup and then the card locks up and so does X. X even becomes stuck in the kernel and unkillable. While the clocks in BIOS are only upper limits for changes from cgminer/bfgminer, they are apparently also used literally at some point. So what you should probably do, and what worked for me, is just set lower voltages and leave the rest alone. You get much better hashes per Watt figures with undervolting than with overvolting / overclocking anyway.
Finally, the only way to brick a GPU with a bad flash seems to be flashing the BIOS for a different hardware model. Just use modified versions of your stock BIOSes and you *should* be safe. If a flash went wrong, just boot with another GPU as primary and flash again. Make sure to flash the right card though! The order will probably have changed after switching stuff around to get the computer to boot. Don’t panic.
One of the cards got “sick” after an hour. It’s been running fine with 710kh/s for a couple of hours at 1020 MHz now. Shows that 1031 mV are really as aggressive as intended 🙂
Cryptobadger,
Thanks for your guide. I was able to save several watts.
I did run into an issue with one of my card models though.
I backed up the original flash on my XFX R9-280X-TDFD and simply modded the power play settings and flashed back. The flash was successful but when i loaded xubuntu my rig would freeze after starting cgminer.
So I thought maybe i didnt give it enough power…went back to flash the original rom and it failed!
ROM Not Erased
Error 0fl01
It turns out I can flash the image from my sapphire cards but not the original image from my xfx. Looking at the directory the roms are in I can see that the sapphire image is roughly half the size of the xfx one.
I am grasping for straws here and considering an RMA…can anyone help me solve this issue?
Update:
Was able to flash back to my original rom using the newest version of atiflash
hey, do you mind sharing where did you get the new version of atiflash?! 🙁 i am getting the same error!
Has anyone had any luck finding a utility to edit the BIOS of R9 290X cards? I’ve been searching for a couple of weeks for a way to undervolt my 290X and haven’t had any luck. I’m running Linux, so using Afterburner, etc. is not an option.
Find a Windows box and set up a USB with ATIFLASH. Google VBE7. Works great.
Looking for configs for the MSI R9 290x as well. Anyone getting close to a 1000 kh/s on these cards on Hynix?
I used all same hardware that this guide recommended.
ASRock board.
Ripsaw Ram.
Sapphire 7950
Sempron CPU.
1250Watt PSU
Same cgminer set up. (cgminer 3.7.2)
Was not able to get the system to run stable when undervolting to 1081 (1.087) had to bump it to 1125, seem to be running very stable now. Just in case anyone else having the same issue.
i followed ur guide and successfully done two of my rig works with some what less hashrates but works fine and _third rig got a problem accidentally i flashed primary BIOS without switching to secondary BIOS ,then switched on my rig and started cgminer it doesn`t show temperature also after starting cgminer with in few seconds my rig goes down automatically,again i copied another rig BIOS rom file and flash once again and one card got SICK other card doesn`t shows TEMP and also very less gives Hashrates only ,, i don`t know what to do pls help me out…….. if there any orginal ROM just sent to my inbox [email protected]….
thanks in advance….
Have you attempted switching cards from the “healthy” rigs to the problem rig to isolate the issue to the GPU BIOS? Are you using ATIFLASH to flash the BIOS? Did you first make a copy of the original BIOS before attempting to flash a modified BIOS?
Hi,
I am trying to follow this tutorial for the Asus R9- 270 and cannot find the backup bios switch on it. Does it have one? has anyone undervolted this anyways?
Where’s your donate link?
Okay I found it. May I suggest you stick those wallets on the right panel so they are easily findable?
This worked really well for my old 7950. I had struggled with temps and low hashrates – flashed it down to 1.125v, lowered temps by ~5 degress and gained literally 100Kh/s. Thanks a ton for the info, solid gold.
In R9 280X what is a recomended voltage level ? Thanks
awesome too bad you need to have a keyboard/monitor to do that. i rather deal with the heat and pay for the extra power than shutdown my miners than plug a monitor into it.
What is the problem with using AMD Overdrive CTL that is available on sourceforge?
sourceforge.net/projects/amdovdrvctrl/
it works at least with my Sapphire HD 6770 1GB
If power cost is your primary concern for scrypt hashing, switch to the new Gridseed 5’s they take between 1/7th and 1/10th of the power for the same hash rates.
So I’m looking at flashing my new Sapphire 280x Toxic GPU’s to lower the vddc. I’m not able to pull the original bios off the card in Dos? I get a ‘Bad Command or file name’ error when I put in “atiflash -s 0 0.rom”
I’m tempted to try and just flash a bios in that I found on rumorscity but am not entirely sure which position the Bios switch should be in?
Should I boot in the ‘legacy bios’ position then switch to UEFI once I’ve got the dos prompt and flash the new bios [atiflash -f -p 0 new_bios_name.rom ]??
Would hate to brick a new card right outta the box :/
I have a MSI R9 290 which keeps crashing / black screens.
I have tried flashing both bios, applying %50 power boost, lowering vrm 1000mhz, nothing can make this card stable in games.
In windows, movies, browsing the net, it is fine. It only crashing when i try to run a game, or GPUZ, overdrive.
Upping the voltage for the NB PCIE in the motherboard bios, and afterburner power boost %50, has been the only change that has made this card slightly more stable.
Does anybody have a solution ?