

 October 10th, 2013
  CryptoBadger
Before VBE7: Creating custom vBIOS files meant manually editing hex and hoping for the best—yuck!
For a long time, I’ve held off on writing a guide about modifying your video BIOS for the purpose of lowering voltage. Undervolting has the potential to reduce power draw by about 50 watts per GPU, so it’s easy to understand the appeal—you’ll see a significant savings on your electricity bill if you’re running a 3×7950 rig (like the one in my guide) 24/7. Unfortunately, the AMD Radeon drivers in linux don’t allow voltage control, so the only current way to lower voltage below manufacturer-specified levels in linux is to modify your video card’s BIOS.
In the past, such a hack involved manually editing your vBIOS file by hand, using a hex editor. Most folks hesitate to make such a modification, as performing the edit can be tricky if you’re not familiar with hexadecimal—and a mistake can mean a bricked GPU. Due to the potential danger I had decided not to post a guide about manually modifying your vBIOS ROMs. After all, nobody wants to be left with a $300 paperweight after inadvertently trashing their video card.
Enter VBE7, a GUI-based vBIOS editor for Radeon 7xxx series GPUs. Now anyone can easily make changes to their vBIOS without having to muddle around in a hex editor, praying they get things right. I’ve been testing VBE7 for a few days now, and it appears to work brilliantly. Read on for my guide on creating your own custom power-saving vBIOS!
Creating your custom undervolted video BIOS
First, let’s get the disclaimer out of the way: while a tool like VBE7 takes a lot of the guesswork out of this process, modifying your video card’s BIOS can potentially damage your hardware and void your warranty. Follow this guide at your own risk!
Step 1: Create a bootable DOS USB flash drive
If you don’t already have a bootable DOS USB stick, you can follow the instructions here to create one. The size of the flash drive doesn’t much matter, so even an ancient USB stick should work fine.
Step 2: Download ATIFlash to your USB stick
You’ll need a program called ATIFlash to read the vBIOS ROMs from each of your rig’s video cards:
- Download ATIFlash here.
- Now unzip it into the root directory of your bootable DOS USB flash drive.
Step 3: Boot your mining rig using the DOS flash stick
Shut your mining rig down if it’s running. Insert the flash drive into one of your rig’s USB ports and turn it on. After a few seconds, you should be looking at a DOS command prompt (if not, ensure that booting from USB is enabled in your motherboard’s BIOS settings).
- At the DOS command prompt, type the following:
atiflash -s 0 0.romThis will save a copy of the vBIOS stored in your primary video card as a file named “
0.rom” on your flash drive. - Repeat for each additional video card that you have in your rig. For example, if you have a total of three GPUs, you’d additionally type:
atiflash -s 1 1.rom
atiflash -s 2 2.rom
You should now have a number of .rom files on your USB stick that corresponds to the number of GPUs on your rig, each containing the vBIOS for one video card.
Go ahead and power down your rig and take the USB stick back to your desktop computer (or any Windows computer).
Step 4: Use VBE7 to modify each vBIOS file
Plug the USB stick containing the saved vBIOS files back into your Windows computer.
-
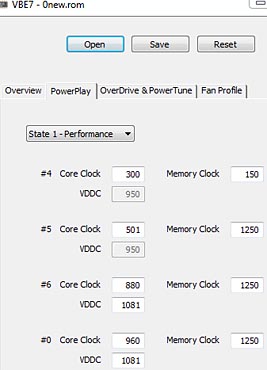
VBE7: Modify the voltage table for the #6 and #0 entries to set whatever voltage you want. Clock speeds are handled in cgminer so no need to touch them.
Download the latest version of VBE7 here. I’ve been using 0.0.7b but if there is something newer feel free to get that instead.
- When the download completes, double-click the VBE7 executable to launch it.
- In VBE7, click on the “Open” button and then browse to the “
0.rom” file that you saved on your flash drive and load it. - If you see some descriptor text in the ROM message area of the “Overview” tab, your vBIOS file loaded successfully. If not, make sure that your GPU is supported (most R7xxx series cards other than the 7790).
- Click on the “Powerplay” tab.
- Make sure that “State 1 – Performance” is selected on the drop-down list. We’re interested in the last two entries: #6 and #0. Change the VDDC setting for both of these entries to your desired voltage level. If you have a Radeon 7950 GPU (like I recommend), then 1081 (for 1081 mV) is a good value for both.
- Click the “Save” button, and save your edited vBIOS file as “
0_new.rom” onto your flash stick. - Repeat for each of your GPU vBIOS files—when you’re finished you should have a corresponding
*_new.romfile for each of the original vBIOS files that you saved with ATIFlash on your flash drive.
Step 5: Flash the modified vBIOS file(s) into your GPU’s video ROM
Head back to your rig, put your bootable flash drive back into a USB port, and boot up. Now we’re going to save the modified files into video memory.
-
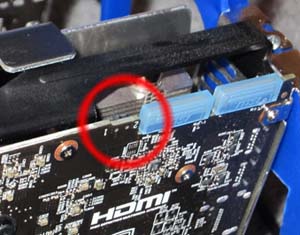
The dual BIOS switch on the MSI TF3 7950 card. Placement is similar on other 7xxx cards.
Each of your GPUs should have a tiny switch somewhere on it (usually on the top). This is the BIOS selector switch—most Radeon 7xxx cards should have one (I’ve never found a 7950 or 7970 card that doesn’t, and I’ve used nearly all of them). Locate this switch, and then flip it (this can be done while your rig is powered on) so that it is now in the other position. This is extremely important and acts as your safety net if anything should go wrong! If you’re unable to boot up after completing the BIOS flash, simply flip the switch back to restore your original BIOS. If you can’t locate the switch, or your video card doesn’t have one, I’d strongly urge you to abort the rest of the process.
- After switching all of your video cards to their secondary BIOS, type the following at the DOS prompt:
atiflash -f -p 0 0_new.romWait for the flashing to finish and make sure that there are no error messages. If successful, ATIFlash will tell you that you need to reboot to complete the process, but it’s safe to go ahead and flash your remaining cards first.
- Repeat for each of your other GPUs. For example, if you have a total of three video cards, you’d additionally type:
atiflash -f -p 1 1_new.rom
atiflash -f -p 2 2_new.rom
Power down and remove the flash drive—you’re done!
Next time your power your rig on, you should note a substantial power savings. Using exactly the hardware that I recommend in my guide, I measured a total power savings of 140 watts (850 watts to 710 watts at the wall, according to my kill-a-watt) when undervolting each GPU to 1081 mV. In addition, your GPUs will run much cooler, and your fans won’t have to work nearly as hard. You can experiment with even lower voltage settings (1054mV is popular as well, and some people even venture into sub 1000mV territory), just be aware that depending on how aggressive your cgminer settings are, you may experience some instability and crashing if you lower voltage too far (just bump voltage back up a bit if that happens).
 Posted in
  Tags:
Tags: 


thats pretty bad ass!
innovation, accomplishment.
i really need to devote more time to this project.
ill cut to the chase and undermine any credibility i might have had.
whats the best way to learn Linux, assuming you have used nothing but windows for 10 years?
I usually find that the best way to learn is just be jumping in and doing. If you want to start getting into linux, I’d recommend grabbing the latest version of Ubuntu and just installing it alongside Windows (you can either dual boot, or create a bootable Ubuntu USB stick to play around with). The Ubuntu GUI is actually very similar to Windows nowadays, so you don’t really need to use the command line much if you don’t want to. You’ll likely be able to figure out how to do most things that you want to do intuitively, and whenever you do get stuck, help is just a Google search away. =)
there is this one too.
http://www.techpowerup.com/forums/showthread.php?t=183423
Seems like atiflash v4.07 is available for linux.
I was messing with this a month or two back and found a linux version.
That would eliminate the need for the dos drive and enable remote flashing… 🙂
http://www53.zippyshare.com/v/99618276/file.html
Any reasons not to use the linux version?
Did my first of three rigs today. Worked like a charm! 🙂
I used the Linux atiflash directly.
High level steps:
1. Copy the atiflash to the Rig.
2. Run atiflash as described above
3. Copy roms to PC.
4. Change the roms with tool
5. Copy the roms back
6. Upload the roms to GPU (This takes a random number of tries)
7. Reboot
8. Done.
Yessssss.
Sorry for the noobish question. This should work for *any* ATI card, right?
You should be able to flash the vBIOS of virtually any ATI/AMD card with this process, provided you have an appropriate vBIOS ROM file. VBE7 will only let you create your own custom BIOS for Radeon 7xxx series cards, though.
I’ve been conditioned to always boot into a clean environment free of other running processes whenever I’m flashing BIOS, just to prevent any possible issues from occurring. In reality, that is probably paranoid and using the linux (or windows) version of ATIFlash shouldn’t cause any issues.
If you have a bunch of rigs, having a dedicated USB stick for BIOS flashing might save you some time, though.
Sort of worked for me.
1) I’m assuming that the switch on the rig is a switch between two different settings on the GPU, ie I can program the rig for “power savings” and non-power savings depending on the flip of the switch and my whims. Correct?
2) I’m getting “SICK” on different GPU’s when I switch over to the new settings. This is my laymen’s term for the newly flashed GPU. Working on this now, but what would you recommend as safe, low settings that can be gradually increased? I’m at trial and error right now, turning everything down (I, thread concurrency, gpu-engine and memclock). There’s a lot of different advice on what to do, especially when it comes to I and thread concurrency. I’d appreciate any insight.
3) I would love to get rich from mining. That’s why I got the rig in the first place. But playing with this rig has been worth the investment twice over. Tons of people give the advice to invest in the currency itself if you’d like to profit. There is nothing like mining, however, and thank you so much for helping me get into it. 40 LTC in and many hiccups, and it is worth it now, even a grand down. Thanks a lot, crypto.
1) You can think of it that way. The video card is capable of storing two complete BIOS copies, and the switch lets you toggle between them at will. I’d recommend keeping one switch set at the factory default settings and not tampering with it. That leaves you free to experiment with different custom BIOSes using the other setting without risk of getting yourself into a situation where you’re stuck and can’t recover.
2) The cgminer settings in my windows and linux guides are fairly conservative (my optimization guide has slightly more aggressive settings), so it should be pretty safe to start there. You can also completely leave out any settings that you’re unsure of and cgminer with use safe defaults, as well.
3) Totally agree – I’ve learned a ton as well! =)
Thank you yet again for this excellent guide. One of my cards developed a bad fan, and I caught it as it happened so the card itself has no damage. Well I’m running on two cards right now so I thought I would give this a try for the Linux build. Worked like a charm! 🙂 I’m now pulling over 630 kh/s each card right now and only using around 500 watts.
Thank you, thank you. 🙂
Expect a donation here soon. You’ve taught me so much about Linux and got me into a really fun hobby.
Just wanted to share my experience on undervolting in Linux using this technique, but here’s the background first:
– I’ve configured a rig much like Crypto’s, it’s been running since the spring, no problem at all, stable as hell
– I have some risers, but these have both caused significant (-30%) impact on hash rates, I guess they’re low quality risers? Not sure on this one. The rig only has two GPUs, so they’re not 100% neccessary
– In the early days the only way I could exceed 600khash with my GPUs was to clock them very high (Memory 1605mhz, engine 1105mhz), so I’ve stuck with that all along
– The only side effect of this extremely high clock speed is that the cards kick out a lot of heat, so the fans spin up, and it’s very noisey!
So, I’ve been very keen to undervolt the cards, to see if I could reduce heat, as well as saving on electricity.
The process described here worked fine, no problems whatsoever, and the cards started hashing immediately. Power draw was about 50watts per card less! Excellent I thought. However, I’ve found it impossible to get the cards to hash at over 500khash at 1.081v.
I’ll see if I can find a good compromise between the voltage and the hash rates.
If anyone has any advice on how to procure MSI 7950s that can reliably hash at higher rates, I’d appreciate that!
What brand and model of 7950 do you have? If you have one of the more inexpensive models, it’s possible that you won’t be able to hit high hashrates while undervolted. I pretty much stick to the MSI TF3, Gigabyte WF3, and Sapphire Vapor-X cards (the top offerings from each company), and they all have no problem running completely stable at 650+ Kh/sec @ 1081 mV.
I haven’t actually had time to experiment further with the cards to see if I can get a better balance yet. The cars are MSI TF3. However, they’re the type with 6-pin power connectors (I could get the actual revision numbers if that’s of interest).
I’ve recently added three more (again MSI TF3) to a second rig, these ones have the 6+8-pin connectors, and happily hash at 650Khashes/second, they came already volted at 1.188 (whereas the first batch were volted at 1.25).
So, I guess it was just a below-par batch of 7950s, and, hopefully there is some space to play with on voltage.
Thanks Mr Badger.
https://litecoin.info/Mining_hardware_comparison
Some nice comparisons on most cards there.
Thanks for posting this, CryptoBadger! Your site is a wonderful resource and I find myself referring to it often. Now for my question; Does anyone have voltage setting recommendations for the 7970? 🙂
Crypto,
Do you still need to tell cgminer (via a command line parameter) to use the lower voltage you flashed, or will the bios handle it by default?
You don’t need to specify in cgminer after the lower voltage has been flashed to your vBIOS, but I like to leave it there as a reference/reminder.
You know that 7950 you’ve never had? The one without the damn BIOS switch? Ya, it’s the XFX Double D FX-795A-TDFC. They decided to just slap their custom heatsink over it and just completely remove the switch (although the headers are still seen). Oh well, I guess I’ll just have to risk it. I’ve got my DOS boot USB and three backups of the BIOS both online and offline so I’m pretty sure I’ll be fine :P.
Hey Jak, thanks for the tip about XFX. I’ll make sure to avoid those cheap bastards like the plague. The problem is not having backup roms. It’s easy to get a working rom so having 3 copies of your rom online seems like overkill. The problem is that if for whatever reason your flash doesn’t go right it will turn your card into a door stop. Your backup roms won’t help you if your box won’t recognize the card sitting in its pcie slot dead as a doorknob. You might want to consider soldering on your own switch if you don’t want to risk that fate. I would.
Hi, I have the same XFX which is very odd as the card looks like it has 2 BIOS’ but doesn’t have the damn switch to change it! So I’m not sure if its stuck on the read-only BIOS or the writable one so I don’t even know if its worth trying or if I’m stuck with a read-only BIOS. Were you able to get your XFX to undervolt?
Hi Crypto
This all worked well for my MSI 7950 cards. I’ve just ordered an ASUS R9 280X DirectCU II 3GB and will want to undervolt it. I’m guessing the VBE7 software will not work with this, but, correct me if I’m wrong… If I set the bios using the Asus (Windows) software and then transfer the card to my Ubuntu rig the undervolt settings should still work?
Your site is really helpful – small donation on its way! 🙂
Hi Twalsh I’m in the same boat as you regarding undervolting with linux.
I have a couple Sapphire r9 280x Vapor-x and have them running nicely with a sempron 145/e4 Motherboard using xubuntu on USB Stick. Disabled all unnecessary features of the Motherboard etc, its auto starting, SSH all working. Its running reliably at ~ 705 Kh/s @ 75C per card.
I now want to undervolt I’m also wondering whether VBE7 can be used with a 280x or how else can it be done?
I want to do this with my Sapphire 7950 Vapor-x, I’m assuming that I’d want to do this with the blue button light pressed on and flash the bios in the UEFI mode, keeping the legacy mode intact. Also it should be easy enough to flash back to the previous setting if I should want to, it’s just a matter of saving the setting before flashing the bios to undervolt, right? It should be really clear by now, but I’d like to know how it’s possible to brick one of these cards even if the bios was completely corrupted, is it that they just won’t flash then; so even if I’m able to go back into legacy mode then the other bios setting is shot for good?
Has anyone tried undervolting R9 280x yet? This card is becoming the new standard and I’d like to know what settings or if VBE7 even supports these new R9 2xx series cards yet.
The application is able to pull the correct settings with the 280x. But I’m unable to locate the 2nd bios switch on my card. I have the Sapphire 280x Vapor card and all I see is a pushable button which switches on the UEFI Bios and boosts clocks/memory by a bit. Should I be using that feature as the 2nd BIOS? If anyone can confirm if this card has the switch to go to a second BIOS, other than switching to UEFI, please tell!
I just tried the process on a Gigabyte R9 280x (Rev 2) which is supposed to be voltage locked. Everything went smooth, and it all looked like it worked, but when I start mining and check voltages in GPU-z it still shows all 3 cards at 1.2V.
Any ideas?
Has anyone successfully did this with an R9 280x? Wondering if some different steps are required for this card.
I even re-downloaded the BIOS post-flash, opened it with VBE7 and it does indeed show the updated VDDC value (1019)…so why is it running at 1.2V still?
Haven’t tried a Gigabyte card yet, but it worked fine with the Sapphires that I tested with. Have you tried measuring power draw at the wall with a kill-a-watt or similar device (before and after flashing)? Sometimes the voltage reported by software isn’t accurate.
Are you using the UEFI switch (the button with the Sapphire logo that turns blue when pressed) on your Sapphires as the BIOS switch?
So, cgminer reported one of my GPUs as “dead” after operating overnight following the undervolting action. Now I’m in a complete dilemma…
Given the device is only about a week old, I suppose it’s eligible for a fix or RMA. However, since the BIOS was tampered with, I’m not sure how it would affect the warranty. I believe I am able to get back in and restore the original BIOS settings from the backup, as the box boots up and remains stable for a couple minutes before getting crashed, during which I should be able to restore the original BIOS config.
If I manage to revert back to the original setting, would it still be considered “BIOS modified” and be dropped from support, or would it be the other way as long as the original settings remain intact?
BTW, I experience the issue with the BIOS switch on either end. So, the issue is possibly not due to BIOS change. Just that it’s an irony that the device has failed, and the BIOS was changed. 🙁
Thoughts?
Don’t worry, your GPU is not actually dead – cgminer is just being dramatic, your GPU only crashed and isn’t responding. =)
Just reboot, and you should be up and running again. You’ll need to slowly either increase voltage, or decrease core clock speed, until you find a point where your GPU doesn’t crash any more. It can take some experimenting, and every card (even between the exact same brand/model) can be a bit different.
Thanks for great guide, Crypto!
Do you know by any chance if this trick gonna work for Gigabyte 7970 (GV-R797TO-3GD)? They are voltage locked at 1.256V, but there is a report in Hardware Comparison chart saying that it was undervolted to 1.1 using custom firmware. Is it referring tho this method?
[…] undervolt the boards, in order to get them cooled down and take less power. I followed the guide here on Cryptobadger’s site and copied the existing ROM to a USB DOS(remember that) boot stick, […]
I have a quick questions related to undervolting. I recently switched to litecoin BAMT and have undervolted via your tutorial (which is really nice btw, thanks for putting the time in to help others). I am using Saphhire Dual X 7970s. On windows I would get around 730 khash using:
I-13 G-2 TC-8192 Core-1085 Mem-1500 VDDC-1.05
On bamt those settings give me a low hash of about 550 khash. Why is their such a large charge just from OS?
Because of this I now use these settings in BAMT to acheieve around 730 khash:
I-20 G-1 TC-22400 Core-1100 Mem-1500 VDDC-1.175
This is really inefficient because I pretty much have to run stock voltages to keep the system from crashing due to the high core clock rate. Should I be able to just up the TC on the 2 thread of intensity 13 setup?
I’m still confused why BAMT would hash much less with the same settings, but it is a lot more stable and I do prefer it over windows quite a bit.
Any experience for do it with Asus R9 290 90YV0560-U0NA00 ? Is the 1081 mV a good beginning for that Cards ? Thanks in advance
I flashed a Sapphire Vapor-X 7950 and a MSI Twin Frozr II BE 7950 using this method. The Vapor-X took it just fine but the MSI card just wasn’t having it. It got “sick” at low voltages. I got it stable at #6-1106,#0-1106 but eventually my screen completely froze and I couldn’t monitor the cards. I could still ssh in but could not execute any ati commands or view card details. For now I’ve given up and switched back to normal settings. Everything seems fine with the original BIOS on both cards (no sick cards, no freezing).
I wasn’t able to get my 4-card MSI 7950 rigs to run for more than two days with the voltages Cryptobadger posted. They would simply lock up after a day or two of mining and I’d have to reboot. I decided to leave the voltage of #6 Core at default and just adjust the #0 Core voltage. So far, that seems to have done the trick. I’m still playing around with it a bit to see if it really made a difference or not.
I downloaded the program but i can only see 3 options at powerplay #1, #2 and #0. I am using the XFX 7950
any ideas?
Hey, just curious. I was looking over my Asus R9 280x DC2T card today to see if I could find the bios switch. I had trouble locating it. Anyone know if it has one?
I was trying to locate that switch on my Asus R9 280x DC2T card as well,
and concluded it doesnt have one. Anyways, I did flash the BIOS, setting the #6 VDDC to 987, #0 VDDC to 1000. The card works fine with these settings as long as I keep the core frequency below 1050..
I have two Gigabyte R9 280X OC HDMI as well, and I cant undervolt those below 1019 or the rigs wont boot..
arverobe.
Question about unervolting as per instructions above.
3 X Sapphire HD7950s with Boost, ASRock 970 EX4 mobo running Linux
When I insert bootable DOS USB in mobo of miner and type in-
atifalsh -s 0 0.rom
atiflash -s 1 1.rom
atiflash -s 2 2.rom
I get this message after each line is intered:
Warning Cannot Open Swap File C:/cwsdpmi.swp
“then after a short delay” this appears:
0x20000 bytes saved, checksum=0x9800
When I put the USB drive back into my desktop computer I see 3 files
with those names with 128 Kb each plus the Atifalsh.exe file.
I am afraid to go any further because of the WARNING message.
Also, my cards have a button type switch where the bios switch should be located on each card and it has a bright blue light..when pushed the light goes off..in which position is the bios save, light on or light off?
Thanks for any help!
That is ATIflash…I did two typos here…but not in the miner
I have 3 Sapphire HD 7870 and everything else is exactly like the guide and getting about 340Khs per card using CGMiner in Xubuntu, with settings:
export DISPLAY=:0
export GPU_MAX_ALLOC_PERCENT=100
export GPU_USE_SYNC_OBJECTS=1
cd /home/xuser1/cgminer-3.7.2-x86_64-built
./cgminer –scrypt -o xxxx -u xxxx -p xxxx –intensity 12 -w 256 –thread-concurrency 8190 –vectors 2 –gpu-threads 2 –lookup-gap 2
I have not been able to get any higher rates using stock bios and my browser has around 40 or more tabs open with hints at different settings to try in cgminer, but none specific that I can find that actually increase the rate. I have started trying different custom bios settings, so far I have only managed to lower voltage and hash rate, rather than at least maintain hash rate. Ideally I want to increase hash rate and keep voltage as low as possible. I have seen references to 400Khs+ on posts elsewhere.
I have a few questions which I cant find answered clearly anywhere online which could help me and others:
1. What is the optimum cgminer settings for Sapphire HD7870, before bios adjustment and after (what bios settings)?
2. When adjusting bios using VBE7 should I try to increase the core clock value from the default 1000 and the memory clock from the default 1200? will this give me higher hash rates, or is lowering core clock the way to go?
3. Do I need to reflect the Core Clock and Memory Clock settings as –gpu-engine xxxx –gpu-memclock xxxx in cgminer for what ever the current values are, default or not?
4. Thread concurrency. Does a modified Core Clock or Memory Clock require different Thread Concurrency settings?
5. Do I need to underclock or does typing a lower gpu value in cgminer create the same result?
Thank you so much for the guide, any optimization tips would be greatly appreciated.
any way to underclock R9(r290) series in linux?
thanks
rami
I have a rig running 4 x 7970’s Sapphire Dual X. One of GPU’s hashes at sub 100kh/s. I checked the voltage and it’s saying it’s at .95. I didn’t change that so what gives. I tried re-installing the driver but it stays under volted. I tried changing this in cgminer by pressing g and following instructions. What’s weird is that if I unplug 1 of the units then the last one of the 3 that are left goes to the same .95 voltage. Any ideas would be helpful.
Thanks!
P
Will 4 R9 280x draw 1200w? Is anyway to know how much a rig is drawing while mining?
thanks
elias, The easiest way to monitor your rigs wattage, KWh, etc is with a Kiil-A-Watt:
http://www.amazon.com/gp/product/B00009MDBU/ref=oh_details_o06_s00_i00?ie=UTF8&psc=1
I have a rig of 4 280x and the powerdraw is 1160W. I have it setup to a 1300W Gold PSU and its crashing the PC (reboots). I have it setup on 2 powered and 2 unpowered risers. I’m not undervolting yet as I’m a little hesitant to do so, but with these crashes, its clear I need to lower the wattage.