So you’re interested in mining cryptocurrency, but you’re not sure where to start? No problem, this guide is all you need to set up your own headless litecoin mining rig—even if you have absolutely no experience with this sort of thing.
First, let’s get the obvious question out of the way: why litecoins? After all, bitcoins are worth more, right? The simple answer is that at the time of this writing, litecoins are currently the most profitable cryptocurrency to mine when you take into account how much each coin is worth, and the time required to mine one. Rest assured that if the situation changes, and another cryptocurrency suddenly surpasses litecoin as the best mining option, the rig outlined in the guide should have no problem switching over to a new coin.
This guide will be broken into several parts, each focusing on a different aspect of building your first mining rig. First, let’s take a look at what you’ll need in terms of hardware to put a respectable miner together.
Build your own Litecoin Mining Rig, part 1: Hardware
4/06/2017: This guide is roughly three years old. Please don’t attempt to buy any of the hardware recommended here—it’s quite obsolete! If you’re looking for information about modern GPU mining, please click here for my updated 2017 guide on mining Ethereum.
Here is the list of hardware that I recommend:
| Motherboard | ASRock 970 Extreme4 |
$98 |
| Processor | AMD Sempron 145 |
$38 |
| Memory | 4GB G.SKILL DDR3 SDRAM (2 x 2GB) |
$46 |
| Power Supply | Seasonic 860w Platinum PSU |
$199 |
| GPUs | 3 x MSI Radeon HD 7950 3GB GDDR5 (Twin Frozr) |
$319 each |
| (optional) | 3 x PCI-E riser cable | $5 each |
| (for dummy plugs) | 68 ohm 1/2 watt resistors | $3 |
Update 11/26/2013: The Radeon 7950 video cards are sold out pretty much everywhere. They’re still the best option for mining if you can find them, but if you can’t, then the new Radeon R9 280X cards are likely your best option. They do consume a fair bit more power though, so you”ll want to upgrade your power supply as well (this 1250w Seasonic should support three 280X GPUs without problems). As for brands, I recommend these Sapphire, Gigabyte, and MSI 280X cards for now. I’ll be updating the rest of my guide at some point in the near future with optimal settings for the 280X, so stay tuned.
Update 12/01/2013: If you’re trying to put a rig together, you’ve probably noticed that the above video cards have become nearly impossible to find. I’ve received a few messages from folks that are having some good results using the R9 290 cards, although they’re a fair bit more expensive than the 280X. If you’re itching to build a rig ASAP and can’t find a 7950 or 280X, then you might consider the 290. It looks like all of the current 290 cards are using AMD’s reference cooling design at the moment, so brand probably doesn’t matter too much. Although given a choice, you usually can’t go wrong with Sapphire, Gigabyte, and MSI. Again, remember to pick up a fairly powerful PSU if you’re going to run 3 of these in a rig.
You will also need a USB stick (8GB or larger, this one is fine) if you’re using Linux as your OS, or a harddrive (a cheap SATA drive of any size will do) if you’re using Windows. I will cover setup on both Linux and Windows in the next sections of this guide, as well as the pros and cons of each.
The video cards may be difficult to find, as they’re popular and often sell out. You can substitute nearly any 7950-based GPU, but if you have a choice, go for the MSI or Sapphire cards. They’re not voltage-locked and will save you some electricity in the long run. I have the MSI card that I recommended in all of my rigs, but I’m told that this (and also this) Sapphire card is also a good choice.
The motherboard, CPU, and RAM are all relatively unimportant. The motherboard simply needs to have enough PCI-E slots to host your three GPUs (if the recommended board isn’t available, here is another, or if you can’t find either ASRock, this Gigabyte board is a good alternative). The CPU will essentially sit idle, as all of the actual mining is done by the GPUs. The Sempron 145 is an excellent choice here because it’s cheap and draws very little power (if the Sempron is unavailable, this one is also a fine choice). If you’re going with Linux, you can get away with even less than 4GB of RAM, but I’d stick to that as a realistic minimum on Windows.
The power supply is important, and you don’t want to skimp on it. The Seasonic that I’ve recommended is extremely solid and 93% efficient, which will help keep power consumption to a minimum. It’s also modular, which is really nice if you’re putting this together in a plastic crate like I recommend.
The PCI-E risers aren’t strictly necessary, as all 3 GPUs will fit on the motherboard without them. However, airflow will be extremely limited due to the close proximity of the cards, and I really don’t recommend setting them up that way long-term. The riser cables allow you to position the GPUs off of the motherboard in a more spaced-out fashion. I dropped the temperature of my GPUs by nearly 10 degrees Celcius by simply using risers to separate them. Availability and pricing on Amazon is constantly changing, so check eBay if you can’t find them.
Important: you may also need to create dummy plugs for each of your GPUs. Some operating systems will idle video cards that do not have an active monitor connection, which will obviously kill your mining performance. Dummy plugs “trick” your OS into thinking a monitor is connected, thus preventing attached GPUs from being idled. You just need a few resistors ($1-2 at Radio Shack if they’re not available at Amazon) and these instructions to create your own plugs.
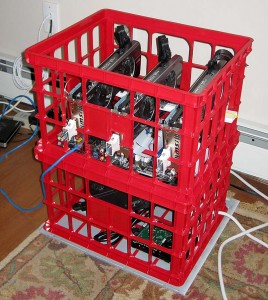
So you’ve got nearly $1400 worth of hardware, but no place to put it, as I haven’t mentioned a case. I highly recommend against trying to cram 3 GPUs into a conventional PC case. A plastic crate or two works far better due to the tremendous heat that the video cards will give off. Added bonus: they’re cheap!
Here is what you’ll need to create a simple DIY plastic crate housing for your miner:
| Plastic Crate |
$5 each |
| Plastic stand-offs | $4 |
| 6 x #4 3/8″ wood or metal screws | $1 |
| Brace to rest GPUs on (I used two of these) | $4 |
| a few cable ties (8″ or so) | $2 |
| power switch & LED (optional) | $6 |
You can get plastic crates in most home improvement stores if you don’t want to ship it from Amazon. I picked mine up at Lowe’s for under $5 each. You should be able to get everything else on the list at Lowe’s if you happen to have one near you, too. As far as tools go, you’ll need a drill and a knife capable of cutting into whatever plastic crate you buy.
Assembly Steps:
First, attach your CPU & heatsink/fan to your motherboard, and place your RAM into the memory slot(s). Then follow the general steps below to mount everything into your plastic crate.
Click the images for a close-up look at each step.
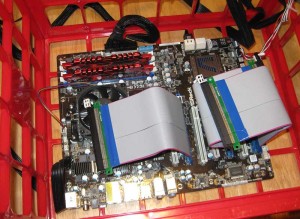 Place plastic standoffs on the bottom of your plastic crate, and rest your motherboard on top of them. Make sure that all of the essential ports are accessible (SATA, USB, keyboard, mouse, etc). Use your knife to cut away pieces of the crate if necessary so that all ports you plan to use are exposed. Then plug your riser cables into the PCI-E slots of your motherboard.
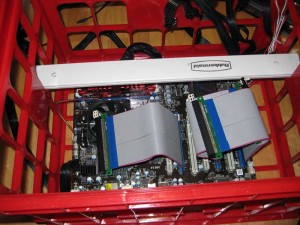 Place your brace (either the plastic guards that I recommended, or a cut yardstick, or whatever you have that works) so that it is sitting above the motherboard, high enough for your GPUs to rest on. Cut the brace so that an inch or two sticks out on either end of the crate.
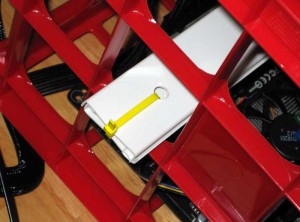 Drill holes in your brace so that you can secure it with cable ties (see image). Do not simply rest the brace on the crate! An accidental bump can cause it to fall into the crate, along with ~$1000 worth of GPUs if you do that!
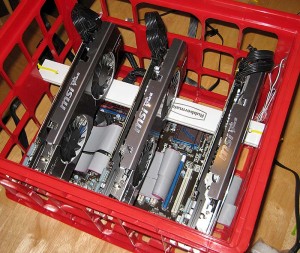 Connect each GPU to it’s corresponding riser cable, resting the bracket end on the lip of the crate and the other end on your brace.
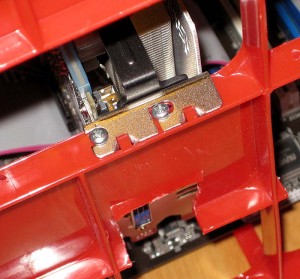 Screw each GPU down into the lip of the crate. If you drill small pilot holes ahead of time (mark where to drill with a sharpie), this is much easier.
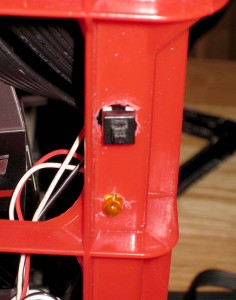 If you have a power switch and LED, mount them into one of the crate’s corners. I was pretty sloppy with mine, but it’s functional.
You’re done! Simply connect everything to your power supply and you should be ready to power your rig on for the first time. If you have a second crate, you can put your power supply in there (along with your harddrive if you’re using Windows), and stack it under your main crate to save some space.
In the next part of this guide, I’ll show you everything you need to do to start mining under Linux (and Windows will follow shortly after)!


 April 18th, 2013
  CryptoBadger
 Posted in
  Tags:
Tags: 


That’s one awesome mining rig! Well done!
I guess my question is, how worth it is the investment?
I’ve been a follower of Bitcoin for many years and have seen its progress. The problem here is that I don’t have the same faith in Litecoin.
The calculator states with 2x 7950 (all I can afford) that I’ll be getting around 80 coins per month. This is only ~$200 month which means the rig won’t even pay itself off for 5-6 months. The problem here is that I’m hoping to stash the coins for a price raise so I’m going to be investing ~$1,000 with no cash out for at least a year.
I’ve only got so much cash available.
Smart idea?
It’s hard to predict the future, but assuming you have some cash that you’re looking to invest into cryptocurrency, I believe that a small mining rig like the one I outlined is the safest/smartest option.
Even if the digital currency market completely dies shortly after you jump in (which I consider fairly unlikely), you’d still have the hardware. You can either re-purpose it, or sell it back and take only a small loss.
If you’re not keen on litecoin’s future, you can always trade them for bitcoins as you mine them (I’m doing this with some of my own coins as a hedge, as well).
Really, the most important thing in a market as volatile as this is to only invest what you’re prepared to lose, because that is absolutely a very real possibility.
I’ll probably do a write-up here on some of my own reasoning behind getting into cryptocurrency at some point next week.
Hi,
Can you link me to the exact riser cables you used for this? I want to order all the parts tonight and hopefully have this up and running early next week.
Thanks!
Pretty much any riser cable will work, but unfortunately they seem to all ship form Hong Kong or China. These should be fine. You may want to grab an extra one in case one of yours is defective. Out of the 25 or so that I’ve ordered, I’ve only had one bad one, but you never know.
Wonderful, thanks!
Last thing, when my miner is connected to my router, the same router my regular windows dekstop is plugged into; do I still have to use port forwarding to access the mining rig? Or do I just put in it’s IP and im good to go?
You don’t need to bother with port forwarding unless you plan to connect to your miner from across the internet. If you’re on your local LAN, just use its IP address and you should be fine.
Awesome write up, complete with pictures and all. After reading this it really pushes me over the edge in investing and building a basic mining rig. Thanks. Cheers!
Thanks, Good read. I just purchased almost exactly the same hardware and am waiting for it to arrive. Just 2xFrozrs & an 8 core 8350… Hoping to get an extra 50Kh/s with this.
I had originally planned to go for 3 x 7990s, but decided to use that extra, buy a couple of bitcoins and and convert them to litecoins.
It would be good to hear what performance you get, and what settings you use. Once mine is set up I’ll let you know how it goes.
I’m currently considering such a build but I’m considering a Thermaltake Toughpower 1500W. In the place where I live this one costs exactly the same as your suggestion (well $14 more). With this I could power more cards if I were so inclined, is there any downside of choosing this PSU?
Assuming you mean this one, the only downside is that it is less efficient than the Seasonic I recommended (87% vs 93%). I go into the importance of a high-efficiency PSU a bit in my FAQ here. If you want to be sure that you can expand to more GPUs, then this one is more efficient than the Thermaltake that you’re looking at, and it should handle 5 GPUs just fine.
If you’re lucky enough that electricity is very cheap where you live, then efficiency is less of a concern. For the majority of us, springing for the highest-efficiency PSU available will likely end up saving money in the long run, even if it costs more initially.
I was wondering were you got these efficiency percentages. I now know of the wonderful world of 80 Plus certification. 🙂
Thanks a bunch!
Why not 4 graphic cards with a slightly better PSU, sounds like there is enough room and will improve a bit the ratio Mh/s / $ ?
That is absolutely doable; there are just a couple things to keep in mind. I talk about how you can safely add a 4th (or 5th) GPU in my FAQ over here.
Does the AMD processor need a fan or heat sink?
Yes, but both are included in the retail box that I linked in my guide. If you really want/need to, you can run it without the fan (just the heatsink) as long as there is at least some continuous airflow over it. Just make sure to monitor the temperature in the beginning (use something like SpeedFan).
Thanks for the great guide. How’s the rig coming along? any update? Also I was wondering if you can suggest any other motherboard to use as the one you recommended is very difficult to get our hands on. Thanks again.
I like the ASRock because it’s cheap and has 3 16x PCI-E slots on it, but you can use pretty much any motherboard. Just make sure that it has enough PCI-E slots (1x slots are fine if you use 1x to 16x risers) to connect the number of GPUs that you want to attach. I’d also stick with an AMD AM3/AM3+ socket board, because then you can use the cheap/low-power Sempron 145 CPU.
If you definitely want a board with 3 16x slots, then this Gigabyte board is a good alternative to the ASRock. Unfortunately it’s a bit more expensive.
I have read elsewhere that there can be issues with other brands of 1600 memory with this motherboard, is this something you can confirm? (Is it best to stick with the Gskill Ripjaws?) Thanks!
I haven’t heard that, but it’s possible. I also haven’t tried any other brand of memory – I tend to stick with Gskill as they’re cheap and generally perform well.
Thanks for the great guide. I’m new to mining and trying find the best way to do it. Is it correct that the number of hashes (or khash or something?) decides how fast the miner will find blocks/mine coins? If so, how may ‘hashes’ does this set up ‘produce’?
That’s correct, the mining speed is measured in kilohashes per second (kH/s). The rig that is described in this guide will do about 1900 kH/sec (slightly better or worse, depending on the quality of your internet connection and geographical location relative to your mining pool).
Ok thanks. One more question, the link to the GPU’s on Amazon it goes to a selection of GPU and I’m not sure which one is the one you mean. Is this it?
http://www.amazon.co.uk/MSI-R7950-DDR5-PCI-E-Graphics/dp/B00B06M0O2/ref=sr_1_1?ie=UTF8&qid=1367778199&sr=8-1&keywords=MSI+R7950+TWIN+FROZR+3GD5
Or this?
http://www.amazon.co.uk/Radeon-7950-Twin-Frozr-PCI-Express/dp/B009LQA2O8/ref=sr_1_3?ie=UTF8&qid=1367778613&sr=8-3&keywords=MSI+R7950+TWIN+FROZR+3GD5
They are quite a lot more expensive than $319! Is that just because for UK dwellers like myself they cost more?
Yeah, unfortunately international prices for PC hardware are higher in most places than they are in the US. =(
As far as which card – you can actually get either one. The one that is slightly more expensive (the one with the V2/OC designation) comes clocked a bit higher from the factory. But since you’ll be setting your own clock speeds in cgminer anyway, I believe that either version should be able to achieve the settings posted in my guide.
Ok thanks, I go for the cheaper one then.
I’m currently running 2 workers, one laptop and one desktop and I’m thinking about building a rig of my own but then with 2 GPU’s instead of 3 (budget).
What do you recommend when this rig is finished? Staying in a pool or starting on my own?
Absolutely join a pool. Unless you have a very serious setup (think like 10+ of these rigs), it’s not worth thinking about solo mining. It could be months before you find a block mining on your own, if you ever do at all.
Thanks for the info. You’ve written a great tutorial btw 😉
There is just only one thing that is putting me in doubt; whether or not the litecoin currency will stay stable. But I think I’m taking the risk anyways.
ps. You said something earlier about that you can easily switch to another currency IF litecoin ‘dies’. But you can’t swich to bitcoin right? since that is CPU based? I probably wont do that anyways since its very hard to mine nowadays.
You can mine bitcoin with one of these rigs. It’s as easy as signing up for a bitcoin mining pool, and changing a few switches in your cgminer startup script. I don’t recommend you do that, though – if you want bitcoins, mine litecoins instead and trade them for bitcoins on one of the exchanges. You’ll earn them much faster that way.
Okey. Just one last question. If I let these GPU’s run all day, how long will they last? When will they die and just give up?
That’s hard to predict, and has a lot to do with how hot you let them get. If you keep them at or under 80C, I’d expect them to last at least a couple years. They should definitely outlive their usefulness as a mining GPU, anyway. And if they do die, most of them have 3 year warranties.
Any reason why I would be getting a bsod using the risers?
I have 2 cards working now on win7 (I can only fit 2 w/o risers) and when I place the secondary card on a riser, win7 boots up. As soon as I start guiminer and it starts cgminer, I get bsod.
Anyone else encounter this?
It’s possible you got a bad riser – it’s not that uncommon. Make sure that both ends of the riser are snug; if you’re still getting BSODs, it’s unfortunately likely defective.
Arent these the same?
http://www.amazon.com/PCI-E-Express-Riser-Flexible-Cable/dp/B004XD74MC
Yes, those will work fine. The ones on eBay are significantly cheaper if you’re ordering a bunch at a time, though.
Hey I am not sure where these ship from but with the free shipping they come out to be about the same price as the others you recommended only these are on amazon for those of you who don’t want to put your credit card on 10 websites to get all the parts you need
they are right at 21 USD for the 3 recommended for this build
http://www.amazon.com/PCI-E-Express-Extender-Flexible-Extension/dp/B008BZBFTG/ref=wl_it_dp_o_pC_nS_nC?ie=UTF8&colid=2S236SVHXZ1XV&coliid=IGWD09SV4853G
Thanks – I’ve updated the guide to link to these.
What about these? http://www.amazon.com/gp/product/B008BZBFTG/ref=ox_sc_act_title_1?ie=UTF8&psc=1&smid=A1AQJTRN2131MJ
Yes, those will work.
Won’t I need a CD Rom to install windows, and if so which one do you recommend?
Also since I plan on building more than one rig, what is the best way to connect them all to the internet? Should I use several wireless usb wifi adapters, one for each rig, or is there some kind of splitter to use to connect many different ethernet cables to one internet router/modem? What would you suggest? (Links please.)
You can create a bootable USB flash drive and use that to install windows. Or if you prefer, you can grab a cheap CD/DVD drive and just temporarily connect that to each rig while using it to do the install from.
You can hook multiple rigs up to the internet by using a switch (example: this one). Just connect the switch to your router and all of your miners, and you’ll be all set. Don’t use wireless unless you have to.
Also I noticed that you linked to an OEM system builder version of Win7. I take it I’ll need a new license for each rig then?
Yup, legally you’d need one license per rig, unfortunately.
Well, I certainly do appreciate your insights. I noticed that you are from back east. I grew up in NJ right outside of Manhattan.
So a couple of more questions. Where I live, occasionally the higher winds knock out electricity, or we have energy spikes from storms. About a year ago one of them fried my modem. At any rate, I do have some concerns about how this could effect my rigs. I’ve already thought that getting a UPS would be a good idea for the rigs that I make. (I’ve ordered just about everything for the first one except for the Lowe’s extra’s, and it’ll be an adventure as it’s also my first time building a computer.) But these spikes made it through my UPS and affected my Mac as well. In these types of situations, what would be the best answer (besides moving of course). Can you suggest a good UPS? Please keep in mind that I’ll eventually be building more than one rig, so I may need something that can handle more than one, or perhaps I need a separate UPS for each rig?
Also, how many amps are you pulling with these rigs? At 700 Watts (under powering) and 120volt power that would be a hair over 5.83 amps. (Or am I missing something?) I have a room on a 20 amp circuit, so I could only build and use 3 of these in that room before reaching an ampage that would cause a breaker to trip unless I have an electrician come out and do some work.
Thank you for your brilliant wepage.
Since these things draw so much power, getting a UPS for each one probably isn’t going to be feasible since they’d cost you a few hundred bucks apiece. I hook mine up to basic surge protectors – if you spend $10+ on one, it should come with a connected equipment warranty. For example, something like this should work fine.
Your amperage numbers look correct. If you plan to run a bunch of rigs, you’ll probably need to do some electrical planning, depending on the number and size of the circuits in your house.
How long can you expect these GPU’s to last before replacing them due to their wearing out since they run 25/7?
I meant 24/7. Fat fingers on my ipad.
Assuming you keep the temperature under control (I’d recommend running them under 80C if possible), I’d expect them to last years. Certainly longer than they will be useful for mining, anyway.
If you do get one that dies prematurely, most of the brands offer 3 year warranties, which is quite a long time.
I was about to order everything but I noticed that some items don’t ship outside the US. I tried to search google for them but I couldn’t find one of them them.
It’s about this item:
– http://www.amazon.com/gp/product/B002RPCLH6/ref=ox_sc_act_title_5?ie=UTF8&psc=1&smid=A2C3SMXXIDC93V
The processor and the motherboard I couldnt order either, but I can order them here where I live so those aren’t a problem.
My question is. Are there any alternatives or something that is very alike the 4GB G.SKILL DDR3 SDRAM (2 x 2GB) I can use?
Because I cant order it where I live (The Netherlands).
Any DDR3 RAM should work. This one should be fine.
It’s available in my country, thanks! 🙂
I have some older PCs sitting around (Core2Duo, Phenom II X4 even an Athlon 64 3000+) which all of them have motherboards with PCIe slots (2 or more).
Do you consider that it would be worth it to fire them up using the newer cards that you use (7950) for mining?
CPU/Mobo/RAM doesn’ really affect the mining results?
Yup, as long as the motherboard as PCI-e slots that can handle the 7950, the other stuff doesn’t really matter at all. If you can use older stuff that you have sitting around, go for it!
how much electricity does the rig you outlined use when undervolted?
Sorry if i missed it somewhere.
Thanks
Just over 700 watts at the wall.
have you seen this….ebay rig on sale based on your configs..
http://www.ebay.com/itm/The-Original-GPU-Miner-for-Litecoin-Bitcoin-All-Crypto-Currency-Mining-Rig-/261212945424?pt=Desktop_PCs&hash=item3cd1813c10
…and they have a copyright too 🙂
Imitation is the highest form of flattery! =)
Am inspired by your very impressive work here! My question: I want to run four cards (7950 or 7990). Have acquired a Corsair AX1200 to start. What other change(s)need I make to do this (motherboard? etc), and is there any issue regarding having 7950’s and 7990’s together in the same rig. I am a TOTAL newbie and could not do this without your brilliant guide! Thanks!
Check out my FAQ on adding more GPUs here.
As far as the 7990, I believe that they will show up as two GPUs in cgminer – the 7990 is basically two 7970s on a single card. I haven’t seen too many people using these yet, so I can’t speak to special considerations that you may need to be aware of when using them.
Sticking to the same topic about more than 3 cards.
Would it be necessary to install powered PCI-E risers to ALL cards if we start mining with >3 or just the ones that we install afterwards?
3 of the risers can be unpowered. Any additional ones beyond that should be powered.
If I saw the pictures right then the mainboard is not attached to the bottom of the plastic crate. Is that right. Would you have an idea how to attach it?
Thanks.
There isn’t really a need to attach the motherboard, but if you want to, the best way would probably be to get a few motherboard standoffs and mount them to the bottom of the crate, and then screw the motherboard into them.
I know that I posted about needing a CD Rom Drive earlier, but now that my motherboard arrived, there is definitely a CD Rom Disk with the motherboard, which I’m assuming is for installation of the drivers for the motherboard.
So I need a Drive then, don’t I? Or is there a work around here?
Thanks again.
In most cases you won’t need to install any drivers – they’ll likely be included with your OS installation.
If you do need drivers from the CD, you can either copy the contents of the CD to a USB stick and install them from there, or you can download the drivers directly from the motherboard manufacturer’s website (unless you need the driver for the ethernet/LAN adapter, in which case you’ll need to use a USB stick). Downloading from the website is usually a good idea anyway, since it ensures that you get the latest versions.