So you’re interested in mining cryptocurrency, but you’re not sure where to start? No problem, this guide is all you need to set up your own headless litecoin mining rig—even if you have absolutely no experience with this sort of thing.
First, let’s get the obvious question out of the way: why litecoins? After all, bitcoins are worth more, right? The simple answer is that at the time of this writing, litecoins are currently the most profitable cryptocurrency to mine when you take into account how much each coin is worth, and the time required to mine one. Rest assured that if the situation changes, and another cryptocurrency suddenly surpasses litecoin as the best mining option, the rig outlined in the guide should have no problem switching over to a new coin.
This guide will be broken into several parts, each focusing on a different aspect of building your first mining rig. First, let’s take a look at what you’ll need in terms of hardware to put a respectable miner together.
Build your own Litecoin Mining Rig, part 1: Hardware
4/06/2017: This guide is roughly three years old. Please don’t attempt to buy any of the hardware recommended here—it’s quite obsolete! If you’re looking for information about modern GPU mining, please click here for my updated 2017 guide on mining Ethereum.
Here is the list of hardware that I recommend:
| Motherboard | ASRock 970 Extreme4 |
$98 |
| Processor | AMD Sempron 145 |
$38 |
| Memory | 4GB G.SKILL DDR3 SDRAM (2 x 2GB) |
$46 |
| Power Supply | Seasonic 860w Platinum PSU |
$199 |
| GPUs | 3 x MSI Radeon HD 7950 3GB GDDR5 (Twin Frozr) |
$319 each |
| (optional) | 3 x PCI-E riser cable | $5 each |
| (for dummy plugs) | 68 ohm 1/2 watt resistors | $3 |
Update 11/26/2013: The Radeon 7950 video cards are sold out pretty much everywhere. They’re still the best option for mining if you can find them, but if you can’t, then the new Radeon R9 280X cards are likely your best option. They do consume a fair bit more power though, so you”ll want to upgrade your power supply as well (this 1250w Seasonic should support three 280X GPUs without problems). As for brands, I recommend these Sapphire, Gigabyte, and MSI 280X cards for now. I’ll be updating the rest of my guide at some point in the near future with optimal settings for the 280X, so stay tuned.
Update 12/01/2013: If you’re trying to put a rig together, you’ve probably noticed that the above video cards have become nearly impossible to find. I’ve received a few messages from folks that are having some good results using the R9 290 cards, although they’re a fair bit more expensive than the 280X. If you’re itching to build a rig ASAP and can’t find a 7950 or 280X, then you might consider the 290. It looks like all of the current 290 cards are using AMD’s reference cooling design at the moment, so brand probably doesn’t matter too much. Although given a choice, you usually can’t go wrong with Sapphire, Gigabyte, and MSI. Again, remember to pick up a fairly powerful PSU if you’re going to run 3 of these in a rig.
You will also need a USB stick (8GB or larger, this one is fine) if you’re using Linux as your OS, or a harddrive (a cheap SATA drive of any size will do) if you’re using Windows. I will cover setup on both Linux and Windows in the next sections of this guide, as well as the pros and cons of each.
The video cards may be difficult to find, as they’re popular and often sell out. You can substitute nearly any 7950-based GPU, but if you have a choice, go for the MSI or Sapphire cards. They’re not voltage-locked and will save you some electricity in the long run. I have the MSI card that I recommended in all of my rigs, but I’m told that this (and also this) Sapphire card is also a good choice.
The motherboard, CPU, and RAM are all relatively unimportant. The motherboard simply needs to have enough PCI-E slots to host your three GPUs (if the recommended board isn’t available, here is another, or if you can’t find either ASRock, this Gigabyte board is a good alternative). The CPU will essentially sit idle, as all of the actual mining is done by the GPUs. The Sempron 145 is an excellent choice here because it’s cheap and draws very little power (if the Sempron is unavailable, this one is also a fine choice). If you’re going with Linux, you can get away with even less than 4GB of RAM, but I’d stick to that as a realistic minimum on Windows.
The power supply is important, and you don’t want to skimp on it. The Seasonic that I’ve recommended is extremely solid and 93% efficient, which will help keep power consumption to a minimum. It’s also modular, which is really nice if you’re putting this together in a plastic crate like I recommend.
The PCI-E risers aren’t strictly necessary, as all 3 GPUs will fit on the motherboard without them. However, airflow will be extremely limited due to the close proximity of the cards, and I really don’t recommend setting them up that way long-term. The riser cables allow you to position the GPUs off of the motherboard in a more spaced-out fashion. I dropped the temperature of my GPUs by nearly 10 degrees Celcius by simply using risers to separate them. Availability and pricing on Amazon is constantly changing, so check eBay if you can’t find them.
Important: you may also need to create dummy plugs for each of your GPUs. Some operating systems will idle video cards that do not have an active monitor connection, which will obviously kill your mining performance. Dummy plugs “trick” your OS into thinking a monitor is connected, thus preventing attached GPUs from being idled. You just need a few resistors ($1-2 at Radio Shack if they’re not available at Amazon) and these instructions to create your own plugs.
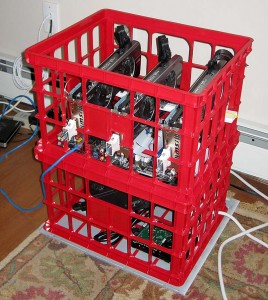
So you’ve got nearly $1400 worth of hardware, but no place to put it, as I haven’t mentioned a case. I highly recommend against trying to cram 3 GPUs into a conventional PC case. A plastic crate or two works far better due to the tremendous heat that the video cards will give off. Added bonus: they’re cheap!
Here is what you’ll need to create a simple DIY plastic crate housing for your miner:
| Plastic Crate |
$5 each |
| Plastic stand-offs | $4 |
| 6 x #4 3/8″ wood or metal screws | $1 |
| Brace to rest GPUs on (I used two of these) | $4 |
| a few cable ties (8″ or so) | $2 |
| power switch & LED (optional) | $6 |
You can get plastic crates in most home improvement stores if you don’t want to ship it from Amazon. I picked mine up at Lowe’s for under $5 each. You should be able to get everything else on the list at Lowe’s if you happen to have one near you, too. As far as tools go, you’ll need a drill and a knife capable of cutting into whatever plastic crate you buy.
Assembly Steps:
First, attach your CPU & heatsink/fan to your motherboard, and place your RAM into the memory slot(s). Then follow the general steps below to mount everything into your plastic crate.
Click the images for a close-up look at each step.
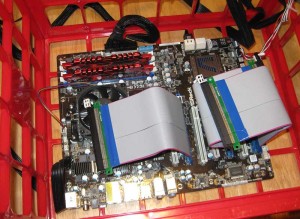 Place plastic standoffs on the bottom of your plastic crate, and rest your motherboard on top of them. Make sure that all of the essential ports are accessible (SATA, USB, keyboard, mouse, etc). Use your knife to cut away pieces of the crate if necessary so that all ports you plan to use are exposed. Then plug your riser cables into the PCI-E slots of your motherboard.
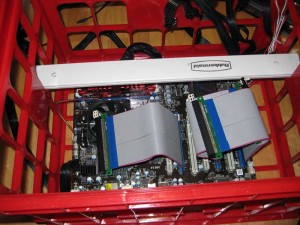 Place your brace (either the plastic guards that I recommended, or a cut yardstick, or whatever you have that works) so that it is sitting above the motherboard, high enough for your GPUs to rest on. Cut the brace so that an inch or two sticks out on either end of the crate.
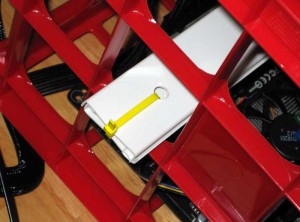 Drill holes in your brace so that you can secure it with cable ties (see image). Do not simply rest the brace on the crate! An accidental bump can cause it to fall into the crate, along with ~$1000 worth of GPUs if you do that!
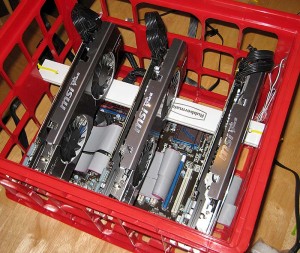 Connect each GPU to it’s corresponding riser cable, resting the bracket end on the lip of the crate and the other end on your brace.
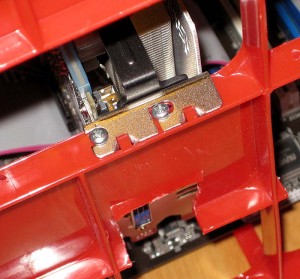 Screw each GPU down into the lip of the crate. If you drill small pilot holes ahead of time (mark where to drill with a sharpie), this is much easier.
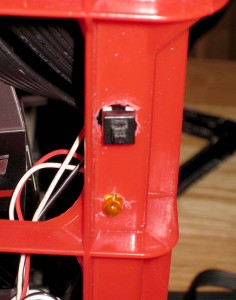 If you have a power switch and LED, mount them into one of the crate’s corners. I was pretty sloppy with mine, but it’s functional.
You’re done! Simply connect everything to your power supply and you should be ready to power your rig on for the first time. If you have a second crate, you can put your power supply in there (along with your harddrive if you’re using Windows), and stack it under your main crate to save some space.
In the next part of this guide, I’ll show you everything you need to do to start mining under Linux (and Windows will follow shortly after)!


 April 18th, 2013
  CryptoBadger
 Posted in
  Tags:
Tags: 


Does anyone think mining proxies are a good idea?
I think it looks like they could easily be scams… and divert your coins but maybe I’m being paranoid.
Hey, great site, very informative. My friend and I are purchasing hardware for a first rig (similar to the one you outlined). Now, the good GPUs are all out of stock in our area as well as online, but if you were to have a motherboard that supports 5 GPUS (with the proper riser cables), and power supply, what is worst GPU you would even bother using (assuming you can return your hardware for a full-refund within 2 weeks, were just trying to mine, see how it is, than really invest funds as we grow)
Thanks in advance!!
You may want to refer to this.
https://litecoin.info/Mining_hardware_comparison
Hi Guys,
I am thinking of getting this board:
http://www.ncix.ca/products/?sku=77606&vpn=A10-5800K%20%26%20F2A85X-UP4&manufacture=Bundle%20Deals
Gigabyte F2A85X-UP4 with an A10 AMD APU bundles CPU for $264.
Reason being. I noticed it is so much to better to run a rig which is still usable while mining. I have dual graphics in my laptop and I just use the discrete graphics for mining while the APU handles my surfing the net and watching video. It works great. Only question, is this a good idea or the price is too much? I was thinking of starting with two GPUs for the meantime then add more later one. Tight budget here due to holidays…. lol if anymore selling their GPUs, let me know I wouldn’t mind using used one as long as it works…….
It’s personal preference. If you are going to use the computer other than mining, then I guess you can purchase any motherboard, however, if you are going to use it nothing but mining then lowest cost would be the best. One of the reason the guide is using Sempron 145 is it’s cheap but still can stably run any OS. Lower cost, earlier you will earn your invested money back. =]
Hoping someone has an idea… I have this board:
http://www.amazon.com/gp/product/B005POPQZA/ref=oh_details_o04_s00_i00?ie=UTF8&psc=1
And this PSU:
http://www.newegg.com/Product/Product.aspx?Item=N82E16817494006
It’s all plugged in with the power switch. When I turn it on all the fans start spinning on the CPU and the GPUs and there’s a green light on the NIC port so the MB is getting at least some power. That said I don’t really feel like it’s totally booting up and I can’t get any signal on my monitor. I’ve reduced it to 1 card plugged directly into the MB with no change. Just not sure what to do. I have both cables plugged in to the MB as required.
A young friend of mine just built his first rig and had the exact same symptoms. I took a look and noticed that he had improperly seated his CPU (didn’t open the little lever so the pins were never seated all the way into the die).
Re-seated the CPU and then it all worked fine.
Also try and make sure atx 4+4 is seated correctly… or ifyoou gave 8 pin Iin try the 4+4
I have both the 6 pin and 6+2 pin hooked up to my R9 280x. I’ve tried every slot including the one my MB says is the primary PCI-E. The 8 pin is seated firmly as far as I can tell. I guess maybe I could try using one on the 6+2s instead. CPU is in correctly and firmly.
I am starting to wonder if it is a CPU compatibility issue. Looking at the ASRock site it does not specifically list mine and I know other people have had temperamental issues with the MB and unsupported CPUs 🙁
No not a 6+2 but you should have a powr plug that is split 4 and 4… for some reason my motherboard liked the 4 and 4 instead of the solid 8
Power Supply: THERMALTA TPG1050W 80PLUS GOLD PSU
Processor: AMD BOX AMD A6-640K BLK ED
Memory: IPSG 4GB DDR3-1333 CL9 DUA
Motherboard: ASUS A88X-PRO FM2+ ATX
GPU(x4): Gigabyte R9 290 GDDR5-4GB 2xDVI/HDMI/DP Graphics Card (GV-R929D5-4GD-B)
Ordering PCI risers
but all in all, thoughts on a first time start up build?
All looks good! Maybe dummy plugs?
I just started to build too. If you have any thoughts or suggestions, let me know. http://delsol7.wordpress.com/
If I have access to free electricity does it matter what make of 1000w PSU I use? I mean it doesn’t have to be super efficient?
Cheers
Nope, use any PSU that would support the GPUs. =]
Struggling to get GPU’s. Do all three need to be the same?
Found this solution and works.
http://devgurus.amd.com/message/1286878
It seems… very complicated. hehe…
Lol I find the whole thing complicated!
Making miner is nothing different from making a PC. Setting the software could get little complicated but it’s not that bad at all. =]
I’ve built PCs and I’m computer savvy it’s the programming and Linux that hurts me head.
Well, I will face that today as HD arrives today. Will see how it goes.
Great guide! I was wondering though how you hook up 3 GPU’s to one Seasonic Platinum 860, as it has only 4 PCI-e power connectors while you need 6 (http://www.seasonicusa.com/Platinum_Series.htm).
Would you mind explaining?
I have Seasonic 1250W. It should be similar to 860W. Each PCIE wire suppose to be connected with 1 GPU. PCIE wire should be V shaped. Top end of V are the connectors for GPU, bottom end of V is the connector for PSU.
I have a seasonic 860w platinum, there’s enough for 3 cards.
Hello,
I followed your guide to build my first rig (you inspired me to get started in whole mining business, so kudos for that).
I was running into lot of issues with running ubuntu so I ended up using BAMT.
I can run 3 7950s kind of out of the box with any problem, but as soon I add 4th card mining doesn’t start.
I tried increase wait time in the begening but no luck.
you mentioned in your guide after adding run aticonfig command, does that apply with BAMT as well?
any help will be appreciated.
thanks in advance
Is it okay to mix graphics cards? I was only able to find two 280x’s, and a bunch of 290x’s. suggestions?
Yes mate AFAIK
Think this could pass as a middle-school science project? I’d be helping my daughter build a science-project anyway, and now that I think about it, a LiteCoin rig would make an awesome science project – – – we just need to think of how to make some scientific principles apply to it that can be measured and graphed.
Perhaps a graph measuring the hash-rates effectiveness over time as difficulty increases? Or perhaps graphing the differences between mining with 2 cards vs. 3? Perhaps graph how much money leaves Dad’s wallet over time building mining gear 🙂
What’s the most interesting graph that could come of this, yet be something a 7th-grader could describe?
Something I was just thinking today is to calculate how much CFM of air per watt is needed to remove waste heat generated by a litecoin mining rig. Probably a fairly straightforward calculation. There is a ton of physics, math, science involved in the hardware that goes into making a rig.
It seems bit to technical and expensive for 7th grader to do project. Your child may know how to build a PC but majority of kids have no idea what CPU is. If your child start talk about all the technical terms, all other kids will be listening to some other language in English. (I am physics/chemistry teacher in an academy.)
I don’t konw… maybe different ways of putting fans to have better air flow and compare the temperature?
https://litecoin.info/Mining_hardware_comparison
shows that the radeon 7990 -gd65 has a kH/s of 1518. Doesnt that mean this is the best card for a rig? And if you had a triple sli/crossfire board you could put 3 of them on one rig, giving you 4554 kH/s. would this be ideal for a maxed out rid or are there more economical cards?
As far as I know, there isn’t more economic GPU that will output 1400~1500 KH/s. I checked most of the 7990 models and they go near or over $1000 for each GPU. But if you can afford them, why not. =]
I think some people create rigs with 2x 7990’s. 7990’s as you know contain 2 GPU’s per card so a rig with 2 cards will have a similar processing power as 4 7970’s. As others have said though they are really expensive
I don’t think it will be cost effective. Running 2 of 7990 are going to cost $2000 where 3 of R9 280X cost $1000. Even if I run 4 of them that’s still $1300. I personally think that R9 280X or 7950 seems the most cost effective.
Hello, i just finished putting my rig together with 3x gigabyte r9 280x but we have a big problem :
When one card is plugged/enabled I have about 600 khah but when I plug 2 both goes at 300 khash/s and if I plug the third 175 khash per card!
The total hashrate is always the same with one two or three cards, it just divides it :/ between the cards.
Anyone already got this problem? Or know a solution ?
Thanks in advance.
Make sure you have the dummy plugs in place. Similar thing happened to a friend because he had no dummy plugs.
The windows setting of not making them idle isn’t enough?
I have 3 of the same card and am having the same problem.
Card 0 runs at high clock speeds (whatever I set it at)
Cards 1 & 2 are locked at 300mhz and 150 mhz at 0.85V
This gives me around 70kh/s total average. I’m on Xubuntu. I tried reinstalling drivers – that didn’t work.
Next I will try installing dummy plugs on cards 1 & 2. I have a feeling that will work now that I’m seeing some of you with the same issue. I’ll let you know if this solves it. You should do the same. Not much information about this issue is indexed yet.
Thanks for your fast answer, just bought the resistors and tested on 2 gpus still get the hashrate divided by 2.
Here’s a screenshot with 1,2 and 3 gpu activated..
http://hpics.li/ae026ef
Thanks for your help!
I got the same issue as you. Got my Hashrate divided by the number of GPU’s intalled on my motherboard.
Anyone with the same problem? Or even better, a solution???
wow… this is interesting. keep us updated. i will see how mine goes today once my rest of parts arrive.
I have the same problem.
Look at your clock speeds – they’re in “desktop” mode according to the following link. You sure you installed the dummy plugs correctly? I haven’t tried it yet, but figured it would solve the issue.
http://www.techpowerup.com/reviews/MSI/R9_280X_Gaming/30.html
If the dummies don’t work, I wonder how else we can trick it into running on “3d Load” mode.
FYI this issue was solved by installing dummy plugs.
Gigabyte R9 280x requires dummy plugs. At least on Xubuntu.
I have two 7970’s What I need is the cpu, motherboard, psu, dummy plugs, and risers. Rather then waiting on orders I think I am just gonna go buy what I need at Best Buy or Frys tomorrow. Now I am reading online and getting confusing information about what is important on a motherboard and CPU? Some people say they have had a bad experience with AMD and AM3? Should I go with an intel or does it matter? The PCIe aspect is also very confusing? What is the difference between PCIe 2.0, 3.0, x1, x16, x4, etc??? Some people are saying to use only x4 for high powered GPU’s?
For example I am looking at this board here:
http://www.frys.com/product/7326144?site=sr:SEARCH:MAIN_RSLT_PG
It has 4 PCIe slots but they are all different?
1 x PCIe 2.0 x16 (blue)
1 x PCIe 2.0 x16 (x4 mode, black)
2 x PCIe 2.0 x1
Whatever motherboard, cpu, and psu I get I would like them to support adding 2 more 7970s or 7990s when I can get them (so 4 cards). That means I should get a 1000w PSU or should it be higher? Also would I imagine I would need different types of risers with these slots but I am not exactly sure? I just want to make sure I do it right the first time. Thank for the suggestions! Maybe I am over thinking the whole thing, LOL
Do you need different risers for different pcie slots? (in terms of x16, x8, x4)
thanks!
I’ve been looking to see if you can use 1x pcie rises instead of 16x and apparently you can.
FYI x1 have one data channel and x16 have 16. The x1 is the small slots on the mb and they get bigger up to 16x if that makes sense!
The 2.0/3.0 etc are just the versions of pcie data rate. Higher the better but only relevant for gaming? Someone will explain better I hope.
Hello
great guide! 😀
but you need a page about mixed gpu setup, and how to optimice it.. i have a 7950 and a 290 in the same rig.. but i only get 1,4mhps with 2-5% rejects
My cards are:
xfx 7950 ghost dual fan
xfx R9 290 (the bad one so no asus bios for me)
my settings are:
setx GPU_MAX_ALLOC_PERCENT 100
setx GPU_USE_SYNC_OBJECTS 1
cgminer –scrypt –thread-concurrency 21712,33792 -o stratum+tcp://stratum01.hashco.ws:8888 -u karlog.1 -p x –intensity 19,19 –auto-fan –auto-gpu –gpu-engine 1100,900 –gpu-memclock 1500,1500 –temp-target 75,80 –temp-overheat 80,90 –temp-cutoff 85,99 -w 256,512 –gpu-powertune -20,5
any ides off what i am doing wrong? :/ (the pc is in a cool room (temps are close to 5-10C)
Have you tried lowering the intensity? High intensity doesn’t always equal to higher hashing rate.
Hello
Yes i just did, when i lower the settings to
i 18 on my 7950
i 17 on my 290
then i get less rejects.. -+ same hash-rate.. but i with one 7950 and one 290 i should get around 1,5-7Mhps right? Or am i silly to think that 1,4Mhps is to little?
I found this.
http://www.overclock.net/t/1437876/290-and-290x-litecoin-mining-performance
Keep us updated with results.
intensity of 19 seems too high try something more like this on you 290 see if it helps
timeout /t 30
setx GPU_MAX_ALLOC_PERCENT 100
setx GPU_USE_SYNC_OBJECTS 1
color 02
cgminer –scrypt -I 13 -g 2 -v 1 -w 256 –lookup-gap 2 –shaders 2048 –thread-concurrency 8192 –temp-cutoff 90 –temp-overheat 85 –temp-target 70 –gpu-memclock 1500 –gpu-engine 1080 –expiry 1 –scan-time 1 –queue 0 –no-submit-stale -o stratum+tcp://pool.d2.cc:3335 -u x -p x –failover-only -o http://ltc.give-me-coins.com:3333 -u x -p x
I really appreciate the budget guide to mining rigs!
How did you get power way up to those cards. Did you use extensions (e.g. Rosewill RCDV-12004 9.8″)?
My Seasonic 1050w won’t come close to getting that high.
Thanks again.
Bill
I have 3 Arctic F12 PWM fans to stick in and around my crate but it’s got me wondering, what’s the best approach with an open air rig?
I did a bit of googling and didn’t find much. The normal approach of intake from cool air and exhaust doesn’t seem to apply quite so much as the rig can breath air from any direction. Exhausts seem to me to be a bit less effective too.
So, maybe just blow air in? Anyone got a bright idea or first hand experience? Or both 🙂
Cheers,
R
Big desk fan, positioned in the most helpful direction…Job done 🙂
I’ve tried a bunch of configurations and find the worst is using a large floor or desk fan blowing into the crate A) you don’t want to disrupt the air being sucked into the fans. for example, you tend to have hot air blowing out of the two ends of the cards. if you have a large fan blowing at the ends of the cards it will be blowing hot air back towards the intake fans on the front of the cards. B) desk fans use a bunch of power (relative to case fans) C) i think generally the random disruption of air caused by a large deskfan blowing into your case can disrupt the flow of air (air pressures etc) of the GPU fans. All this seems to result in inefficient cooling.
Anyway, so I found the best setup is placing case fans directly ontop of cards. Positioned so that two fans are adjacent to each other blowing down. You can have two fans covering two GPU. This way cooler air is forced down towards the GPU fans and does not disrupt the hot air blowing out the ends of each card.
forgot to mention, i found positioning case fans directly onto of 2GPU reduced temp from ~78C to ~74C whereas using a desk or floor fan might use 20W and would barely cool by 2C
Great guide and very inspiring! Because of this I’m going to build my own rig and follow your guide as close as possible.
When I today finally received the last required hardware piece for this rig I started to install every component as described here in the guide and in each specific manuals. But when I pressed the power switch button on the motherboard nothing happens. As a noob on this I don’t really understand how to connect the PSU to the motherboard. I have the exact same equipment as recommended, so here is what I did:
– Both M/B (18 pin and 10 pin) inserted in PSU and connected to motherboard (same slot as in picture)
– 8 pin with PSU end in PSU on top row at CPU/PCI-E slot and connected to motherboard to 8 pin ATx12VI Slot near the CPU (as shown in picture)
– 6+2 pin and 6(with +2 pin not connected) end cords in the GPU (have all three GPU, but I’ll start with just one) and connected to the PSU in the bottom row next to M/B on the left in the 8 pin PCI-E slot
The last one is the most confusing, coz I have a lot of different PCI-E/CPU cables from seasonic package and they all have different number of pins and it is hard to see in the pictures which ones that are used. I have also made sure that all cards are mounted correctly and are all the way in their die. The CPU arrow is pointing the same way as the motherboard arrow (read the someone here in the comments missed that). So then I plug in the power supply cable in the wall and switch the power on on the PSU. Then I press the power switch button on the motherboard and nothing happens. No fans running or anything. The only thing that happens is that my usb hardrive starts to blink.
What can be the problem? I read in the seasonic manual that if something is not connected the right way it will not power up. Have I connected the cables between PSU and motherboard in the wrong way? Is something missing, like I don’t have a hardrive connected to SATA as shown in picture. But is that required for the motherboard to start?
As you see I’m new to building computers and I hope someone can help me with this! Thanks in advance.
On the GPU, there are 6 and 8 pin connectors from the PCIE power source from PSU. It sounds like 8 pin connector is connected with different source.
SOLVED.
I just unmounted every piece and mounted it again and then it worked… very strange.
If you’re still having issues, try disconnecting everything except the motherboard, CPU, CPU fan, memory, and PSU. Just put everything else aside and connect the power supply to the motherboard via the large ATX power connector, and the smaller 8 pin CPU connector. Plug the PSU into the wall, make sure the switch is on, and then press the power button on the motherboard. If it powers up (the CPU fan should spin and the red diagnostic LED should come on), start adding additional components one at a time until you the system refuses to boot, and then you’ll know what to focus on.
If it doesn’t power up with just the motherboard and PSU connected, make sure that all of the power connectors are completely snug – they should snap down all the way into place.
I have seasonic 860 watt platinum PSU and 2 sapphire radeon vapor-x hd 7950 running on ASRock 970 Extreme4 motherboard, can I add one more same 7950 Vapor-x gpu with this power supply.
Thanks
Sam
I have been unable to source the HD7950 GPUs. SO will a 850w PSU I bought still be ok for a 2x Sapphire R9 280x rig?
2x R9 280X should be fine with 850W since I run 3x R9 280X with 1250W.
I’m running 2x Sapphire R9 280X with a Antec 850W Platinum PSU. PSU is barely breaking a sweat.
I have the cards undervolted and running 1125mV @ 1080GPU speed giving me 745Kh/s per card using the optimised bin files for bcminer.
Its pulling 540W at the wall. (standard voltage draws 700-710W at the wall). So I’m considering putting a 3rd 280x on there to see if the PSU can handle it, it should but only when undervolted.
What is your bat file coding?
Hi,
I am building (I know a bit late to the game) a mining rig using 3 7850s. Putting aside the flaming for buying this gpu – can anyone help me get comfortable around which power supply to get? I know psu is very critical, so I want to buy the right one. But it seems the prices move pretty steeply at the higher watts.
Would a 750W be ok? Would bronze be ok or do I need better?
Based on the thread I linked it seems like those 3 would run about 450W, I am using a sempron 145 chip. I pasted some of the text below from that thread. Many thanks!
https://bitcointalk.org/index.php?topic=172603.0
You’ll be fine with a 650 watt PSU. Unless you get free (or very cheap) electricity, or don’t plan to run the rig full time, it’s always best to get a gold or platinum rated unit – it’ll end up being cheaper in the long run compared to a bronze-rated unit thanks to the power savings.
That should work fine… if buying one though try and get gold or plat… much more power… uses less elect and puts out less heat. My new rig is 4x 7850’s as well…
What power supply did you grab uberdag? Thanks.