Setting up your new mining rig
Thank you for purchasing a custom CryptoBadger mining rig! The following instructions will guide you through the set up process. Don’t worry, the process is simple—you’ll be mining in a couple minutes!
(Click on any of the images in these instructions for larger versions.)
Setting up your rig for the first time
Step 1: Unpack your new rig
Carefully open the box, remove the packing materials (take care that the packing paper and bubble wrap isn’t caught on anything as you remove it from the rig), and lift the rig straight up and out of the box.
Check the shipping box for a small plastic bag and set it aside. The bag contains your power cord, USB stick, and various manuals & extra cables that came with your hardware.
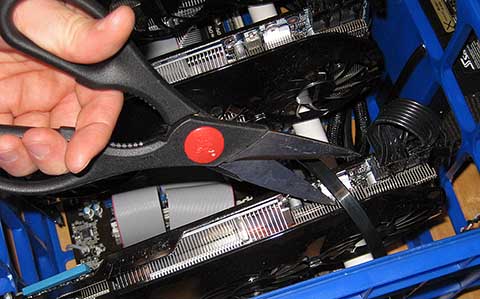
Locate the three (3) cable ties that are securing each GPU (see image below). These ties are a precaution in case the box was inverted at any point during the shipping process, and are no longer necessary (and may interfere with the operation of the GPU fans). Carefully cut each tie with a pair of scissors, and discard them.
Inspect the rig to make sure that the GPU power cables are still snug, and weren’t pulled loose during the unpacking process.
Step 2: Insert USB stick and network cable
Open the plastic bag that came with your rig. Locate the USB flash drive inside the bag, and insert it into the USB port shown in the photo below.
Now plug one end of an ethernet/network cable into your rig, and plug the other end into your internet router.
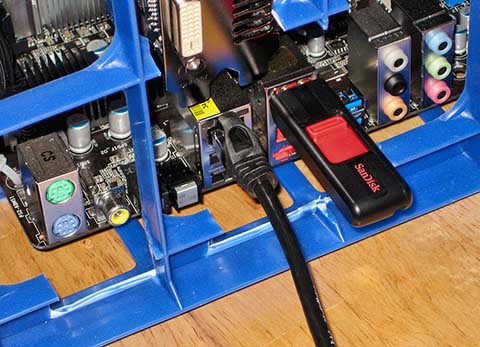
Plug in the USB stick that came with your rig, and then connect your internet router to the rig with a CAT5/6 cable.
Step 3: Plug in and power on!
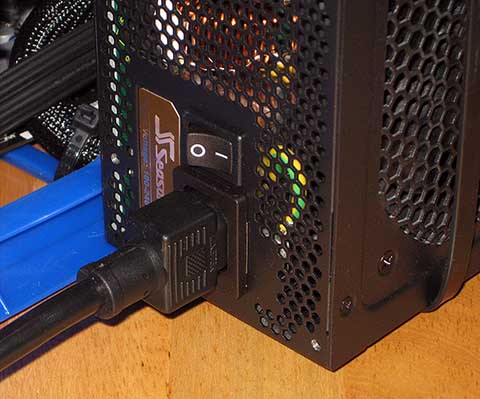
Check the plastic bag that came with your rig for the power cord. Plug one end into the PSU (make sure that it is snug), and the other end into a power outlet (I highly recommend a quality surge protector with ethernet protection).
Flip the switch on the PSU to the “1” position. The rig should power on (if the PSU switch is already in the “1” position, the rig will power on as soon as power is connected).
You’re done!
That’s it! Your mining rig should now be in the process of booting up. In about a minute, your rig will automatically connect to your mining pool (your mining credentials are already pre-configured for you) and begin mining—you’ll probably notice the GPU fans spin up when that happens.
You should be able to log into your mining pool and monitor your hashrate (note that the hashrate given by pools is a very rough estimate and will fluctuate +/- 20% of your actual speed) and mining income. It’ll take about 5-10 minutes for your pool stats to stabilize.
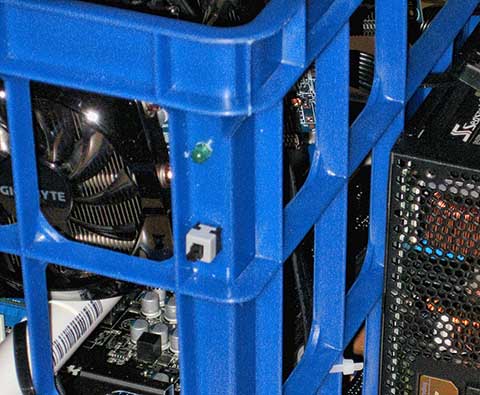
Just one last note. You can shut down your rig with the power button (located next to the LED built into the corner of the crate—see image below). Press it once to shut down (if the rig doesn’t power down within 20 seconds or so, simply hold the power button for 5 seconds). Press the power button again to turn the rig back on. The mining process will always start automatically about a minute after you power it on.
While you can certainly stop here if you wish, most of you will likely want to monitor mining progress directly on your rig as well. Read on to learn how.
Optional/Advanced: Rig Management
Connecting to your rig via SSH
The easiest way to manage your rig is to connect to it from another computer via SSH. There should almost never be a reason to plug a monitor, keyboard, and mouse into your rig directly, although you can certainly do that if you wish.
You’ll need a couple things before you can begin: your rig’s IP address, and an SSH client.
Obtaining your rig’s IP address should be pretty straightforward, although depending on your network configuration some methods may not work for you. Fear not; I’ll give you a few options.
Make sure that your rig is powered up and connected to your internet router, and then head over to your desktop computer. I’m going to assume that you’re using Windows 7—if you’re on a different Windows version or a Mac you can Google the equivalent for your OS or contact me if you get stuck.
Open up a command prompt (click the start menu, type “cmd” in the search box, and click cmd.exe) and try the following:
- Type “
ping miner” (without the quotes). If you get an IP address here, great—make a note of it and skip the rest of these bullets (for most of you, the IP address will start with 192.168.xxx.xxx). - Type “
arp -a” (without the quotes). This should give you a list of all the IP addresses on your local network. If you have a typical network configuration, your mining rig will have a “dynamic” type address, so you can ignore the static ones. If this is a short list (or a list of one), then you can simply try each address. Note that it may take a few minutes for your mining rig’s address to appear in this list if you’ve just recently powered it on. - You can log into your internet router’s administration area—normally there is a section that shows the IP address and name of all currently-connected devices. You’re looking for “miner”.
- If the above methods didn’t work for you, you’ll unfortunately need to plug a monitor, keyboard, and mouse into your rig temporarily so that you can discern its IP address. Connect everything, and you should be looking at the Xubuntu desktop. Simply follow these instructions to get your IP address (the network icon is the up/down arrow at the top of the screen).
Now that you have an address, you’ll need an SSH client. I like Putty—you can download it here.
Now that you have everything you need, fire up Putty (just double-click the putty.exe file that you downloaded), and input your mining rig’s IP address into Putty’s “Host Name (or IP address)” field. Make sure that the port is 22, and the connection type is “SSH”, and then click the “Open” button.
If all goes well, you should be looking at a login prompt. Use these credentials:
login as: miner
password: miner
You should now be authenticated and looking at the linux command prompt.
Ok, so now what? Glad you asked—the next section contains a list of the commands you’re probably most interested in.
Common rig management commands
I’m assuming that you’re already connected to your rig via SSH (see previous section). Alternatively, you can perform these commands locally on the rig via monitor, mouse, and keyboard (open a terminal window first by clicking “terminal” at the bottom of the desktop screen), but I don’t recommend that since performance will be very sluggish while the rig is mining (the GPUs are being pretty much fully utilized to mine, and thus even re-drawing the screen is delayed—SSH uses the CPU and will be far more responsive).
Here is a list of the commands you can enter:
cgm
Use this to bring up cgminer’s monitor (if you just powered on, you’ll need to wait about a minute before this does anything, as cgminer will not have started yet). This is probably the only command the majority of you are interested in. Here you can check on hashrate, GPU temperature, fan speeds, and a whole bunch of other mining-related information. If you want to shut cgminer down, you can press “q” (without the quotes). If you want to return to the linux desktop and leave cgminer running, press control-A, and then control-D. You can get more information on cgminer and what the various output means here. Just a note that this is a custom alias that I’ve prepared, and not a built-in linux command../miner_launcher.sh
If you’ve stopped cgminer for some reason (by pressing “q” while at the cgminer monitor), you can run this command to start it back up. Make sure that cgminer isn’t already running before you use this! After running this command, you’ll need to type “cgm” to view cgminer’s output (see above).passwd
Use this to change your password. Highly, highly recommended if you intend to make your rig accessible across the internet.sudo nano mine_litecoins.sh
Edit your cgminer startup script, which includes your mining pool information and GPU settings. Do not modify this unless you really know what you’re doing! You’ll need to restart cgminer for any changes you make to take effect.exit
End your SSH session and close Putty (alternatively, you can just close the Putty window at any point to end your session).
Access your rig over the internet
I don’t really recommend that you do this, since the operation of the rig is fully automatic and it really shouldn’t need constant attention. However, from time to time this might be useful.
Before you even think about doing this, change your password to something secure (connect via SSH and type “passwd” without the quotes).
First, you’ll need to log into your router’s administration area. You’re looking for a section that says something like “virtual server”—it’ll probably be in an advanced setup section. You need to open port 22 and point it at your mining rig. Every router is different, so check your manual for help here.
Once you’ve finished with your router, you need to find your external/public IP address. The easiest way to do that is to go to whatismyip.com (you can visit from any computer inside your network). This is the IP address that you’ll use in Putty to connect to your mining rig across the internet. If you’ve set up your router properly, you can test it now. If you’re able to connect successfully via your public IP address, it should work from anywhere.
Note that in rare cases, your internet service provider may not allow you to run servers. If that is the case, you’re unfortunately out of luck. Also note that your public address may change from time to time (usually when you restart your internet modem, but it may be more frequent than that for some).
Backup your USB flash drive
I highly recommend that everyone do this, especially if you’re going to be experimenting with your linux and/or cgminer configuration. If you ever get to a point where your miner isn’t working because of something you did, you’ll always have the option of simply restoring your USB stick back to a working state. This also protects you from your flash drive potentially failing at some point down the road.
To create a backup image of your rig’s USB flash drive, you’ll need a handy tool called ImageUSB. It’s free, and you can download it here.
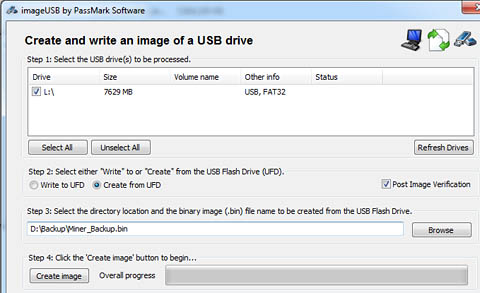
Put your rig’s USB stick into your desktop computer and start up ImageUSB. You should see a screen that looks like the one below. Make sure that your USB flash drive is selected, choose the “Create from UFD” option, choose a location to save your backup, and then press the “Create image” button. In a few minutes, you’ll have a backup file of your USB stick that can be used to re-create it exactly.
Just keep the backup file in a safe place in case you ever need it. If/when you want to restore the backup, you’ll need a 8GB (or larger) USB flash drive. These Sandisk sticks are a good choice (I use them in most of the rigs I build) if you don’t have any laying around. Simply put the blank USB stick into your desktop computer, open ImageUSB, make sure the blank stick is selected, choose the “Write to UFD” option, and choose your backup file. Easy!
FAQ & other issues
Help! My mining rig crashed!
If you’ve made any recent configuration changes, undo them. Most likely, they’re the cause of the crash.
If you haven’t made any recent changes, and this is the first crash in a very long time (a few weeks or more), and the GPU temperatures are normal, then it’s probably safe to simply reboot and ignore it. Mining is fairly stressful on hardware, and a random crash here and there once in a great while isn’t necessarily cause for concern.
If you’ve recently taken delivery of the rig, and haven’t made any changes, one of the GPUs is probably running right at its limit. I run the rigs for at least 24 hours to test them, which should allow me to catch any instability and correct it before shipping. However, in some cases GPUs can run for a few days before eventually crashing. Most likely, a GPU just needs to have its clock speeds lowered a few megahertz.
If you’ve just taken delivery and don’t feel comfortable making the change yourself, I’d be happy to remotely access your rig via SSH and make the change for you. Just let me know.
If you’re comfortable making the change yourself, I’d recommend lowering the core and memory clocks by 5 mhz across the board and seeing if that resolves the issue (no crashes in a week). Make sure to backup your USB stick before you make any changes (see previous section)! If crashes persist, continue to drop the clock speeds by 5 mhz at a time until they stop.
My GPU temperatures are out of control!
I set cgminer to maintain ~80C on each GPU before I ship—this is a good compromise between keeping the GPUs cool, minimizing fan noise, and maximizing fan longevity. If temperatures are creeping up much beyond that (85C or higher), then you may have your rig located somewhere that it isn’t getting sufficient airflow, or the ambient room temperature is simply too high. A good rule of thumb is that if it’s too warm to be comfortable for the average human, then it’s probably too warm for your rig.
If it’s nice and cool wherever your rig is located, then it’s possible that a GPU fan might be failing. If the cards are old (over a year), then this isn’t that uncommon. If your card is still under the manufacturer warranty, then a dead GPU fan should be covered, if you want to deal with the RMA process. Another simpler option is to just point a box fan at your rig when this happens.
My rig hangs on shutdown—why?
There is a bug with the Catalyst drivers and the linux shutdown command. Typing “sudo shutdown now” at the command prompt will likely result in a hang.
I’ve configured the power button mounted on the plastic crate to initiate a clean shutdown, and this seems to usually work, especially if cgminer isn’t running. It does still hang sometimes, unfortunately.
When this happens, simply hold the power button down for 5 seconds to force a power off. Given that most of you will be running these rigs 24/7, hopefully this shouldn’t be too much of an inconvenience.
Is it possible to get any more performance out of my rig?
The short answer is that it’s probably possible if you’re willing to spend a significant amount of time tweaking settings and observing the result over a long period of time. I’m not sure it’s worth it to squeeze maybe another 1% out of the rig, though—the configuration as you received it should be pretty close to optimal, or I didn’t do a very good job. =)
If you’re interested in experimenting, the easiest way to coax more speed out of the rig is to increase the clock speeds on the GPUs. You can try increasing each card in ~10mhz increments or so to see what kind of result you get—just be aware that you might push the rig into unstable territory by doing so. If you cause a crash (it may take a day or two), just revert your changes (it’s best to backup your USB flash drive before you start playing with settings).
I think I messed up my USB stick (or my USB stick died), and I don’t have a backup. Do you offer replacements?
I can send you a replacement USB stick with linux and your cgminer configuration pre-loaded for a fee. Contact me.
And make a backup this time! =)
I’d like another rig (or a few more)—do I get a frequent customer discount? Will you build me a custom 4+ GPU rig?
Contact me directly and we’ll discuss it.


