

 April 11th, 2017
  CryptoBadger
  No doubt some of you saw the Ethereum mining guide for Linux that I published last week and balked at all of that “command-line nonsense”. Linux isn’t everyone’s thing, and that’s ok—if Windows is your OS of choice, then this guide is for you!
While Linux offers some significant advantages when it comes to GPU mining, Windows does have one potentially important edge: undervolting your GPUs currently requires quite a bit less effort under Windows. If you want your mining rig to run at its maximum efficiency, you’ll want to keep power consumption to a minimum, and with Linux that generally requires flashing a custom BIOS to each GPU—whereas in Windows you can usually accomplish this at the driver level with a simple software setting.
The bad news is that if you want maximum performance out of your rig, you’ll probably eventually want to flash your GPU BIOS under either operating system, but we’ll get into that in part 4 of this guide. But if you already know that overwriting your GPU BIOS with a custom replacement is outside of your comfort zone, then sticking with Windows will at least allow you to undervolt.
So with all of that in mind, if Windows sounds like the best option for you, read on for our setup guide!
Build an Ethereum Mining Rig, part 3: Windows Setup
I won’t go into quite the same excruciating level of detail as I did with my Linux guide, as it’s probably a safe assumption that anyone reading a guide about building a custom cryptocurrency mining rig is already quite comfortable with basic Windows tasks. The steps outlined below should be more than adequate for the average Windows user, but feel free to leave comments if anything is unclear!
Step 1: Configure BIOS Settings
Before we even get to Windows, make sure your mining computer’s BIOS settings are in order. Power on your computer, and press the “delete” key a few times immediately after power on. You should end up in the BIOS configuration area. Do the following, then save & exit:
- Change power options so that the computer automatically turns itself on whenever power is restored. The reason for this is two-fold: first, it’ll make sure that your miner automatically starts up after a power outage. Second, it makes powering the computer on much easier if you don’t happen to have a power switch connected to the motherboard.
- Disable all components that you don’t plan to use. This might save a little bit of power, and since your miner will likely be running 24/7, it’ll add up. For me, that meant disabling onboard audio, the USB 3.0 ports, one of the SATA controllers, the Firewire port, and the serial port.
- If you’re running a lot of GPUs (4+), additional tweaks might be necessary to ensure that they’re all recognized by the OS. Exact tweaks vary by motherboard, but setting the PCIe speed to Gen1 is usually a good place to start. No need to change anything now, but make a mental note that you may need to come back and play around a bit if all of your GPUs don’t show up in the OS later.
Step 2: Install Windows 10
Any 64-bit edition of Windows 10 should work fine (a 32-bit OS is not capable of running the Ethereum mining software). Windows 7 and 8 will work as well (as long as they’re 64-bit versions), although you may need to do a bit of extra work to recognize all of your GPUs if you’re running more than 4. The guide is written assuming that you have Windows 10, but the steps for 7/8 should be pretty similar.
I’m going to assume that everyone reading this is capable of installing a fresh copy of Windows. Complete the installation and boot into the Windows desktop before proceeding to the next step. If necessary, also install the LAN/Ethernet driver that came with your motherboard so that you can get online.
Step 3: Configure automatic login
If you’re building a dedicated mining rig, then you probably want your mining rig to boot up and start mining automatically, without any user intervention. We’ll need to enable auto-login for that to be possible.
- Right-click on the Start Menu and select “Run”. Type “netplwiz” (without the quotes) at the prompt, and click “ok”.
- Uncheck the box that says “Users must enter a user name and password to use this computer”.
- Click “Apply”. You’ll be prompted to enter your password to confirm the change.
Step 4: Change power settings to prevent sleep
By default, Windows will go to sleep after 30 minutes without user interaction. Obviously, we don’t want that behavior on our mining rigs. To disable it:
- Right-click the Start Menu -> Control Panel -> System & Security -> Power Options.
- “Balanced” should be selected. Click on “Change plan settings” next to it.
- Change “Put the computer to sleep” to “Never”, then click “Save changes”.
Step 5: Minimize unscheduled reboots due to Windows Updates
Windows 10 introduced forced updates as a pretty controversial “feature”, and not having control over when your mining rig is rebooted to install OS patches could be frustrating. We’ll be setting things up so that your mining rig automatically begins mining any time Windows boots, so leaving automatic updates in place certainly wouldn’t be disastrous if you want to skip this section. But if you’d prefer to retain control over downtime, here are some workarounds:
- If you have Windows 10 Home, use this method
- If you have Windows 10 Professional or better, this method is preferrable
Keep in mind that if this is a fresh install of Windows, it’s a good idea to let the OS install any available updates first (right-click start -> settings -> windows update -> check for updates).
Step 6: Allocate at least 16GB of virtual memory
The author of the mining software that we’ll be using recommends this step, although I’ve never encountered issues with a smaller pagefile (edit 4/19/17: I tried mining on a machine with only 4GB of physical RAM and got terrible performance until I increased my pagefile to 16GB). Here’s what you need to do:
- Right-click the Start Menu -> System -> click “change settings” on the right side of the window (if you don’t see “change settings”, click “system info” first)
- Click on the “Advanced” tab, then in the “Performance” area, click “Settings”
- Click the “Advanced” tab, then click “Change” in the area labeled “Virtual Memory”
- Uncheck the box at the top that says “Automatically manage paging file size for all drives”, then click on the “Custom Size” radio button.
- Enter “16384” (without the quotes) in both the Initial and Maximum size fields, then click “Set”. You’ll need to reboot for the change to take effect.
Step 7: Disable unnecessary Windows visual effects
On systems with borderline hardware, this may increase performance a bit and help keep the OS a bit more responsive during mining:
- Right-click the Start Menu -> System -> click “change settings” on the right side of the window (if you don’t see “change settings”, click “system info” first)
- Click on the “Advanced” tab, then in the “Performance” area, click “Settings”
- On the “Visual Effects” tab (which should be open by default), click on the radio button labeled “Adjust for best performance”, then click “Apply”
Step 8: Install AMD GPU drivers
AMD offers special mining-specific “blockchain compute” drivers that deliver considerably more performance than their standard drivers, so that’s what we’ll be using. If the computer that you’re installing to will not be a dedicated mining rig (eg: you plan to also play games on it, etc), you may prefer to use the latest available standard driver.
- Download and install AMD’s blockchain compute drivers for Windows 10
It’s ok to simply pick all of the default options during installation. Skip including ReLive when asked, as we don’t need it.
Reboot after the driver installation is complete.
Step 9: Generate a wallet address
You can skip this section if you already have an Ethereum wallet address. Otherwise, you’ll need to create one to mine with. There are many ways to generate your own wallet address, but I’ll show you how to do it using the official open-source Ethereum software. Be wary about trusting other methods, as some online creation tools are potentially scams designed to later steal your coins.
- Download the latest release of Geth for Windows here.
- When the download is finished, run the installer and select all of the default options.
- Open a command prompt window (right-click the Start Menu -> Command Prompt).
- Type the following to switch to the Geth installation directory (assuming you installed it in the default location):
cd \Program Files\Geth - Type the following to create a new wallet address:
geth account new
If you see a warning about starting the Ledger hub here, you can ignore it. You’ll be prompted to enter a password, and then to confirm it (use a strong password that you won’t forget!). The output will be a long string between two curly braces { }. That’s your new wallet address—make a note of it. You can easily copy it by right-clicking anywhere in the command prompt window, selecting “Mark”, highlighting your new address by holding left-click and dragging the mouse over the entire address, and then right-clicking again to copy to your clipboard. From there, you can paste your address anywhere using standard Windows shortcuts (CTRL+V).
Important: The combination of the password you just used to create this address *and* the associated encrypted key file is what gives you control over your new wallet address. If you lose either of these, you’ve also lost control of your wallet and all of the coins associated with it—and there is literally nothing that anyone will be able to do to help you. Remember your password, and keep multiple backups of your key file(s)!
Your key file(s) are stored in the %APPDATA%\Ethereum directory. For a fresh Windows 10 install, that means the C:\Users\[YOUR WINDOWS USERNAME]\AppData\Roaming\Ethereum\keystore folder (note that the AppData folder is hidden by default). Copy the entire keystore folder someplace safe to backup your wallet.
If you ever forget your wallet address, you can open a command prompt, return to your Geth installation folder, and type geth account list to see your addresses and the location of their key files.
Step 10: Install Claymore’s Ethereum miner
I talked about my reasons for selecting Claymore’s miner over other alternatives in my Linux guide, but to sum up: it’s currently the fastest, most stable Ethereum miner that’s still under active development. The downside is that it’s not free—about 1% of your mining time will benefit the creator of the software instead of you. However, even after the usage fee, you’ll come out ahead compared to the alternatives.
- Download the latest version of Claymore’s ETH miner (v10.2 at the time of this post). Make sure to get the .zip file and not the Linux tar (also check here for newer releases)!
- Extract the downloaded archive into a folder on your mining computer.
- Open the folder where you extracted the miner, and create a new text file called “mine.bat” (you can use notepad for this).
- Enter the following text into your mine.bat file exactly as written (but do make sure to substitute your own wallet address—see note below):
timeout /t 15
setx GPU_FORCE_64BIT_PTR 0
setx GPU_MAX_HEAP_SIZE 100
setx GPU_USE_SYNC_OBJECTS 1
setx GPU_MAX_ALLOC_PERCENT 100
setx GPU_SINGLE_ALLOC_PERCENT 100
ethdcrminer64.exe -epool eth-us-east1.nanopool.org:9999 -ewal YOUR_WALLET_ADDRESS/Miner01 -epsw x -mode 1 -allpools 1
pause
Where it says YOUR_WALLET_ADDRESS, use the address you created in step 9 (you’ll need to put “0x” in front of it). The “Miner01” following your address can be changed to any friendly label that you want to give your miner (only important if you plan to run multiple rigs).
Note that I’m using nanopool.org as the mining pool here. It’s a fairly typical ETH pool that seems to have good reliability, but feel free to pick your own pool. Most don’t require registration, and simply payout to whatever wallet address you supply whenever a certain threshold is met (usually whenever you accumulate 1+ ETH). Assuming you stick with Nanopool, you’ll be able to check on your miner’s status by going to this URL after you start mining: https://eth.nanopool.org/account/[YOUR WALLET ADDRESS]
Save and close notepad when you’re done.
Now is a good time to perform a quick test. Simply double-click your mine.bat file to launch the miner. It’ll take a minute or two before it actually starts mining, but it should get there eventually. When you see a scrolling log of outputs that includes non-zero hashrates (expect hashrates in the low to mid 20s for unoptimized GPUs), you’re good to go. If the script fails to start, or you see errors, make sure that you’ve created the script exactly as outlined in the guide.
Press CTRL+C to exit the miner when you’re satisfied that it’s working.
Step 11: Configure your miner to start automatically
We want our rig to automatically start mining whenever it’s powered on or rebooted. That way, we keep mining losses to a minimum whenever a power outage occurs, and we don’t have to worry about manually starting it back up in other situations.
- Open Windows Explorer and navigate to the folder where you created “mine.bat” in the previous step.
- Right-click on your mine.bat file, and pick “Copy”.
- Now, navigate to %AppData%\Microsoft\Windows\Start Menu\Programs\Startup (should be something like C:\Users\[YOUR WINDOWS USERNAME]\AppData\Roaming\Microsoft\Windows\Start Menu\Programs\Startup).
- Right-click anywhere on the empty background of the Startup folder and select “Paste shortcut”.
You should see a shortcut to your mine.bat file appear in the startup folder. Windows should automatically execute it upon bootup.
At this point, we’re done with the essentials. If you’ve done everything correctly, you should be able to reboot and watch your rig automatically start mining shortly after the Windows desktop loads. There are a couple more steps that may be important to you, though.
Step 12 (optional): Optimize clock speeds and undervolt (basic)
We’ll get into more advanced optimization in the next section of this guide, but as long as we’re on Windows, it doesn’t hurt to see what we can accomplish via some basic driver setting adjustments. We should be able to squeeze out some extra performance on most RX 470/480 cards and save a bit of power without venturing into the realm of BIOS mods.
- Open the Radeon Settings app. There should be an icon for it in your system tray. If not, it’s located here: C:\Program Files\AMD\CNext\CNext\RadeonSettings.exe
- Click on the “Gaming” tab at the top left.
- Click on the “Add” button near the top right, then click “Browse”.
- Navigate to the folder where you installed Claymore’s miner, select “EthDcrMiner64.exe”, and then click “Open”.
- You should see a new profile appear on the Radeon Settings App window labeled “EthDcrMiner64”. Go ahead and click it.
- Click on the “Profile OverDrive” tab.
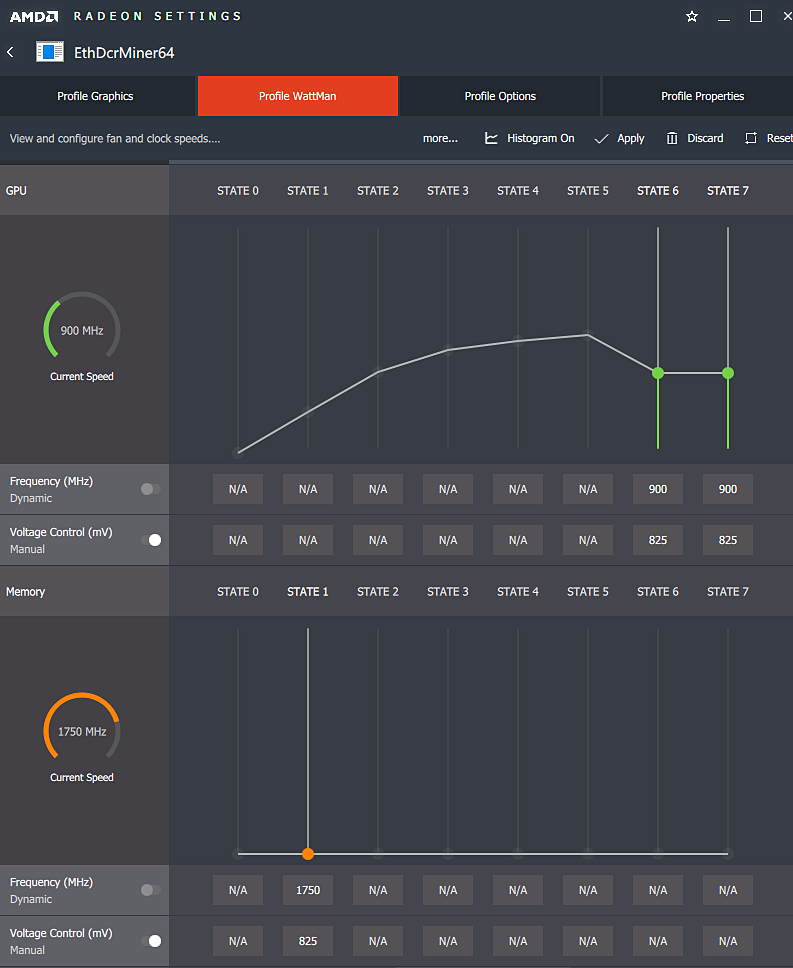
(click for full-size)
You should see something that looks like the image on the left (click for full-size). I’ve cropped in on the two areas that we’re interested in (they’re labeled “GPU” and “Memory”). Find them and start by setting the Frequency to “Dynamic” and the Voltage Control to “Manual” in both areas.
Before we go any further, I’ll just throw out this disclaimer: changing the factory voltage settings on your GPU can result in system instability, crashes, and/or damage. Proceed at your own risk! Honestly, the risk here is tiny—we’re still constrained to basically safe values by AMD’s software, and in the case of a crash we’ll just reboot and be back to factory settings (where we can try again with less-aggressive values).
We’re aiming to accomplish three things here:
- We want to lower the core clock speed as low as possible without impacting performance.
- We want to increase the memory clock speed as high as possible without impacting stability.
- We want to lower both the core and memory voltage as low as possible without impacting stability.
Before we go changing any values, if you haven’t run your miner at stock settings already for a few minutes to get a decent idea of its baseline performance, now is a good time to do that. Look for output along the lines of “ETH: GPU0 XX.XXX Mh/s” while Claymore’s miner is running. There will be some variance from line to line, but that XX.XXX number is the hash rate for that individual GPU. When you have a good idea of your average hash rate, close the miner—it’s time to start making some changes!
- Start by decreasing your core clock speed to 1000 mhz from whatever the factory setting was (in the “GPU” area, change the values for state 6 and 7 to 1000 on the Frequency row). Click “Apply” (at the top right). Restart your miner and see how performance looks. There is a good chance that it’s unchanged. If that’s the case, repeat the process, but decrease the core clock speed by another 50 mhz or so. Keep moving down in 50 mhz increments until you notice mining performance drop. When that happens, bump the core clock back up to the previous value—that’s the sweet spot.
- We’re going to basically do the reverse with the memory clock speed, but there are some important things to know. If you have a GPU that is factory-clocked at 1750 mhz or less (virtually every 4GB RX 470/480 GPU, and most RX 470 8GB GPUs as well—the Sapphire Nitro being the notable exception—then 1750 mhz is going to probably be your limit via this method. Increasing the memory clock beyond 1750 mhz will likely result in a change to less-aggressive memory timings that will result in a loss of performance, and there is no way to prevent this outside of BIOS modifications. So if you have a card clocked at under 1750 mhz, bump it up to exactly 1750 mhz, which will give you a decent performance boost. If you have a 2000 mhz card, you can increase it incrementally, like the reverse of what we did with the core clock. Eventually you’ll experience system instability: artifacts on the screen, a GPU crash, bluescreen, etc. When that happens, back down a bit until things are stable.
- When you’re satisfied that you’ve found the sweet spot for both clock speeds, it’s time to lower voltages. This is pretty straightforward: drop values 25 mV at a time until you experience instability, then bump it back up to last stable value. You should be able to reduce your power consumption a fair bit this way without impacting performance at all (these are great if you want to measure your electricity usage at the wall).
While more significant performance gains are possible by flashing a custom GPU BIOS (which I’ll cover in the next part of this guide), you should at least be able to realize some significant power savings (which has the added benefit of lowering GPU temperatures as well).
The screenshot in this section is from a factory-clocked 1650 mhz 4GB RX 470 GPU. Feel free to use the settings pictured as your starting point if you have a 4GB GPU, I haven’t found any cards that aren’t stable at these settings yet; most go a bit lower on the voltages.
Step 13 (optional): Configure remote administration
Configuring remote administration will allow you to disconnect the monitor, keyboard, and mouse from your mining rig and manage it from another computer—even over the internet, if you wish. Windows 10 Professional and up have the built-in option to use Remote Desktop, although it’s disabled by default and must be configured. It’s a fine option if you’re looking for something basic and don’t want to install additional software.
There are a host of other options available, if you’re on a Home edition of Windows and/or want something a bit more robust. I recommend TightVNC: it’s lightweight, simple, cross-platform, and free. Here are the basic setup instructions for TightVNC:
- Download TightVNC.
- Install TightVNC on your mining rig. Choose a custom installation and make only the server portion of the application available.
- Now install TightVNC on the other computer(s) that you plan to manage your rig with. Choose a custom installation and make only the client portion of the application available.
- If you plan to manage your miner across the internet, forward port 5900 on your router to your mining rig (make sure you choose a strong password if you do this!).
That’s it—you’re done! You’ll probably want to test everything now. The easiest way to do that is to power down your miner. Turn it back on and the following should happen:
- Windows should boot up as usual.
- You should see a 15 second countdown to the Claymore miner’s launch shortly after the Windows desktop appears.
- After the countdown, the miner will start, and your GPUs should start mining.
- You should be able to VNC into your rig at any point after the desktop loads to monitor your miner’s progress and GPU temperatures.
- If you ever need to start the Claymore miner manually (because you quit out of it, or it crashed, etc), simply double-click your mine.bat file, located in your Claymore miner installation folder.
Congratulations—you have your own headless windows Ethereum miner!
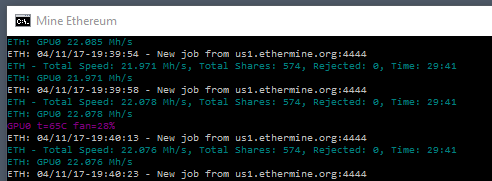
The screenshot above shows a single 4GB RX 470 mining at the settings pictured in section 12. I was able to get about a 10% performance gain over factory settings while reducing power consumption at the same time. That’s good, but we can do better (sometimes much better!) if we’re willing to venture into the world of GPU BIOS mods—and I’ll show you how to do exactly that in the next section of my guide.
 Posted in
  Tags:
Tags: 


Hi guys I wanted to know why I am not able to start mining . I had checked from the ethermine site just in case .
I was following the instructions and made the bat file in my folder which was located in downloads.
The bat file looks like this :
timeout /t 15
setx GPU_FORCE_64BIT_PTR 0
setx GPU_MAX_HEAP_SIZE 100
setx GPU_USE_SYNC_OBJECTS 1
setx GPU_MAX_ALLOC_PERCENT 100
setx GPU_SINGLE_ALLOC_PERCENT 100
ethdcrminer64.exe -epool us1.ethermine.org:4444 -ewal 0x7d59e2e192b7840244ef4ce45989c47b842fce00.Miner01 -espw x -mode 1 -tt 68 -allpools 1
pause
I am a total noob in these things but I really want to start getting better at it .
You don’t offer much detail to help. You say .bat file, so presumably you’re on Windows. A reasonable place to start would be to open Device Manager and check that your GPUs are properly visible to the operating system (and not as generic VGA cards). If not check the physical connections and the device driver software.
Happy mining!
need a forward slash between Eth address and Computer name?
i would suggest you give it a try with https://perfectmine.io
everything is so easy
Perfectmine seems like an expensive way to set up a rig, when following the instructions here is free. (Although tipping is good karma!)
hi I did the whole set up, everything is mining BUT I have no idea how to check my wallet, I did the set up as detailed here but
How can I check it? Is there are step by step for a non computer person?
I have my password and account number but that is it.
Any help would be great, thanks!
In addition to your password and account number, make sure to find the corresponding keystore file and keep it in several safe places. Read more about where to find those here:
https://github.com/ethereum/go-ethereum/wiki/Backup-&-restore
To see the content of your wallet, you can use a number of services that track transactions on the Ethereum blockchain, like Etherscan:
[Previous reply sent prematurely.]
In addition to your password and account number, make sure to find the corresponding keystore file and keep it in several safe places. Read more about where to find those here:
https://github.com/ethereum/go-ethereum/wiki/Backup-&-restore
To see the content of your wallet, you can use a number of services that track transactions on the Ethereum blockchain, like Etherscan:
https://etherscan.io/
Just enter your wallet address, and you’ll see all your incoming transactions.
Keep in mind that most mining pools don’t pay out until you reach some threshold. For example, with Etheremine that threshold is 1Eth, but you can lower it using the Settings tab.
You’d be wise to generate a second wallet, and transfer your earnings to it. That way, you can reassure yourself you know how to manage the Ether you’re generating. Ethereum Wallet is the usual tool.
Happy mining!
[…] YOUR OWN ETHEREUM MINING RIG PART 1: HARDWARE PART 2: LINUX SETUP PART 3: WINDOWS SETUP PART 4: […]
can some one explain after step 9 I have created password and generated wallet ID but after this where do I use password ? login some where ?
You will need that password when you want to transfer Ether out of your wallet.
Zelda thank you, so now I have some coins in my ether wallet how do I transfer to my other ether wallet ?
Hi Gg, are you using geth as a miner ? which pool are you working with ?
I am using geth ethermine is the pool.
As CryptoBadger suggests elsewhere, you’ll want to use Ethereum Wallet, available here:
https://github.com/ethereum/mist/releases
(Don’t bother with Mist, which provide a superset of functionality that you won’t need.)
Once you’ve installed it, put the keys for the wallets from which you wish to transfer Ether in the appropriate folder. On a Mac, that’s ~/Library/Ethereum/keystore. Once you’ve done that, the wallets will show up when you start the Ethereum Wallet application, and the rest is pretty obvious.
To speed things up, under the Develop menu, select Sync with Light client (beta). Otherwise, you’ll have to wait hours or even days to sync with the entire blockchain.
You might consider transferring small sums at first, to minimize losses if you make a mistake. Feel free to use my tip jar if you’d like. I’ll confirm the transaction with a nice thank you note. 🙂
0x61a7d5222cbbC4c86AF8f26954D4BA2a8983DBC9
lol Thank you will try to follow above.
Hi,
what can I do with the GPU error:
Not enough GPU memory to place DAG. You cannot mine this coin…
How can I fix it?
Seems pretty clear: You need to get a new GPU that has enough memory to place the current DAG. 4GB works for now, 8GB will work for longer.
which gpu? How much RAM do you have? Most probably you’ve not set enough virtual memory.
Amazing Guide! Got me up and running on a dual RX 580 rig! I will send some eth once I get a payout.
However, I had run simpleminerOS for a couple of days juist to get started and it had a way to over/under clock the cards and set fan speed etc. How can I do that? Tia!
With AMD cards under Linux, the best way is usually to flash your custom values directly to each GPU’s BIOS. You can read about the process here.
I got AMD ADL library not found. error message, this prevents to user clock and volt tweaks in claymore.
Do you have any tips to install AMD ADL drivers ?
Thanks !
Should I be using the most recent amd drivers or the blockchain compute drivers?
Whichever gives you a better hashrate and/or stability. For most people, that’s probably the blockchain compute drivers.
If the computer you’re mining on isn’t a dedicated mining rig (eg: you also play games, etc on it), you may want to consider the standard drivers.
I build the rig with the Newest ASUS B250 Mining Expert mother board that supports up to 19 GPUs, and I have three GPUs, the one that connects to PCI-E is GT610 and the other two is connected with usb to motherboard. once starting the minin in Win 10, it only recognizes the GT610 that is connected to the main PCI-e port,
What is the issue?
I was struggling for few days to find a solution and then I gave up. I’ve used a different miner and it worked immediately.
Hi,
just fininsh my 1st mining rig 2xRX480-8Gb + 4xRX580-8Gb
Got around 175Mhash/s
One thing : you MUST install latest AMD mining driver. Went from 20Mh/s to 24ish Mh/s and I wasn’t able to get more than 22Mh/s with stock driver went straight to 29+ with the mining ones.
As this post is about building a mining ring, I would recommand to use ONLY mining drivers. difference on a 6GPU rig is about 1000$ profit / year on today’s numbers…
Hi, which motherboard are you using?
asus h81 btc pro
Is it ASUS or ASRock?
asrock sorry
Very useful information, thanks!
Could you please post the exact version number of the AMD driver you’re using?
Thanks!
first run a “clean uninstall”
http://support.amd.com/en-us/kb-articles/Pages/AMD-Clean-Uninstall-Utility.aspx
and then mining driver for windows 64bits.
http://support.amd.com/en-us/kb-articles/Pages/Radeon-Software-Crimson-ReLive-Edition-Beta-for-Blockchain-Compute-Release-Notes.aspx
Thank you, sir!
29+ with just blockchain drivers without BIOS mods and OC? How much are you overclocking?
Btw both RX 480, RX 580 can do 31 MH/s.
thank you for all the great information on this thread. Looking to create my own rig. I’ve estimated the cost to be approximately $5,000. Geforce 1070 8g x 6.
With your experiences, what would be a ball park time frame for a return on investment?
https://etherscan.io/ether-mining-calculator
6 x 1070’s will yield around 180-192 MH/s (when overclocked and set 65%-70% power limit). It consumes roughly 90-100W per 1070. So your rig would yield around 340-360 per month (assuming electricity is 10 cents per KWh) according to today’s rate for ETH which is $424.
after changing cd to geth directory it wont let me type in the cmd window or paste to it any ideas why this command in the instructions blocke typing ?
Are u running cmd as administrator? What are u trying to do I geth?
Hi Cryptobadger,
I’m one of your pupil from this guide and it worked like a charm!
Thank you very much for your help.
And now that Bitcoin Gold (BTG) is out and mine-able with the same rig, I want to hear your take on the new BTG Coin, and I wonder if you’d make a guide on BTG mining.
Thank you very much beforehand.
Keep up the great job!
On the optimisation part, do you remove all but 1 graphics card to save time? Aussuming that the GPU’s are the same, once you figure out the sweet spot, you make the same changes to all of them.
Correct?
Different cards will tolerate different levels of overclocking and undervolting. Each batch of silicon chips is slightly different, and the point of this optimization is finding an operating point right at the edge of stability. Thus each GPU needs different tuning, if you wish to squeeze out the last bit of efficiency.
So what would building this rig cost, what would be the running cost per month, and how much Ethereum would it actually mind to your wallet? Also. With the Ethereum in your wallet how do you get cash from it to cover your operating expense. What mb internet is required as well?
U can get all this info using a ethereum calculator. As for cost to build, that depends on what card u use. Amd card are less expensive but to get the full hash rate from the cards u need to mod the bios. Nvidia is much easier for new people but more expensive. I started with 1070s and now have 50 rx580s also
Will windows XP work? I have windows XP from your last tutorial in 2013 I still have 1 7950 card left over so testing things o that and then I will add 2 more rx 470 or above.
Windows XP? Seriously? 🙂
The time you would waste trying to get drivers etc. working with XP would more than pay for an upgrade to Windows 10.
Thank for the reply to my winxp question. Will use linux instead
IMO just use ethOS. I’ve always used windows. I used it based on cryptobadgers guide back in 2012/13 and have been using it again for windows 10 for past 6 months or so. Its great but i tell you what. It took me exactly 30minutes to get up and running with ethOS using a test motherboard + single 1060 this morning while in a rush before getting ready for work. It is dead simple. I just wanted a proof of concept before pulling my main windows rig apart.
I also wanted to build a new 6x 1070 rig using ethOS.
Its so easy. buy os for $39USD. install to USB with their step-by-step instructions. boot up rig enter your nanopool details and boom its mining. and for me, it increased hash speed with zero fine tuning. went from ~18.5MH/s per single GTX 1060 on windows, to ~19.9Mh/s on ethOS.
Super easy setup and it should be more stable and easily configured headless over SSH.
I followed this guide for configuring ethOS https://bitform.at/post/170523-3/
they also have parts 1 & 2 for hardware setup but you probably already know about that, and cryptobadgers guides are top notch for that anyway.
I used gpushack to buy ethOS https://gpushack.com/ They also sell packages of MB+CPU+RAM+ssd+OS and also top quality usb risers.
Here is guide i used to install ISO to a spare USB3 USB stick i had. its running perfectly from it
http://ethosdistro.com/kb/
Claymore’s miner requires a 64-bit OS, so if you happen to a 64-bit copy of WinXP, it’s probably possible to get everything working. But I tend to agree with Zelda – it’ll probably save you a lot of time and headache to just find a copy of Windows 7/10, or give Linux a try.
I have an RX470 4gb 1650 MHz GPU but upon upping the memory clock speed and decreasing the core clock speed, I was met with results that lowered my hash rate (from ~18.5 MH/s to ~17.5 MH/s). Help is appreciated!
Did all like its written and can see thats its mining in (https://eth.nanopool.org/account/%5BYOUR WALLET ADDRESS]) but how can i trasfer to my other wallet?
https://eth.nanopool.org/account/fd61e6fce1e6593f36944c0fd046d2a1f2198512
Account not found above.
Batch file seems to be running perfectly, but I have nothing in my wallet after 30 minutes or so. How long will it take before I can see something in my wallet? 1 hr? 1 day? I want to make sure it’s setup properly before I set and forget it.
When I put in my wallet address here: https://etherscan.io/address/0xfd61e6fce1e6593f36944c0fd046d2a1f2198512
I can see data, but there is nothing to show. All zeros.
This is my batch file setup
timeout /t 15
setx GPU_FORCE_64BIT_PTR 0
setx GPU_MAX_HEAP_SIZE 100
setx GPU_USE_SYNC_OBJECTS 1
setx GPU_MAX_ALLOC_PERCENT 100
setx GPU_SINGLE_ALLOC_PERCENT 100
ethdcrminer64.exe -epool eth-us-east1.nanopool.org:9999 -ewal 0xfd61e6fce1e6593f36944c0fd046d2a1f2198512/Miner01 -epsw x -mode 1 -allpools 1
pause
Am I doing everything correctly? Is it just a dely. Does anyone see any mistakes I made?
Account
not found
Remember: to add your account to the database you should find at least one share
You won’t see anything in your actual wallet until you reach the cashout threshold on Nanopool (I think the default is something like .5 ETH, but it may have changed recently). Everything you mine in the meantime will show up on your Nanopool account status page (https://eth.nanopool.org/account/YOUR_WALLET_ADDRESS).
Everytime I try to download the blockchain driver it say error????
I was able to mine and get something in my wallet. I read mutiple tutorials, but I can’t go any faster than 2.7 mega hash. I have 1 4gb gtx 970. Seems everywhere I read average is 20mh.
Is it worth it to mine anymore? Especially with 1 graphics card? I have 8350fx quad core processor with 8gb ram.
I have no clue how to increase my hash speed. Any help would be appreciated.
Hello Everyone,
I am trying to run my miner on windows, but when I try to run the Batch file I get this error
“EthDcrMiner64.exe” is not recognized as an internal or external command
Can you guys tell me what I am doing wrong?
You antivirus has detected the file “EthDcrMiner64.exe” as virus and has deleted it. Please change your antivirus settings to treat this file as safe and then it should work.