

 April 20th, 2017
  CryptoBadger
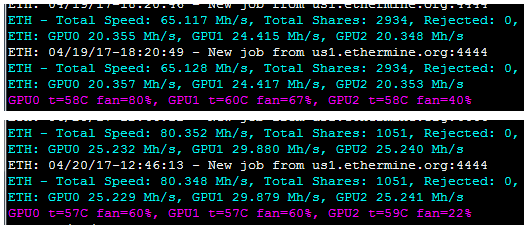
Before (top) and after (bottom) GPU BIOS mods.
This fourth installment of our Ethereum mining guide will focus on optimizing your rig’s performance via GPU clock speed and voltage setting tweaks to achieve maximum efficiency.
The tweaks that I outline in this article are applicable whether you’re using Linux or Windows. If you’re using the hardware that was recommended in the first part of this guide (or very similar hardware), you should expect to achieve Ether mining performance gains of 20-25%, compared to stock settings! At the same time, you’ll reduce power consumption by 10-15% (and consequently, lower GPU temperature and fan noise).
More speed for less power—how is that possible? Click “read more” to find out, in our mining performance optimization guide!
Build an Ethereum Mining Rig, part 4: Optimization
Let’s get the bad news out of the way up front: achieving these levels of performance gain require flashing your GPU BIOS with custom replacements. Doing this incorrectly may leave you with a non-working GPU that can be difficult or (sometimes) impossible to restore to factory settings. The steps that I outline in my guide will show you how to minimize the risk that you end up with a bricked GPU, but always remember that messing around with BIOS settings can potentially result in unstable hardware.
Disclaimer: Installing a custom BIOS and/or changing factory clock speed & voltage settings on your graphics card(s) may cause system instability, may harm your hardware, and probably invalidates your warranty. I assume no responsibility for hardware damage if you choose to follow this guide!
With that said, I’ve flashed probably close to a hundred GPUs, and I haven’t destroyed any hardware yet. =) If you proceed, just make sure to follow the steps in order, don’t take any shortcuts, and stop if there is anything that you’re confused or unsure about.
What you’ll need
There are ways to create and flash custom BIOS mods to your GPUs without some of these things, but I believe this method is by far the most user-friendly:
- A computer running Windows
You’ll flash your GPUs with this computer. My mining rigs run Linux, but I keep a small/cheap SSD loaded with Windows 10 handy for testing/BIOS flashing purposes (I simply swap the SATA connector between disks when I want to switch OSes). Any version of Windows 7, 8, or 10 will work fine (note that you don’t have to activate Windows to install it). Or, you can simply temporarily move your GPUs to another computer running Windows to flash them. - ATIFlash / ATIWinFlash
You can download the latest version of ATIFlash here (v2.74 at the time of this article). We’ll use this to read and write BIOS files to our GPU hardware. - Polaris BIOS editor
You can download the latest version of Polaris BIOS editor here (v1.4.1 at the time of this article). We’ll use this to modify BIOS files. - ATI Pixel Clock Patcher
You can download the latest version of ATI Pixel Clock Patcher here (v1.4.5 at the time of this article). We’ll need this to get AMD’s Windows driver to recognize a modded BIOS. - A Kill-a-Watt electricity usage monitor (or similar device)
Not strictly required, but I highly recommend this—it’ll pay for itself! I have two of these and consider them invaluable in dialing in the performance of my mining rigs. When doing optimization tests, I often find that the last few percentage points of speed gain come at a much larger cost in power consumption (and thus, a decrease in overall profitability)—having an electricity monitor allows me to find the efficiency sweet spot between raw speed and electricity usage. - Some baseline information on each of your GPU’s factory performance to compare your modifications against. If you haven’t already, let each GPU run for 5+ of mining and record its speed, temperature/fan speed, and power consumption at the wall (assuming you have a Kill-a-Watt). This will be immensely useful later when trying to figure out if your mods are beneficial or not.
From this point on, I’m going to assume that you’re following directions on a Windows computer with the above software available, ideally with a Kill-a-Watt connected for testing. I’m also going to assume that you have a single GPU installed. If you have multiple GPUs, I highly recommend that you disconnect all but one, and work on them one at a time. All of the software does support multiple GPUs, but you’ll keep confusion and the potential for mistakes to a minimum by only connecting one video card at a time. The times that I’ve made mistakes with BIOS flashing, it has always been because I flashed the wrong card due to having multiple GPUs connected!
Step 1: Make a backup of your factory GPU BIOS
 Before we start, open your Radeon Settings and disable any overclocking/undervolting that you have set up through WattMan (if you followed my Windows setup guide, you’ll need to temporarily disable the “EthDcrMiner64” profile that you created in step 12). After that:
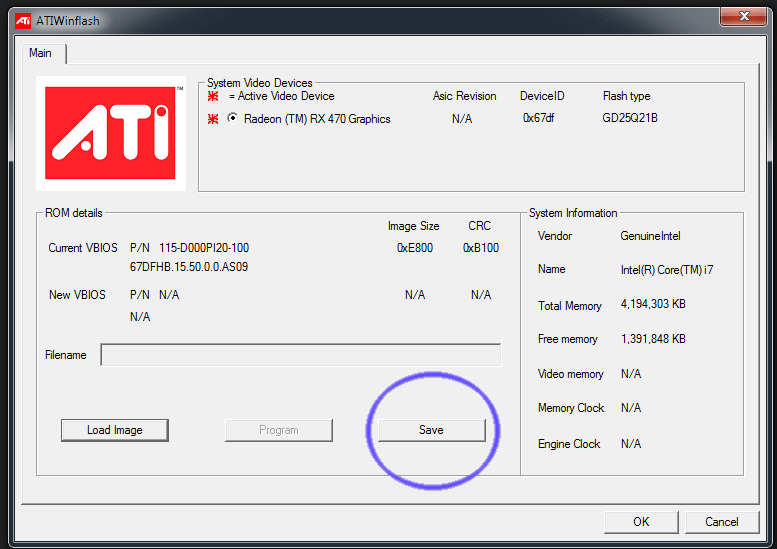
- Open ATIWinFlash (extract the .zip file you downloaded and double-click ATIWinflash.exe).
- You should see your GPU detected at the top under “System Video Devices”. Again, I highly recommend that you have only a single GPU connected for this entire process!
- Click “Save” to make a backup of your GPU’s BIOS data. Don’t lose this file!
Your computer might appear to freeze for a few seconds while your GPU BIOS data is being saved—this is normal. When ATIWinFlash is done, you can close it for now.
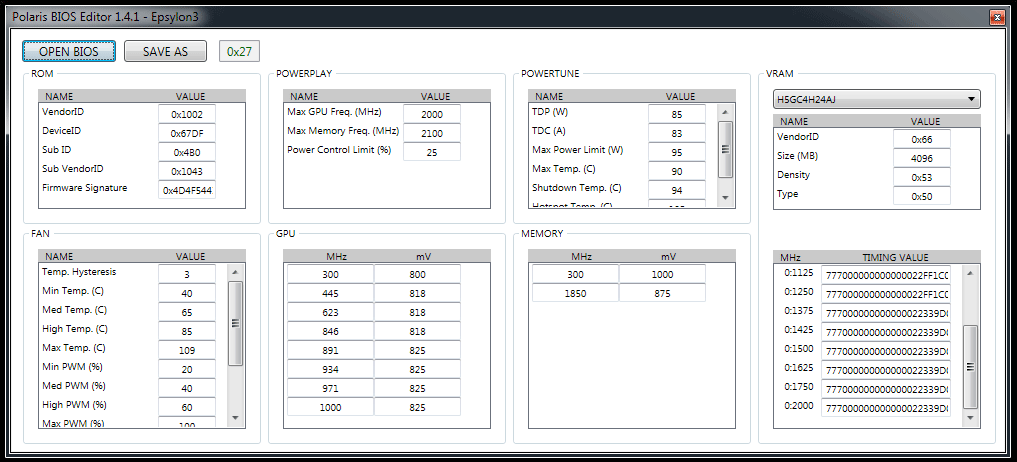
Step 2: Open your GPU’s factory BIOS with Polaris BIOS editor
Here is where we’re going to be making all of our modifications. Editing the BIOS data gives us access to a few values that we normally wouldn’t have any control over—most importantly, the memory timing values.
- Open Polaris BIOS Editor (extract the .zip file you downloaded and double-click PolarisBiosEditor.exe).
- Click “OPEN BIOS” in the top left, then browse to where you saved your GPU’s factory BIOS in step 1, and double-click it to open it.
You should see something like the image below (click for full-size). I’ve highlighted the areas that we’ll be modifying in blue—if you stick to these areas, you’ll generally be safe from getting yourself into too much trouble, as the GPU doesn’t enter these states until it’s mining or otherwise working hard. Note that the first entries in the “GPU” and “Memory” section are outside of the blue area and should never be touched unless you absolutely know what you’re doing. Likewise, the memory timings at 1500mhz and below should usually be left at default settings.
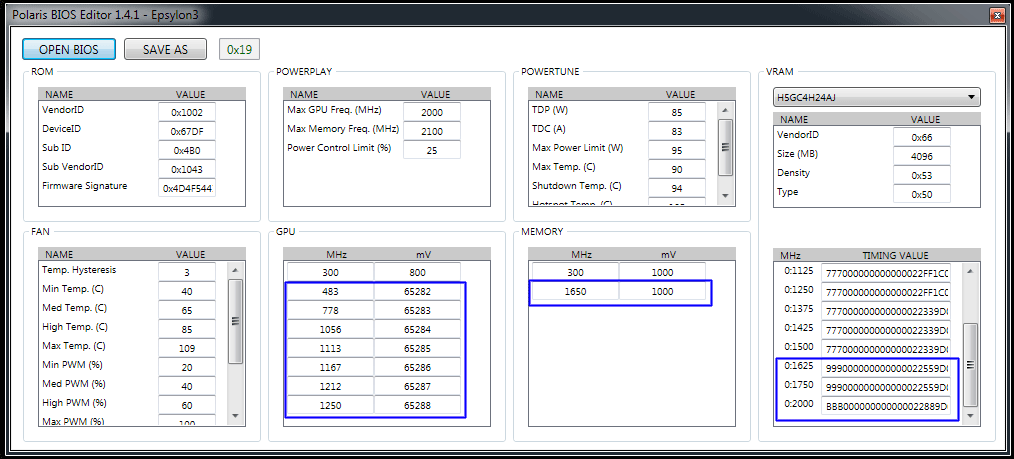
My screenshot shows the default BIOS from an Asus 1650mhz factory-clocked RX 470 4GB GPU. If you have a 4GB RX 470, it should look pretty similar, although many of the values will likely differ by a small amount. At these factory settings, I get around 20 Mh/s in Claymore’s Ethereum miner, which isn’t spectacular.
If you don’t see memory timing values for your card, try this version of Polaris instead (click the “clone or download” button, then “Download ZIP”).
When you’re comfortable, let’s move on and start modifying some values.
Step 3: Modify BIOS memory timing values
At this point, you should still have Polaris BIOS editor open, with your GPU’s factory default BIOS loaded. We’re going to focus on the lower-right corner area containing memory timings.
If you have a RX 470/480 that has memory clocked at 1750mhz or less (eg: most 4GB cards), you may have noticed that it’s really easy to overclock past 1750mhz via the driver (in Windows, anyway). You probably also noticed that mining performance immediately tanks as soon as you do so: a 1751mhz overclock results in much slower performance than 1750mhz. You may have wondered why, and these memory timings are the answer. On most 4GB cards, the GPU switches over to less aggressive memory timings at clock speeds beyond 1750mhz, which results in slower performance even though the absolute clock speed is higher. We’re aiming to fix that.
This isn’t an exact science, and some experimentation may be necessary for you to achieve optimal results, but what follows is a good starting point and should work for 99% of you:
- If you have a RX 470/480 that is factory clocked at 1750Mhz or less (eg: nearly all 4GB cards):
Copy the value in the 1500Mhz field, and then paste it into all of the fields after it (1625mhz, 1750mhz, 2000mhz). The easiest way to do this is to click anywhere inside the 1500mhz value, then press CTRL+A to highlight the entire string, and then press CTRL+C to copy it. Then you can simply click into the remaining fields and press CTRL+A followed by CTRL+V to paste over the existing value. - If you have a RX 470/480 that is factory clocked at 2000Mhz or more (eg: nearly all 8GB cards):
This is a bit trickier, but generally most cards will be most stable by simply copying the value in the 1750mhz field into the 2000mhz field. The easiest way to do this is to click anywhere inside the 1750mhz value, then press CTRL+A to highlight the entire string, and then press CTRL+C to copy it. Then you can simply click into the 2000mhz field and press CTRL+A followed by CTRL+V to paste over the existing value.
Once you’ve made the edit that is appropriate for your GPU, click on the “SAVE AS” button located at the top left. Save your modded BIOS with a new name (don’t overwrite your factory BIOS!), and then close the Polaris editor when you’re done.
Step 4: Flash your modified BIOS back to your GPU
 Now it’s time to write your custom BIOS back to your hardware. This can be a little scary if you’ve never attempted anything like this before, but generally if you’ve followed the steps as written, you shouldn’t have any issues. Again, there are no absolute guarantees, so proceed at your own risk!
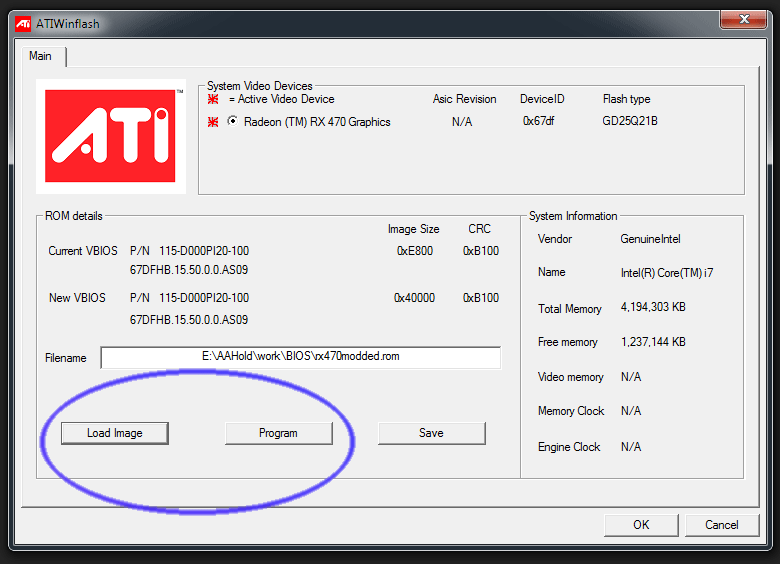
- Open ATIWinFlash back up.
- Click on the “Load Image” button and select the modded BIOS that you created in step 3.
- Click on the “Program” button to write the BIOS to your GPU. Your computer may appear to freeze for what might seem like a long time—this is normal.
- You’ll be prompted to reboot when ATIWinFlash finishes. Don’t reboot yet—we have one more thing to do. Go ahead and close ATIWinFlash, though.
- Unzip the ATI Pixel Clock Patcher utility that you downloaded and double-click atikmdag-patcher.exe. It should offer to apply a patch, let it. You only need to do this step once per GPU, even if you flash it multiple times. If you skip this step, when your computer reboots, the AMD display driver will refuse to load because it’ll detect that your GPU BIOS has been tampered with it.
- Go ahead and reboot after the patch is applied.
If you’ve done everything correctly, your computer should boot normally, and you’ll arrive back at the Windows desktop, ready to test your changes.
Step 5: Test your modified GPU BIOS
Now is a great time to fire up your miner and see what kind of difference your changes made.
If you have a 4GB card, the timing change alone should be enough to get you from ~20 Mh/s to ~24 Mh/s. If you have a 8GB card, you likely went from ~24 Mh/s to ~28 Mh/s. We can do better, but that’s a pretty good start!
Power consumption will be unchanged (or even up slightly, due to the more aggressive timings), but we haven’t touched voltages yet.
Once you’ve recorded your GPU’s new metrics (speed, temperature/fan speed, power usage), we can move on.
Step 6: Find appropriate clock speed and voltage values for your GPU
Before we head back into Polaris BIOS editor to increase memory clock speed settings, it’s a good idea to have an idea of how high we can push them. It’s a lot easier (and faster) to make these tweaks in Windows via the driver (Radeon Settings/WattMan), and then once we’re confident on the proper values, write them to BIOS.
So if you haven’t already, read step 12 of my Windows guide to get an idea of the process around overclocking and undervolting via driver-level edits. If you’ve already gone through the process, you’ll need to repeat it, as your new more-aggressive memory timings invalidate all of your previous data—you won’t be able to push the memory clock speed as high as you previously could (but performance will be much better).
Using Radeon Settings/WattMan in the manner that I describe in my Windows guide:
- Increase memory clock speed slowly until you see signs of system instability (incorrect share warnings in your miner, artifacts on screen, crashes)
- Decrease core clock speed slowly until it starts to significantly negatively impact performance
- Decrease memory voltage slowly until you see signs of instability (you may not be able to significantly lower memory voltage, depending on your card)
- Decrease core voltage slowly until you see signs of instability
Don’t rush; make sure that your system is stable before moving on. It’s possible to reach speeds of nearly 29 Mh/s with 4GB cards, or over 31 Mh/s with 8GB cards, but watch out for power consumption and stability issues—it’s not always worth running at higher speeds. I’ve found that 25-26Mh/s for 4GB cards, and 27-29Mh/s for 8GB cards is right around the sweet spot for maximum efficiency and stability. When you feel confident that you have good clock speed and voltage values, then move on to the next step where we’ll write them to the BIOS.
Step 7: Write new clock speed and voltage values to GPU BIOS
Note that this step is not strictly necessary if you plan to use Windows for your miners long-term. You can certainly just dial in whatever values you found in the previous step at the driver/WattMan level and call it a day. I prefer to have everything done at the BIOS level, as then I don’t have to worry about software configuration, and can move GPUs between environments with ease.
If you’re running Linux, this is the only way (currently, at least) to overclock and undervolt.
- Open Polaris BIOS Editor back up.
- Load the modified BIOS that you created in step 3 (click “OPEN BIOS” in the top left and browse for your modded .rom file).
- In the “Memory” area, carefully input your values for memory clock speed and voltage in the bottom row.
- In the “GPU” area, carefully input your values for core clock speed and voltage in the bottom row. You’ll probably be overwriting a 65xxx value in the voltage column—that’s ok.
- Still in the “GPU” area, fill in the table between the bottom row and the first row (but do not touch the first row!) with values that ramp up to whatever you entered in the bottom row. It isn’t super important to get these values “right”; you can look at the original table and see what percentage adjacent rows vary by, and just calculate new values that way.
Here is my finished, modded BIOS for my Asus RX 470 4GB (click for full size):
The original factory BIOS is shown in step 2 for reference. Note that I’ve made absolutely no edits outside of the area I originally outlined in blue. I get over 25 Mh/s after the modifications (+25%), while using ~15% less power compared to stock. These changes are fairly conservative; I’m stable at nearly 27 Mh/s on this card with more aggressive settings, but the increase in power consumption isn’t worth it at my electricity rate.
If you’re looking for a good starting point, the settings pictured here should be stable in just about every 4GB card (in the timings section, just copy the 1500mhz value to every row below it).
When you’re done making your edits in Polaris, save your final BIOS (click “SAVE AS”) as a new file. Then open up ATIWinFlash and write the new .rom to your GPU (same as step 4). Reboot and test!
Step 8: Repeat steps 1-7 for each of your remaining GPUs
Yes, it’s a little tedious. But it goes quite a bit faster after your first one. Don’t be tempted to simply take the first BIOS that you create, and flash that to all of your other cards—every GPU is different, even between cards that are the same brand/model. It’s quite possible (likely, even, if you have a lot) that some of your cards will be capable of stable speeds 25+ mhz higher than others. Test them all; it’ll save you headaches later.
Analyzing the cost/benefit of different setups
If you’re stuck on whether or not an extra 1-2 Mh/s is worth 25 watts of additional power consumption, remember that you can use an online calculator to help simplify things. For example, here is a GPU hashing at 25 Mh/s @ 100 watts vs another GPU at 26 Mh/s @ 125 watts (assuming $0.15 per kWh, remember to plug in your own rate!). At the time that this was written, the slower GPU is slightly more profitable.
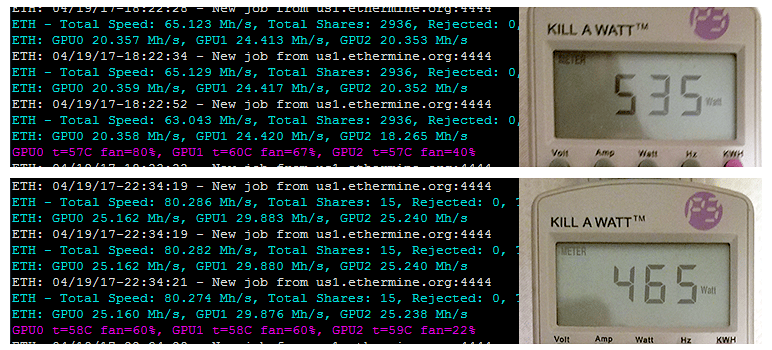
My test rig, running two RX 470 4GB cards, and one RX 480 8GB card, mining ETH in Linux. Top is stock factory settings, bottom is after BIOS mods outlined in this guide. From 65 to 80 Mh/s, using 70 watts less power!
In the next and final installment of this Ethereum mining guide, I’ll post a mining FAQ and some other tidbits that didn’t quite fit anywhere else. Until then, thanks for reading, and feel free to leave questions or comments!
 Posted in
  Tags:
Tags: 


Hi,
Have a MSI twin frozr 280x and after backing up my bios with the ATI tool, i open it in polaris and it says the bios is smaller than 512 and cannot be edited and when i continue, all the values in the various blocks are jumbled rubbish?
Bios rom is 256kb big.
Any ideas????
Suspect you may be using wrong polaris BIOS editor. There is at least 2 types that I know of, perhaps more, I needed to use the Micron memory one for my GPU and that opened the BIOS file just fine with no corruption.
If its not that you could try exporting Bios from GPU-z instead?
I used your settings on my RX470 (4GB) and now it refuses to boot. I get the windows logo for a few seconds and then vertical lines on the screen. Is there any way for me to recover the card or is it basically trash? Thank you.
Hi Nathan
I was messing about with Bios settings on a sapphire Rx470 OC 8GB with Micron mem and basically did exactly this!
Simple fix I found (which was easier than I was expecting it to be), was to boot into safe mode, open device manager and remove your RX470 display adapter from the list of devices.
If you now reboot windows again normally the drivers for high clock/mem speeds wont even be loaded so you can then get back into windows normally again and then reflash the bios and start again.
Hope this helps 🙂
Hi! First I want to thank you for the incredible detail and effort you’ve put into making these guides.
I have a machine running multiple AMD RX560s. Yesterday I successfully followed your instructions to get one of my 560s reflashed and running at higher speeds. I didnt have the time to reflash all cards tho, so I started to go through the process of installing all my cards again. Basically when I added a second card (non-flashed), it caused my first card (flashed) to fail.
Have you encountered this before, and any advice on resolving it?
Thanks!
Changing mv on bios os not possibile for almost every RX card. You see 100W power consumption because power controller put low mv for low MHz core. You can do 80W with lower mv for 8GB 28MH, 4GB 27MH.
Hi,
Perfect guide, thank you.
I was wondering if you can see if something else is going on that crashes the videocard, as my memory overclock is not that high (4.5%)?
I have a Sapphire Radeon RX 480 NITRO+ 8G OC, with 2000 MHz stock memory frequency and 1342 stock GPU clock, and followed your guide. I copied the 1750 timing into the 2000 field, even though the 1625 was different from the 1750 field I didn’t use that (is it still an option though?). Runs smooth.
Then I downed the GPU clock, runs stable. Then upped the memory clock a little, and when I believe it was stable, I undervolted some.
However, only after 10 hours the videocard crashes.
Could you see why? Exact settings, as well as the HWInfo log, in the link below. Suddenly millions of GPU errors, as well as a weird D3D usage of 63%, as well as changed VRM voltage¤t change.
Thanks, Guido
https://drive.google.com/file/d/0B00UcxG4FiDIemNBaHBQZlduLTg/view?usp=sharing
Sorry, forgot to add settings in the xls and couldnt update as it was in the bin..
new link:
https://docs.google.com/spreadsheets/d/1195Vd2yj3wXAFJrrz8-LC-HCPgzmPBaCadqntDuk5K0/edit?usp=sharing
I’m interesting on values to OC a RX580 and a GTX 1080TI that I’m testing. For me is not important power consumption
Hey Crypto, what do you think of MSI Afterburner instead of the Radeon Drivers for tweaking before doing the final flash?
Hi, not too long ago read about the hashrate of RX series will drop some 10-15% at every major #dag epoch.
Will flashing of bios solve this problem? Looking into getting RX series card, but not sure whether newer versions / older versions make any difference or not.
Simple question. I have a card I modded the bios per this guide. I have the original bios, if I flash back to the original will I still need to use the bios patcher? In other words can I return the card back to normal or will I have to use the patcher every time I update the drivers? Thanks
hi will this work on a r9 390 & r9 380?
Hello, I would like to share an issue and how I resolved it.
Im on Sapphire Nitro+ RX480 8GB OC and Windows 10 64bit, if that matters.
Scenario is like this:
1- PC while mining crashed or something. When I returned to it, the machine was off
2- After booting up, I saw an update ready for Radeon, which I installed.
3- After rebooting, clicking the Radeon icon in taskbar kept saying there was somethign wrong with the AMD Display Driver.
Device Manager showed RX480, but displayed as there was a problem with it; the well known error code 43, with detailed error 0000002B.
I tried everything to resolve this; clean driver uninstall in safe mode, a multitude of Radeon driver versions, physically reconnected the graphics card, and even a Windows Restore (but I did not have restore point before the issues started).
In the end, what fixed it was:
>>> Run ATI Pixel Clock Patcher again and reboot, as described in step 4 <<<
hi
i do everything as indicated
but i have the problema everything is 0, and computer dont recognize
i thing is the amd sign drivers or something like that, y tried to reinstall de drivers, i run more tan 1 time the ATI Pixel Clock Patcher
and it didnt work
i have to load the original bios and it again work but at 20 mhs
can you help me with it?
what i have to do
I am a newbie, but I would say; try to change less settings in the BIOS. For example, if there is 1500 1750 and 2000 Mhz timing settings and you copied 1500 into the 1750 and 2000, try to keep the 1500 setting as-is and only copy the 1750 field into the 2000 field.
Let us know what happens (via the Reply button)
Do you find that undervolting memory helps? I would be surprised if it’s significant compared to GPU core speed.
I have 5 Asus Hynix RX 470 4G, 2 XFX Samsung RX 470 4G and 1 Gigabyte gaming g1 Hynix RX 470 4G.
All of them with wattaman settings config are able to mine at 25mh/s and ~80w of power cost.
If I modify the BIOS, undervolting is apparentely not working, (I tried to set fixed values such as 950, but I think it needs another kind of values, e.g. 6XXXX)
And this is the windows behavior.
If I use any of them except the gigabyte one, none of the BIOS changes are working. (All GPUS mine at 20mh/s and ~100w)
Great guide.
In your next section, could you please cover security and networking/lan configuration for these mining rigs.
How do we protect it from hacking etc?
What ports are required on the firewall?
Do we need to separate mining rigs from home LAN with subnet/IP range ?
Is Wifi good enough or should it be hardwired to the router?
What is the data traffic like?
Is a separate broadband connection required?
Do you need to backup anything?
There are many other resources for networking and security.
Security on a mining rig is no different than that of your PC at home. We assume you are behind your router’s firewall at the minimum.
No ports need to be opened. You can create a separate subnet if you want to. Wifi is OK for a few rigs but if you have more than 3-5, you should think about something else.
If you don’t have broadband with at least 128k up/down, then don’t bother.
Wow. Same make GPUs having different figures is the understatement of the year. I purchased 4x (8GB Nitro 580s) cards of same make and model, same location at same time with in line serial numbers. First one couldn’t get anything stable over 2100 mclock, ended up at 29.800MH/s best config at 85-90w. Unboxed the 2nd card and went incrementally straight to 2250 mclock and could end up optimising at 30.900mh/s at around 90-95w. I new it would be different but didn’t think it would be this much. How can it differ this much when they are mass produced in a factory?
I have a question. I always get around 5% lower on mining with DAG stuff over the “-benchmark -1” option when fine tuning. I am wondering if this is because I’m in Australia and need to use overseas servers with 300-600ms DAG times. Can anyone else test this for me? For example, someone that lives in the US and connects to a US server with sub 30ms or whatnot DAG times? Can you give me the benchmarked MH/s and actual MH/s differences you get?
Looking forward to optimizing the next two cards.
Sub yeah, I would definitely not use the same .rom for all cards of the same model. And if you use someone else’s .rom then definitely tweak it for your card specifically. There isn’t any shortcuts for this. It’s quite time consuming.
Cheers.
when I try it, the benchmark sets up for epoch #136.
when I mine for real, claymore setup for for epoch #139 and the hash rate is like 0.03 slower. This is based on a small sample, so can’t know for sure. I am using AMD DAG beta fix
However Each epoch gets more difficult, so the hash rate slowly decreases.
And if you are not using the new AMD DAG Epoch fix, the hash rates will be much greater.
Sorry, I meant hashrate differences between the two epochs will be greater if you do not install the AMD driver (assuming you have an AMD card).
I’m getting nearly +5% hash differences in -benchmark mode over real mining. I just wanted to see if it was the DAG ping time differences that was doing it because of my far geo location from closest server. (300-400ms)
Would the newer DAG difference just being more difficult over time ?
If you change the bench.bat file to go against your actual pool address instead of the default one (I think it’s Etherpool), that would eliminate any variables. I have not done this but it might help.
hello Crypto Badger or anyone who can help,
I have a rx 580 8gb. Can I follow the instructions for the Rx 480 8gb will that work?
Yes everything is the same. For the straps, use the 2:1750 timing in the 2:2000 & 2:2250 fields for a start.
Use only if your have hynix memory!
777000000000000022AA1C00B56A6D46C0551017BE8E060C006AE6000C081420EA8900AB030000001B162C31C0313F17
This is the timing strap I am using on my Sapphire RX 580 Nitro 8GB cards in the 2:2000 and 2:2250 fields which yielded 3-4 more MH/s over the stock 2:1750 field and 5-6 MH/s over ‘out of the box’ rates. You should be able to push another 3-4 with clocks.
Above strap from a Sapphire Nitro RX 480 4GB Hynix memory
I’m experiencing mem power flashing issues. Now I have my wall power meter I am revising my cards one by one again and optimising efficiency now I have whole card power usage. I am finding good combos using wattman on core clock/mv and memclock/mv but when I use ATIflash with the these figures it changes everything but mem core voltage which always remains the same at 950mv no matter how many times I flash (1000mv memcore stock rom on these cards). (It allows be to repeat flash with same .rom and not give me “rom already on” message which confirms that mv is not changing)
Cards are Sapphire RX 580 Nitro 8GB (hynix) x4
If that have set 950mv at the mem voltage under limit then how can I use AMDs own Wattman software to unvolt well under that until the card fails even? (sub 800mv)
I’ll test another one of the 4 to see if they are all being locked to 950mv on the bois. I really don’t want to have to run my miner on windows and have to use software undervolting on every bootup. I am about to drop power 20w at the wall per card by dropping it into the 800’s, for very little MH exchange.
Can anyone suggest anything I can try? Is there another flashing tool besides ATIwinflash? Should I try the secondary bios switch and see if that will do it ?
Yes. All cards being blocked to drop under 950mv on the bios which flashing.
I might try the “-mvddc” tag on Claymore and see if I can get it that way. Run out of time though, gotta run to work. I’ll let you know what I find. Any suggestions, please let me know.
Cheers.
mvddc tag works but I read the Claymore readme and it says does not work with linux amd drivers. I’m also reading that the amd drivers also are overriding the bios voltages too and just providing stock voltage again.
Looks like I’ll have to run my rig in windows. Bugger.
Side question… how do I identify what card is what in the Claymore gpu numbering to which physical card it is?
Card identity fix: While the Claymore cmd box is up and running, press the GPU number you want to identify on the keyboard. This will stop that GPU only from mining. Wait for the fan to stop on that card to identify it. Obviously, you can’t be running fan tags for this to work. Or perhaps you can by feeling which card is cooling. (make sure you ground yourself before touching computer components)
Brilliant! even faster…
I have the same trouble too with identifying which GPU Claymore id’s with. With Afterburner, I just turn on the fan to the 1 card to the max, and that gives it away. Maybe try -fanmin with Claymore and specify 100 for one card and 20 for everything else.
Just as a precaution, I had huge issues with Afterburner and Claymore both trying to set the mem and cpu clocks, etc. I ended up with only 4 Mh/s on my cards. I had to power off and remove the -cclock and -mclocks to get it back to 26-29. I guess you use one or the other.
Hi,
I installed the new AMD Radeon Software Crimson ReLive Edition Beta for Blockchain Compute drivers, from:
https://support.amd.com/en-us/kb-articles/Pages/Radeon-Software-Crimson-ReLive-Edition-Beta-for-Blockchain-Compute-Release-Notes.aspx
For some reason undervolting via Wattman is not working, and according to HWInfo the memory and GPU are running on default voltage. With as result that the GPU Chip Power usage is 30% higher than before, with the accompanying fan speed increase and general heat generation.
Does anyone else have a problem with this?
Overclocking memory and underclocking GPU is working fine.
Got a Sapphire Nitro+ RX480 8GB OC
You’re post reminded me of the blockchain drivers which I have yet to try. I just downloaded and installed and tested and instantly, nearly 2MH faster… but the most astounding thing is my benchmark tests are matching my real pool share test in MH/s exactly. (like I was winging about above) I’m not sure how some drivers do it but I’m now getting over 31MH per card at 120-125w per card at the wall. I really like these figures now.
But to answer your question, I found no power difference on the new drivers. I still have that .950 under limit on my cards, but that would be card specific. I ended up ditching Wattman for fine tuning my cards and just used the Claymore tags. Wattman was freaking out now and then with all the card shuffling and restarts. I ended up having to uninstall drivers and reinstall just so wattman would show real figures and all the clock lanes. I disabled all the profiles on Wattman and went with the Claymore Tags.
Check you don’t have an aftermarket app blocking your power like afterburner or wattman etc.
Wow, what graphics card do you have?
I like using Afterburner to fine tune but am frustrated each time my config changes, Afterburner needs to be reset. I will try taking the afterburner settings and using them on Claymore.
I have 4x Sapphire Nitro+ RX 580 8GB (Hynix). Running these 4 on a Asrock Fatality x370 Gaming K4 mobo and Cosair HX1000 psu running at 580-600w at the wall @ 124MH/s ETH only. I havent yet tried to turn off mobo components to shave more power, but it would only be 10-15w max.
Only the newest Claymore (v9.8) tags will work with the newest AMD drivers (17.7.2) and I’m assuming the blockchain version as well. But it is the best way to do it as it only modifies the GPUs on Claymore .exe program and only when you start.bat it. Wattman and afterburner are good, but are very bloated software which causes delays and errors in the graphics/displays on occasion.
I’m getting instability when benchtesting these cards though a 1 to 3 PCIe extender board. I think it takes a stability toll on the GPUs when you duplicate PCI lanes…. from first impressions. I will run these off the main board and when I get my next bunch of GPUs I will specifically tweak them on the Extender board to know their limits via this route.
Check your risers… If I connect my powered risers with a dedicated molex wire, no issues. If I try adding two risers to 2 molex on the same wire, then my hashrates fluctuate wildly. Same thing happens when I used a SATA to molex adapter.
I will only use pci risers with either a molex or 6 pin PCI-e power connector after this experience. SATA power connectors only conduct up to 18 watts, where as molex can handle 132 (11A at 12v).
Actually, good idea. The PCI expander 1-3 board takes a molex and a sata power cable. I tagged it along a sata power rail along with 2 of the graphics cards and a fresh rail for the molex. I should of gave it it’s own for both. I’ll try that, thanks.
Nope. Still giving same driver crashes with independant power connectors. Even does it with only two cards connected to the sub board. With this riser board the cards are going via riser to riser board via usb3, into mobo pcie via another usb3. I think the distance traveled is tilting my cards over the edge considering they are already tweaked to their stable limits going from mobo direct. I have ordered a 1 to 4 riser card (without the sub board and sub power) to see if maybe they will work without going down two usb3 cables in daisy link.
I would think if I rolled back these cards like 5% undervolt and mem OC, they would work via the board. But I don’t have time to test this now, I’m going to setup this rig with the 4 cards direct into mobo in it’s perminent location and when I get the next bunch of GPUs I will specifically tweak/oc via a PCIe extender board.
Success! I have fixed the riser sub board issue! Thanks to Rob T for making me redo the sub board route again.
When I removed the sub board the second time with dedicated power, I put all 4 cards back direct to mobo again, but in a jumbled order from before. When I started system again to test the same thing happened a couple minutes into mining. Incorrect shares on one card with driver crash 5 minutes later. But this time I wasn’t running the sub board. Even after a few restarts.
So it hit me, it isn’t a hardware issue, it’s the same caching driver/bios issue I was experiencing with Wattman when tweaking/swapping and shuffling my cards around to other PCIe lanes (Fooled me twice, shame on me :/). I uninstalled drivers (Control Panel > Programs > AMD > Uninstall), restarted system, installed blockchain drivers, restarted system and bam!, flawless mining again without changing any hardware around.
So I figured this is the same issue that’s happening with the sub board riser. So I uninstalled drivers again, turned system off, added the sub board in again with 3 risers/cards connected to it, started system, reinstalled blockchain drivers again, restarted system, and BAM! works like a charm with 3 of the cards going into a single mobo PCIe 1x lane. (pending a 24h benchtest)
So my issue was the drivers remembering a cards bios settings via some sort of caching and not resetting it when I put a different card in the same PCIe slot. Since non of my cards have identical ROM settings, it was causing issues, most probably the one of my 4 cards which couldn’t get near the other 3 in power/performance. It would of been running on one of the other cards bios settings and causing the drivers to crash. So lesson learnt, whenever you do any major hardware changes, uninstall drivers via the AMD uninstaller first before shutting down, and remember to reinstall and restart when you bootup again with the new hardware setup.
In theory, PCIe lane splitting is fine for mining rigs as only two things happen over a PCIe slot, power and data bandwidth. Power is supplied to the risers and cards directly so this is bypassed. The major processing bandwidth happens within the GPU card itself, between core and memory. The only output coming back out the PCI lane should be what’s being posted on the blockchain over the internet bandwidth, which is what… 1GB a month per card?
I’m glad I’ve sorted all these issues now and thanks for the help. 12 GPU 1600w system here I come!
I am so very glad to see you sorted it and explained what may have caused your issue. I too once got so frustrated, I arbitrarily changed the order of the riser USB connector to the PCI-e slots on the motherboard, and it worked but I didn’t know why.
Here are two other utilities that may be useful and are often quoted on bitcointalk.org
Clean driver uninstall – removes every trace, including registry settings and works in Windows Safe Mode
http://www.guru3d.com/files-details/display-driver-uninstaller-download.html
Pixel Patcher – used whenever a modded bios will cause AMD driver not to load properly – making Afterburner or other OC/UV tools not work. For Windows.
https://www.monitortests.com/forum/Thread-AMD-ATI-Pixel-Clock-Patcher
Hi, thanks for a great guide. One of the best out there!
The only part I have had an issue with is tweaking the clock speeds and undervolting in the radeon wattman software.
Whenever I apply changes and reboot, it doesn’t make the tweaks according to GPU-Z although displays the changes in Wattman. The same goes for MSI Afterburner and Sapphire Trixx.
Any ideas?
Hi I have the same issue on the latest Radeon drivers.
So I moved back to 17.1.2 on which the undervolting is actually applied.
This issue causes my single-RX480 rig to use 40W more if undervolting is not working.
BIOS mod Lessons Learned
After spending hours to find the maximum possible hashrate settings, my cards have degraded to less then what they are capable of before.
One RX 470 GPU 4gb ran great at 29mhs but now causes Windows to BSOD.
Word to the wise… Dont max out your overclocks or undervolts and expect them to run 27×7 forever.
Hi, Thanks for the comprehensive guide.
My 1st rig is ready with the following H/W:
Motherboard: ASUS ROG STRIX Z270E GAMING
CPU: Intel Celeron
RAM: 4GB corsair
PSU: EVGA 1200 P2
GPU: Sapphire Nitro+ RX580 8GB.
I followed the exact steps to BIOS Mod the GPUs and am getting ~28 Mh/s, total ~169 Mh/s.
Randomly, I am getting this error “GPU #3 got incorrect share. If you see this warning often, make sure you did not overclock it too much!” Do I need to change the setting and flash the GPU BIOS again? or is there any other fix available?
Any help will be highly appreciated.
Hi.
I am running my Saphire 470 4gb OC/UV at 1170core@950mv and 2015mem@975mV with default memory timings as my original BIOS memory table (Samsung) already has 7-7-7 timings even at 2000 (OP’s card had 9-9-9 at 1900). But stil, I am only getting around 23MH/s with latest Clayomore and AMD mining driver.
Card is stable (no throttling), at 70c. Any ideas? I thing my card would not work with changed timings as this would mean that I would force 5-5-5 timings for 2000mhz. Or am I wrong? Thank you.
Great post! Have nice day ! 🙂 bidoz