

 April 6th, 2017
  CryptoBadger
  In this second installment of our DIY Ethereum mining guide, we’ll look at how to install and configure Linux to setup your rig as an automated, remotely-manageable appliance. Don’t be dissuaded if you’ve never used Linux before—our step-by-step guide makes it simple!
Why Linux over Windows? First, it’s free—and saving ~$100 on the operating system is a big plus when you’re trying to maximize profitability. Other reasons include lesser hardware requirements (Linux is perfectly happy running from a USB stick plugged into ancient hardware!), simpler remote administration capabilities, and oftentimes better stability. The downside of running Linux is that video driver support isn’t on the same level as Windows, and things like GPU undervolting are trickier (but still possible via BIOS mods).
If you missed the hardware portion of our guide, make sure to check it out first. Otherwise, read on.
Build an Ethereum Mining Rig, part 2: Linux Setup
The following is heavily adapted from my original 2013 Litecoin mining guide, updated for the latest Xubuntu LTS version, the new AMDGPU-PRO drivers, and necessary ethereum mining software (all up-to-date as of 11/29/2017). If you’re a bit nervous because you’ve a complete Linux newbie, don’t be. Simply follow the step-by-step instructions exactly as they’re written, and you’ll be fine. Even if you’ve never done anything like this before, you should be up and running in roughly an hour.
Step 1: Configure BIOS settings
Before we even get to Linux, let’s take a minute to make sure that your mining computer’s BIOS settings are in order. Power on your computer, and press the “delete” key a few times immediately after power on. You should end up in the BIOS configuration area. Do the following, then save & exit:
- Change power options so that the computer automatically turns itself on whenever power is restored. The reason for this is two-fold: first, it’ll make sure that your miner automatically starts up after a power outage. Second, it makes powering the computer on much easier if you don’t happen to have a power switch connected to the motherboard.
- Make sure that your USB stick is first in the boot-up order (you may need to have a USB stick attached).
- Disable all components that you don’t plan to use. This may save a little bit of power, and since your miner will likely be running 24/7, it’ll add up. For me, that meant disabling onboard audio, one of the SATA controllers, the USB 3.0 ports (I only had a 2.0 USB stick), the Firewire port, and the serial port.
- If you’re running a lot of GPUs (4+), additional tweaks might be necessary to ensure that they’re all recognized by the OS. Exact tweaks vary by motherboard, but setting the PCIe speed to Gen1 is usually a good place to start. No need to change anything now, but make a mental note that you may need to come back and play around a bit if all of your GPUs don’t show up in the OS later.
Step 2: Install Xubuntu Desktop on your miner
Xubuntu is a lightweight version of Ubuntu, a popular Linux distribution. Most other distros should work just fine, but be aware that the GPU drivers require the presence of Xorg, which means server distros that don’t have a GUI will not work properly.
- Xubuntu 16.04.3 is the latest LTS release at the time of this guide, so that is what I recommend you use. You can download it here.
- You’ll need to either write the installation ISO image to a USB stick (highly recommended), or burn it to a DVD. If you use a DVD, you’ll need to temporarily hook up a DVD drive to your mining rig for the installation (make sure you temporarily enable your SATA controller if you disabled it in step 1!).
- Once you have the installation media prepared, you’re ready to install Xubuntu to your miner’s boot device (whether it’s an SSD, mechanical harddrive, or another blank USB stick). Boot using your new installation media (make sure it’s first in your miner’s BIOS boot order list). The Xubuntu installer should appear.
- Follow the prompts, and make sure to click the “auto-login” box on the last step of the installer (otherwise, all of the default options are fine).
- When the installation is complete, you should automatically boot into the Xubuntu desktop. Make sure to remove your installation media.
Step 3: Install SSH and package updates
At the Xubuntu desktop, press CTRL+ALT+T to open a terminal window.
- Install SSH by typing:
sudo apt-get install openssh-server
With SSH installed, you can unplug the keyboard/mouse/monitor from your miner, and complete the rest of the installation from your desktop computer. Simply download Putty onto your desktop, run it, and enter the IP address of your mining rig (type ifconfig at the Xubuntu terminal to find your miner’s address if you don’t know it—it will probably look like 192.168.0.x). That should bring up a remote terminal session to your miner, which is more or less just like sitting at the keyboard in front of it.
If you plan to manage your mining rig remotely over the internet, you’ll need to forward port 22 on your router to your miner. Make sure that you use a strong Xubuntu password!
Setup should be pretty quick from this point, as now you can simply copy text from this webpage (highlight it and press CTRL+C) and then paste it into your Putty session by simply right-clicking anywhere inside the Putty window. I highly recommend that you complete the remainder of the guide in this manner, as it eliminates the risk of typos!
- Install package updates by typing (or copying & pasting via right-click into Putty) the following command:
sudo apt-get dist-upgrade
Step 4: Install AMDGPU-PRO drivers
Next up, we’ll install AMD’s video drivers. AMD has special blockchain compute drivers available for mining that give far superior performance compared to their standard drivers, so that’s what we’ll be using (version 17.40, which is the latest as of 11/29/2017).
- Type the following commands (press “enter” and wait for the operation to complete at the end of each line):
cd ~/Downloads wget --referer=http://support.amd.com https://www2.ati.com/drivers/linux/beta/ubuntu/amdgpu-pro-17.40-483984.tar.xz tar -Jxvf amdgpu-pro-17.40-483984.tar.xz cd amdgpu-pro-17.40-483984 ./amdgpu-pro-install -y - Some of these steps may take a minute or two to complete. When the installation is complete, type the following:
sudo usermod -a -G video $LOGNAME - Next we need to install and configure the ROCm component:
sudo apt install -y rocm-amdgpu-pro echo 'export LLVM_BIN=/opt/amdgpu-pro/bin' | sudo tee /etc/profile.d/amdgpu-pro.sh - Finally we need to enable large page support, which will dramatically improve mining performance. Type the following to open your grub file in nano for editing:
sudo nano /etc/default/grub - Find the line that reads GRUB_CMDLINE_LINUX_DEFAULT=”quiet splash”. Modify it to:
GRUB_CMDLINE_LINUX_DEFAULT="quiet splash amdgpu.vm_fragment_size=9" - Save the file and quit nano by pressing CTRL+X and then answering (Y)es to save the changes. When you’re finished, update grub and reboot:
sudo update-grub
sudo reboot
The final command will reboot your rig, which will cause you to immediately lose your SSH (Putty) connection. Wait a few seconds to give the computer a chance to boot, and then re-establish a new connection via Putty, and re-login.
Step 5: Install Ethereum software
(Note: you may skip step 5 entirely if you already have an ethereum wallet address that you intend to use!)
Next up, we’ll install the Ethereum software that will let us create a new wallet address. We’ll need this to store the coins we receive from mining.
- Type the following to install the necessary ethereum packages:
sudo add-apt-repository ppa:ethereum/ethereum sudo apt-get update sudo apt-get install ethereum geth - Now it’s time to create your Ethereum wallet address:
geth account new
You’ll be prompted to enter a password, and then to confirm it (use a strong password!). The output will be a long string between two curly braces { }. That’s your new wallet address—make a note of it (highlight it within Putty to copy it to your clipboard).
Important: The combination of the password you just used to create this address *and* the associated encrypted key file is what gives you control over your new wallet address. If you lose either of these, you’ve also lost control of your wallet and all of the coins associated with it—and there is literally nothing that anyone will be able to do to help you. Remember your password, and keep multiple backups of your key file(s)!
Your key file(s) are stored in the ~/.ethereum/keystore directory. Copy the entire /keystore folder someplace safe to backup your wallet (backups are covered in more detail here—don’t forget to make multiple backups and keep them in a secure offline location!).
If you forget your wallet address, you can type geth account list to see your addresses and the location of their key files.
Step 6: Install Claymore’s Ethereum miner
There are several options as far as mining software, and I’ve experimented with all of the popular ones. I think Claymore’s miner is the best option, even if it does have two fairly significant downsides: it’s closed-source, and it’s not free (~1% of your mining time benefits the creator of the miner).
Two alternatives are the stock ethereum miner (ethminer) and Genoil’s fork of the stock miner. They’re both open-source and free, but they have pretty crippling downsides.
The stock ethminer is much slower than Claymore’s miner (by a margin of over 5% on my test rig). In addition, ethminer creates the Ethereum DAG file on disk instead of in GPU memory, which is slow and uses a lot of space (and if you’re running off a USB stick, all those writes may eventually wear it out).
Genoil’s fork seems to be nearly as fast as Claymore’s, and it doesn’t use physical disk space for the DAG, but it’s not stable (at least not for me). It often crashes, especially on startup (whereas I have yet to see a single crash on Claymore’s miner after nearly a week of full-time mining). The author abandoned development months ago, so improvements are unlikely.
So, explanation aside, here is how to setup Claymore’s miner:
- First return to your downloads directory and grab the latest version (10.2 as of 11/29/2017). I’m pulling the file directly from the author’s Google Drive repository, if the link is broken check here for a newer release or updated link):
cd ~/Downloads sudo apt install curl curl -L -o claymore_10.2_miner.tar.gz https://drive.google.com/uc?id=1t25SK0lk2osr32GH623rR8aG2_qvZds9 - Then create a new directory for it, and unpack it there:
sudo mkdir /usr/local/claymore10.2 sudo tar -xvf claymore_10.2_miner.tar.gz -C /usr/local/claymore10.2 - Then let’s head over to the installation directory and create a startup script. Note that commands 2-5 below just clean up the installation directory a bit by removing an intermediary directory that was included in the original tar archive:
cd /usr/local/claymore10.2 cd Clay* sudo mv * /usr/local/claymore10.2 cd .. sudo rm -r Clay* sudo chown root:root ethdcrminer64 sudo chmod 755 ethdcrminer64 sudo chmod u+s ethdcrminer64 sudo nano mine.sh - Nano will open a new blank text file; enter the following into it:
#!/bin/sh
export GPU_MAX_ALLOC_PERCENT=100
./ethdcrminer64 -epool eth-us-east1.nanopool.org:9999 -ewal YOUR_WALLET_ADDRESS/Miner01 -epsw x -mode 1 -allpools 1 -tt 68
Where it says YOUR_WALLET_ADDRESS, use the address you created in step 5 (you’ll need to put “0x” in front of it). The “Miner01” following your address can be changed to any friendly label that you want to give your miner (only important if you plan to run multiple rigs). It’s easiest to copy the last line from my guide into something like notepad, then replace YOUR_WALLET_ADDRESS with your actual address there, and then copy the finished line into putty via right-click to get everything into nano without typos.
- Save the file and quit nano by pressing CTRL+X and then answering (Y)es to save the changes, then enter the following to give your new script execute permission:
sudo chmod +x mine.sh
Note that I’m using nanopool.org as the mining pool here. I’ve tried a few, and it seems to be a top pick, but feel free to pick your own pool. Most don’t require registration, and simply payout to whatever wallet address you supply whenever a certain threshold is met (usually whenever you accumulate 1+ ETH). Assuming you stick with Nanopool, you’ll be able to check on your miner’s status by going to this URL after you start mining: https://eth.nanopool.org/account/[YOUR WALLET ADDRESS]
- Now is a good time to test things. You can fire up your miner by typing:
./mine.sh
You should see the Claymore miner start up. It’ll take a minute or two before it actually starts mining, but it should get there eventually. When you see a scrolling log of outputs that includes non-zero hashrates (expect hashrates in the low to mid 20s for unoptimized GPUs), you’re good to go. If the script fails to start, or you see errors, make sure that you’ve created the script exactly as outlined in the guide.
Press CTRL+C to exit the miner when you’re satisfied that it’s working.
Step 7: Create auto-start scripts
We’re almost done! We want to set up our rigs automatically start mining whenever the rig is powered on. That way, we keep mining losses to a minimum whenever a power outage occurs, and we don’t have to worry about manually starting it back up in other situations.
- First, install screen:
sudo apt install screen - Then type the following to create a new script in your home directory and open it in nano:
cd ~sudo nano miner_launcher.sh - Enter the following text into the editor (substitute your actual Xubuntu username for YOUR_XUBUNTU_USERNAME where necessary!):
#!/bin/bash DEFAULT_DELAY=0 if [ "x$1" = "x" -o "x$1" = "xnone" ]; then DELAY=$DEFAULT_DELAY else DELAY=$1 fi sleep $DELAY cd /usr/local/claymore10.2 su YOUR_XUBUNTU_USERNAME -c "screen -dmS ethm ./mine.sh" - Save and quit nano (CTRL+X), and then type:
sudo chmod +x miner_launcher.sh - Now we need to call our new script during startup; we do that by adding it to /etc/rc.local. Type the following to open /etc/rc.local in nano:
sudo nano /etc/rc.local - Add the following text, right above the line that reads “exit 0” (substitute your own username!):
/home/YOUR_XUBUNTU_USERNAME/miner_launcher.sh 15 &
Then save and quit out of nano (CTRL+X).
Step 8: Create an alias to easily check on the Claymore miner process
We’re essentially done at this point, but you’ll probably want to manually SSH into your miner from time to time to manually check on your hashrates & GPU temperatures, etc. Creating an alias will make that easy.
- Type:
sudo nano .bashrc - Scroll to the end of the file, and then add this text above the line that reads “# enable programmable completion…”
alias miner='screen -x ethm' - Save and quit out of nano.
That’s it—you’re done! You’ll probably want to run a full test now. The easiest way to do that is to close your Putty session and power down your miner. Turn it back on and the following should happen:
- Your miner should boot into Xubuntu. This may take up to a minute, depending on the speed of your boot device (it’ll be much faster on an SSD).
- 15 seconds after Xubuntu has loaded, the Claymore miner will automatically start and begin mining. You might notice the fans on your GPUs spin up a bit when this happens.
- You should be able to SSH into your miner at any time and type miner to monitor the miner’s process. To close the screen (but keep the miner running), press CTRL+A, then CTRL+D.
- If you ever need to start the Claymore miner manually (because you quit out of it, or kill it, etc), simply type ~/miner_launcher.sh
(update 1/15/2018: **IMPORTANT** please read this if your hashrate is lower than expected!)
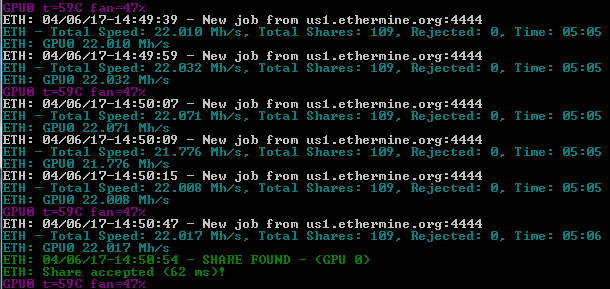
Output from a single budget RX 470 at stock settings running Claymore’s ETH miner. You should see something like this when connecting to your rig via SSH and running your “miner” alias.
Congratulations—you have your own headless linux ethereum miner!
The next section of this guide covers setup under Windows, and then we’ll take a look at optimizing miner settings for better performance.
 Posted in
  Tags:
Tags: 


First of all, THANK YOU CRYPTOBADGER!!! What is your wallet addy so I can tip you?
After getting my 2-rig test rig running (at 51Mh/s) i power cycled to check the auto-restart process, but after doing so my hash rate dropped in half! Both GPUs are working just at half the output. Any ideas?
Thank you!
Writ
First of all, THANK YOU CRYPTOBADGER!!! What is your ETH wallet addy so I may tip you to say thx?
After getting my 2-GPU test rig up and running (at 51Mh/s) I power cycled to check the auto-restart process, but after doing so my has rate dropped in half! Both GPUs are working, just at half the output :-/ Any ideas?
Here’s the msg I’m getting…
GPU0 t=79C fan=52%, GPU1 t=71C fan=47%
server: bind failed with error: 98 (check -mport option value), next attempt in 20sec…
ETH: 06/22/17-11:00:13 – New job from us1.ethermine.org:4444
ETH – Total Speed: 24.486 Mh/s, Total Shares: 0, Rejected: 0, Time: 00:08
ETH: GPU0 12.164 Mh/s, GPU1 12.322 Mh/s
server: bind failed with error: 98 (check -mport option value), next attempt in 20sec…
Thank you!
Writ
…Aaaand of course as soon as I bug y’all about it my hash sped back up to 52Mh/s. Doh! Hopefully this will give comfort to other with this problem that all you have to do is wait! 🙂
And Badger, lmk that wallet #.
-Writ
Ha, sometimes it takes a little while for hash rates to stabilize – glad it’s working!
Donation info is here – thanks!
Thanks for the guide!
I can tell it’s mining because it shows as active in ethermine.org.
But I can’t log in with SSH anymore. The only time it works is right after the computer boots, then once claymore starts the SSH connection is lost.
Any idea why this is happening?
Update:
When I boot up without the graphics cards plugged in, I can easily get into SSH and check on things. Double checked the steps and I did everything right.
When I manually start Claymore and then run “miner”, I successfully see the Claymore output before it exits due to no gfx cards.
Not sure what to do at this point.
Update:
I erased the line that runs miner_launcher at boot. Then I plugged my gfx cards back in and booted. SSH connected normally with no problems.
Then I did:
~/miner_launcher.sh
and then:
miner
Claymore got as far as “setting dag epoch” before I lost connection again.
Putty gives the message “Software caused connection abort”
It’s clear that Claymore is having some affect on SSH server but I have no idea how to fix it.
It was crashing my wifi dongle.
Just gonna bite the bullet and get a long ass ethernet cable
Instead of the long ethernet cord i use these TP-Link AV1000 1-Port Gigabit Powerline Adapter, Up to 1000Mbps (TL-PA7010 KIT)
You may want to mention (for those like me that have this issue) that if you’re using the GUI to set this up, your iGPU might cause issues with graphics output. The solution I found on askubuntu was to use
amdgpu-pro-install –px
This should deconflict it.
Found the fix here:
https://askubuntu.com/questions/880523/cant-login-after-installing-amdgpu-pro-16-60
did anyone had this issue before and knows how to fix it?
_________-________________
This pool (eth-eu2.nanopool.org) does not support Ethereum addresses as login (or requires worker name in “Login.Worker” format) and cannot be used for devfee mining, therefore it is not supported.
However, you can mine on this pool if you specify “-allpools 1” option, default pools (different from this pool) will be used for devfee.
Please read “Readme” file for details.This pool (eth-eu2.nanopool.org) does not support Ethereum addresses as login (or requires worker name in “Login.Worker” format) and cannot be used for devfee mining, therefore it is not supported.
However, you can mine on this pool if you specify “-allpools 1” option, default pools (different from this pool) will be used for devfee.
Please read “Readme” file for details.Pool eth-eu2.nanopool.org removed from the list
This pool (eth-us-east1.nanopool.org) does not support Ethereum addresses as login (or requires worker name in “Login.Worker” format) and cannot be used for devfee mining, therefore it is not supported.
However, you can mine on this pool if you specify “-allpools 1” option, default pools (different from this pool) will be used for devfee.
Please read “Readme” file for details.This pool (eth-us-east1.nanopool.org) does not support Ethereum addresses as login (or requires worker name in “Login.Worker” format) and cannot be used for devfee mining, therefore it is not supported.
However, you can mine on this pool if you specify “-allpools 1” option, default pools (different from this pool) will be used for devfee.
Please read “Readme” file for details.Pool eth-us-east1.nanopool.org removed from the list
This pool (eth-us-west1.nanopool.org) does not support Ethereum addresses as login (or requires worker name in “Login.Worker” format) and cannot be used for devfee mining, therefore it is not supported.
However, you can mine on this pool if you specify “-allpools 1” option, default pools (different from this pool) will be used for devfee.
Please read “Readme” file for details.This pool (eth-us-west1.nanopool.org) does not support Ethereum addresses as login (or requires worker name in “Login.Worker” format) and cannot be used for devfee mining, therefore it is not supported.
However, you can mine on this pool if you specify “-allpools 1” option, default pools (different from this pool) will be used for devfee.
Please read “Readme” file for details.Pool eth-us-west1.nanopool.org removed from the list
This pool (eth-asia1.nanopool.org) does not support Ethereum addresses as login (or requires worker name in “Login.Worker” format) and cannot be used for devfee mining, therefore it is not supported.
However, you can mine on this pool if you specify “-allpools 1” option, default pools (different from this pool) will be used for devfee.
Please read “Readme” file for details.This pool (eth-asia1.nanopool.org) does not support Ethereum addresses as login (or requires worker name in “Login.Worker” format) and cannot be used for devfee mining, therefore it is not supported.
However, you can mine on this pool if you specify “-allpools 1” option, default pools (different from this pool) will be used for devfee.
Please read “Readme” file for details.Pool eth-asia1.nanopool.org removed from the list
ETH: 1 pool is specified
Main Ethereum pool is eth-us-east1.nanopool.org:9999
Catalyst 15.12 is REQUIRED for best performance and compatibility
For Polaris cards, use latest drivers
At least 16 GB of Virtual Memory is required for multi-GPU systems
Make sure you defined GPU_MAX_ALLOC_PERCENT 100
Be careful with overclocking, use default clocks for first tests
Press “s” for current statistics, “0”..”9″ to turn on/off cards, “r” to reload pools, “e” or “d” to select current pool
OpenCL initializing…
AMD Cards available: 1
GPU #0: Ellesmere, 1634 MB available, 32 compute units
GPU #0 recognized as Radeon RX 470/570
POOL/SOLO version
GPU #0: algorithm ASM
No NVIDIA CUDA GPUs detected.
Total cards: 1
AMD ADL library not found.
ETH: Stratum – connecting to ‘eth-us-east1.nanopool.org’ port 9999
ETH: Stratum – Connected (eth-us-east1.nanopool.org:9999)
ETHEREUM-ONLY MINING MODE ENABLED (-mode 1)
ETH: eth-proxy stratum mode
“-allpools” option is set, default pools can be used for devfee, check “Readme” file for details.
Watchdog enabled
Remote management (READ-ONLY MODE) is enabled on port 3333
ETH: Authorized
Setting DAG epoch #130…
Setting DAG epoch #130 for GPU0
Create GPU buffer for GPU0
GPU0 – OpenCL error -61 – cannot allocate big buffer for DAG. Check readme.txt for possible solutions.
ETH: 06/23/17-14:52:11 – New job from eth-us-east1.nanopool.org:9999
ETH – Total Speed: 0.000 Mh/s, Total Shares: 0, Rejected: 0, Time: 00:00
ETH: GPU0 0.000 Mh/s
GPU 0 failed
Setting DAG epoch #130 for GPU0
GPU0, OpenCL error -38 – cannot write buffer for DAG
GPU 0 failed
Hi Al
This error looks to be the case when you have 2 instances of claymore running at the same time. Did you set claymore to startup and then manually try to run it again?
I get the same message, just ignore it, it’s running fine alright.
Have two rigs, both have the same wallet address. One rig gets this message at startup, the other one not.
Guess the pool recognises the address as already in use, and sends this warning message.
Talking about this error
___________________
GPU0 – OpenCL error -61 – cannot allocate big buffer for DAG. Check readme.txt for possible solutions.
ETH: 06/23/17-14:52:11 – New job from eth-us-east1.nanopool.org:9999
ETH – Total Speed: 0.000 Mh/s, Total Shares: 0, Rejected: 0, Time: 00:00
ETH: GPU0 0.000 Mh/s
GPU 0 failed
Setting DAG epoch #130 for GPU0
GPU0, OpenCL error -38 – cannot write buffer for DAG
GPU 0 failed
What card do you have?
GPU #0: Ellesmere, 1634 MB available, 32 compute units
Looks like not enough memory to hold the DAG.
Hi Ben
this is my 4th rig first 2 I did on Ubuntu 16.04.2 with this guide back in May.
My third rig I had this same problem using Ubuntu 16.04.2 and Claymore 9.5. My buddy and I spent so much time on it that we decided to use Windows 10 and it worked…
Here are my setups
Rig 1 Sapphires 480 8G Ubuntu 16.04.2 Claymore 9.3
Rig 2 Assus 570 4G (Ubunto 16.04.2 Claymore 9.3
Rig 3 MSI 480 8G Window 10 Claymore 9.5
Rig 4 Sapphires pulse 570 4G Ubuntu 16.04.2 Claymore 9.5
I really like Ubuntu and dont want to switch to Windows… 🙁
Al
Hello, great website and guide! I am continually getting the following error (running Linux Mint) when trying to start up the miner with the mine.sh script:
./ethdcrminer64: error while loading shared libraries: libcurl.so.4: cannot open shared object file: No such file or directory
Any ideas on how to correct this issue? (hoping there is an easy fix!)
Thank you.
Solved – for some reason, I did not have libcurl4 installed at all, so needed to run libcurl4-openssl-dev.
Cheers,
Brian
Thank you for the awesome guide!
When initiating the miner I’m presented with:
Cannot build OpenCL program for GPU 0
Segmentation fault (core dumped)
Here’s the full message:
����������������������������������������������������������������ͻ
� Claymore’s Dual ETH + DCR/SC/LBC/PASC GPU Miner v9.5 �
����������������������������������������������������������������ͼ
ETH: 4 pools are specified
Main Ethereum pool is eth-us-east1.nanopool.org:9999
DCR: 0 pool is specified
Catalyst 15.12 is REQUIRED for best performance and compatibility
For Polaris cards, use latest drivers
At least 16 GB of Virtual Memory is required for multi-GPU systems
Make sure you defined GPU_MAX_ALLOC_PERCENT 100
Be careful with overclocking, use default clocks for first tests
Press “s” for current statistics, “0”..”9″ to turn on/off cards, “r” to reload pools, “e” or “d” to select current pool
OpenCL initializing…
AMD Cards available: 1
GPU #0: Tahiti, 2662 MB available, 14 compute units
POOL/SOLO version
Cannot build OpenCL program for GPU 0
Segmentation fault (core dumped)
Any idea what’s going on?
I am also having this issue. AMD R9 280x, which I know has 3GB of RAM, but not all of it is showing up for some reason….
I verified that it does on windows. Maybe I need to purge all of my graphics drivers and just start over. I am booted into it with desktop…is that an issue?
I’ve run through uninstalling and reinstalling a few times. I’m thinking it might have to do with having <4GB of video memory _or_ that the card isn't explicitly mentioned as supported in the latest driver release notes. Are you using the driver version 17.10? https://support.amd.com/en-us/kb-articles/Pages/AMDGPU-PRO-Driver-for-Linux-Release-Notes.aspx
I find it super weird that the 270, 270x, 280, 280x aren't listed here – these cards are Tahiti architecture and the R9 285 is built on the Tonga core. Maybe AMD isn't continuing support for our cards(?).
I should have mentioned, I am also running an R9 280x in this build.
I should have mentioned, I am also running a 280x.
Thanks for the write up! Your post is the only one that has worked for me on Ubuntu.
Thanks Cryptobadger! Your first firdt litecoin tutorial got me mini gdogecoin year sago.
My question now i still have my old 2gb hd 5970 amd cards and apparently the eth dag wont fit on that 2 gb memory. Will the eth miner write it to a hardisk instead so i can still mine eth unlike clayminer?
Also apparently the amdpro drivers no longer support the 5970 . The flgrx drivers are needed.
What are your thoughts on how to mine with my old 5970 forgeting power costs? (it still has the most shaders of any card 1600 )
Again thanks for such brilliant tutorials. By fsr the nes ton the interent for building mining rigs.
I woukd suggest being care about always doing apt ge tupdates etc. Sometimes new drivers break working mining rigs. Always preserve copies of old working software and installations. I let xbuntu update my old rigs and lost all mining ability with my 5970 card 🙁
Sorry Geopilot, you’re out of luck, the minimum GPU RAM size required to fit the DAG is 3Gb, nothing under that can mine ethereum, even if it was very capable last year, it’s because the DAG size is growing and is now beyond 2Gb, as far as I understand it will grow beyond 3Gb in late 2018.
DAG can’t be redirected to system RAM nor virtual memory (disk) unless someone find a way, but I believe if it can be done, will decrease dramatically hashrates, because GPU RAM GDDR5 is capable of 8-256 Gbps vs system RAM speeds DDR4 2666Mhz only run at 2-30Gbps, so will kill the reason to use any GPU for mining: high hashrate, I think it be like CPU mining if you use system RAM.
Can y’all tell me from step 4 where commands start and stop or if each line is a command
In this guide each line is a separate command, you must complete the first line inputs and let it run (some commands ask you for aditional input).
Terminal must display something like “anonymous@miner01:~$” before you start to input the second line and so on.
So I’m stuck on the latest build. Asus z270 mobo + 2x nvidia 1060. Miner only sees 1 GPU. I’ve swapped out the riser and the power cable. Fan doesn’t turn on. Miner doesn’t recognize that GPU if I unplug the first one (and the GPU in question is the only one plugged in) Could be a bad GPU, but before I jump to that conclusion, I’m looking for other solutions.
Any thoughts?
Thanks,
Charles
I swapped out the GPU – and confirmed that that isn’t the culprit. Rig runs well with only 1 GPU plugged in. Plugging in a second GPU hurts the performance of the GPU that is recognized and working. Any thoughts here, CryptoBadger?
Any and all suggestions are welcome.
Best,
Charles
just leaving an update in case others are struggling with similar issues. I got it working by fiddling with the internal display settings in the bios.
New issue (isn’t there always?): when I plugged in GPUs 3 and 4, the rig wouldn’t start at all. Have a 1000w power supply. Didn’t think 2 GPUs would overwhelm it, but maybe so. Ordered a second PSU and hope to be mining with 4x1060s by the weekend.
Hope y’all are mining successfully!
Not sure why adding a 3rd GPU would cause the rig to fail to power on, but just wanted to comment that a 1000 watt PSU is definitely (more than) enough for four GTX 1060s.
Yep. I don’t get it either. I got a (relatively) inexpensive 650w PSU plugged in the extra 2 GPUs. Booted up just find but Claymore didn’t recognize ANY GPUs with more than 2 plugged in. Upgraded to Claymore 9.6. No luck. Then I re-installed the NVIDIA drivers with all 4 GPUs plugged in and BAM – all GPUs recognized an dam now mining at full potential. I have one more slot available on my 2nd rig (running 1070s), so as soon as 1 becomes available (at some price that is not ridiculous), I will install that and be happy with my setup.
Thanks for your help, as always.
Best,
Charles
Followed this to a t, says no file or directory when I try to launch miner. Please help
How do I check my hash rate , I have claymore set to startup automatically ???
You must open claymore in a terminal window to see the active GPUs and it’s individual and combined hashrates, it look like the last picture in the guide
If you followed my guide exactly, you set up some scripts to start Claymore attached to a screen session so you can easily check on it (step 7-8). Just SSH into your miner and type “miner” at the prompt. You should see Claymore running. When you’re done, just hit CTRL+A followed by CTRL+D to exit the screen session and leave Claymore running.
Hi and thanks a lot CryptoBadger for this how-to!
I followed every step, but when I start the miner script Claymore starts well but don’t see any of my GPU.. Log below:
————————
No AMD cards in the list.
No NVIDIA CUDA GPUs detected.
No AMD OPENCL or NVIDIA CUDA GPUs found, exit
————————
I have 4 RX580.
I checked on drivers usig ‘dpkg -l amdgpu-pro’, they’re installed but when I checked the hardware with ‘sudo lshw -C video’ cards are fully recognize as I have 4 cards called “*-display NON-RÉCLAMÉ” (yeah Xubuntu is in french).
Do you have an idea on what could be wrong please ?
I meant :
I checked the hardware with ‘sudo lshw -C video’ cards are NOT fully recognize as I have 4 cards called “*-display NON-RÉCLAMÉ”
I have same problem and no idea
Well, to save me some time to find a solution, I switched on Windows 🙂
And tbh I don’t know if I’ll go back on Linux as all the bios modding needs to be done on Windows.
Sure I’d like to simply ssh my rig, but Teamviewer does the job as well.
But if someone has a solution, I’d like to hear it anyway!
Segmentation fault (core dump)
it is probably because of the driver
not the driver itself but the driver installation
if you are using the display of the gpu then “./amdgpu-pro-install -y”
will get everything done and you probably dont need anything here
if you are using the intel gpu (which you will probably do because of the new mining edition gpus) then you must install amdgpu-pro with –px “./amdgpu-pro-install –px”
the miner still wouldnt work with just that, you need to configure the driver
its like the laptop igpu/gpu switchable configuration
simply put
cd /opt/amdgpu-pro/bin
./amdgpu-pro-px –mode performance
and logout or reboot
and you’re good to start mining 🙂
I had to use –px option to get the rig to boot.
However, getting slow hashrate (15mh) on rx 570.
Should the –mode performance help here?
Well the default for –px is powersaving mode which shuts down the gpu and uses the intel’s gpu instead
–mode performance uses the gpu while keeping the intel gpu as the display which is basicly what we want
Thank you very much for this guide, it helped me tremendously.
However, claymore miner only recognises 2 of 6 gpus
I have 2 Radeon RX480 and 4 Radeon 580
I have no problem running one 480 and one 580 or two 580 or two 480.
Any advice?
Thank you so much for the guide, Cryptobadger!
Quick question:
Sometimes upon reboot, GRUB doesn’t show up. It’s merely a black screen. It takes manually powering on and off the rig in order to “Select Ubuntu”. Any idea on how to troubleshoot this?
I went through and did everything as instructed, all installs worked and everything went smoothly. However when i went to run claymore, its says no amd or nvidia card present (currently trying to get just one r9 280 running). The card shows up under lspci | grep VGA the card shows up. I am using the current Xbuntu like recommended in the log above. not sure where i am going wrong? Any suggestions as to why claymore isn’t seeing the card?
Thomas – I’m also having issues with an R9 280.
Do you get Claymore to start? For me, it starts but then returns the error:
“Cannot build OpenCL program for GPU 0 Segmentation fault (core dumped)”
I *suspect* (but am not sure) that the cause may be that AMDGPU-PRO doesn’t like the R9 280. Anyone else using this guide managed to make it work with this card?
(PS. Cryptobadger – thanks for the guide, even though I’ve not yet managed to make it work!)
Let me start off by saying thank you your guide works great!
My biggest problem in setting this up BEFORE your guide was that i couldnt get start.sh to run
start.sh & epools.txt is generated when you visit https://eth.nanopool.org/help and click on generate config which you paste in the Claymore.s.Dual.Ethereum.Decred_Siacoin_Lbry_Pascal.AMD.NVIDIA.GPU.Miner.v9.6.-.LINUX folder
“cat start.sh” shows the following
#!/bin/sh
export GPU_MAX_ALLOC_PERCENT=100
./ethdcrminer64 -epool eth-us-east1.nanopool.org:9999 -ewal MYWALLET.MYMACHINENAME/MYEMAIL -epsw x -mode 1 -ftime 10
However when i try to run start.sh the terminal would start then quit
Following your instructions allows me to run mine.sh without any problems but some reason i cant make start.sh work even though it has the same information inside the file.
bascially this doesnt work which is my way
-rwxrwxrwx 1 eddie eddie 67248 Dec 22 2016 ethdcrminer64
-rwxrwxr-x 1 eddie eddie 308 Jul 4 2017 start.sh
and your way works
-rwsrwxrwx 1 eddie eddie 67248 Dec 22 2016 ethdcrminer64
-rwxr-xr-x 1 root root 231 Jul 3 20:16 mine.sh
Please explain why if you can
So after a little trouble I’ve got claymore mining.
I had conflict with intergrated gpu which was fixed using –px flag during driver install. I am using 17.10 drivers.
However, I’m getting only 15mh/s with stock bios with a MSI Armor rx 570 4gb oc.
What could be the issue causing such low hash rate?
Did you try
amdpro-gpu-px –mode performance
I did mentioned it in my comment above
Going to try this as soon as I get home.
Fingers crossed this helps.
Made the hashrate drop to 4 mh/s 🙁
Theoretically that should be impossibe
Try connecting the display to the gpu
And ‘amdgpu-pro-install -y’
Just to checl the hash rate
Performed with the most recent version 17.10-446706.
Rebooted system and still only 4mh/s.
ETH: 07/04/17-21:24:30 – New job from eth-eu1.nanopool.org:9999
ETH – Total Speed: 4.130 Mh/s, Total Shares: 0, Rejected: 0, Time: 00:00
ETH: GPU0 4.130 Mh/s
I believe i read before that version 17.10 caused problems sometime
Try version 16.40 with -y parameter and gpu display
Hopes up
Hey, first of all thx for all the info, its been really useful. Im building a rig for the first time and deciding on the OS I heard about SimpleminingOS. I have cero knowledge un Linux so I wouldnt be able to fix anything if it doesnt work. Do you think I should I pay for Windows (about $170 in my country) or turn to simplemining? Thx in advance!
Gonza
Gonza it’s all about how much you know Windows: can you install drivers? make regitry editing? troubleshooting hardware? by my little experience if you don’t know Windows enought, is the same using Linux or Windows as mining OS, by the “fixing” problems side. I practically know nothing about linux, but can manage myself a little above everage user on Windows, but anyway I choose Xubuntu as in the guide, because was something to learn, and as far as my Windows knowlege goes I don’t trust W10 for mining because it’s privacy issues. Another consideration is that talking about the RX GPUs performance under linux, they give more mh/s that in Windows, if you use GTX the true is that you’ll want to use Windows for maximize your mh/s.
The good thing about using simpleminingOS is that I want to think that they give you support with any problem related to mining, nothing you can get from microsoft, but can get from windows/linux mining comunities.
I can tell you that besides a pair of hiccups(you will wave them in Windows too) all went as expected following this guide, but at the end the decision is yours.
Finally resolved this by switching to headless mode in grub.
# Change GRUB_CMDLINE_LINUX_DEFAULT=”text”
PX mode was not required in this case and all the above steps work a dream