

 April 6th, 2017
  CryptoBadger
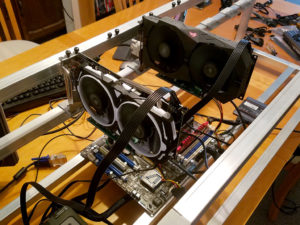
Building an open-frame GPU miner.
It’s finally time for an update to my popular 2013 Litecoin mining guide! It’s four years later, and Ethereum mining is where it’s at for GPU miners, so that’s what I’ve focused on. I’ve kept the same format and detail level as my old guide, so if you were around back then, you’ll know what to expect.
If you’re new to the world of crytocurrency mining, this guide should give even an absolute beginner all of the knowledge needed to put together an efficient Ethereum (or other GPU-minable altcoin) mining rig using readily-available consumer hardware.
This guide will be broken into several parts, each focusing on a different aspect of building your first mining rig. First, let’s take a look at what you’ll need in terms of hardware to put a respectable Ethereum miner together.
Build your own Ethereum Mining Rig, part 1: Hardware
Here is the list of hardware that I recommend. Don’t worry if you’re not able to get exactly what’s on this list, I provide some excellent alternatives below the table.
| Motherboard | 1 x Asus B250 Mining Expert | $180 |
| Processor | 1 x Intel Celeron G3900 CPU | $45 |
| Memory | 1 x 4GB DDR4 DIMM | $40 |
| Power Supply | 1 x 1200w Platinum PSU | $260 |
| GPUs | 3+ Radeon RX 570 video cards (*see below) | ~$200 each |
| Boot Device | 1 x 60GB SSD -or- USB stick (Linux) | $5 – $35 |
| Case | 1 x build your own (see bottom) -or- open frame case | $30 – $200 |
Some explanations and alternatives for each item:
Motherboard
Generally, any motherboard with PCIe slots on it is suitable for mining—typically one GPU per PCIe slot. The PCIe slots don’t need to be full-length, as we can attach GPUs to 1x slots with the help of risers. With that said, there are potentially some limitations when you start to pack a large number (4+) of GPUs onto one motherboard, even if that board has enough PCIe slots to physically accommodate them. That’s why picking a suitable motherboard is probably your biggest hardware headache if you want to run as many GPUs as possible in your rig.
My top choice is currently the Asus B250 Mining Expert board. It’s literally made for mining, with support for up to 19 (!) GPUs and 3 power supplies right out of the box. Even if you don’t intend to initially run more than a few GPUs, the included mining-centric diagnostic features and ability to expand later probably make the price premium over less-robust boards worth it.
The ASRock H110 Pro BTC+ is another excellent choice for mining, with support for up to 13 GPUs. However, it currently costs about the same as Asus’s mining board, and for the money I’d rather stick with Asus. If you know that you’ll definitely stick to a single PSU and a small handful of GPUs (e.g.: the majority of us), this is a fine choice, especially if you find a deal on it.
Finally, the Biostar TB250-BTC is also aimed at miners, and costs considerably less than the Asus and ASRock offerings. The Biostar board “only” supports 6 GPUs, but that’s likely all that the majority of us need. If price is your primary consideration, the TB250-BTC should be at the top of your list for 6 GPU rig builds.
If you only want to use 3-4 GPUs in your rig, then you’ll have a much easier time. Most boards with up to four PCIe slots should accommodate a GPU in each. Keep in mind that you can use old hardware that you have sitting around—the board doesn’t have to be recent. I dug out an old ASRock 970 Extreme4 that I used four years ago for litecoin mining, and it still works fine today for up to 4 GPUs (5 is possible with some work). So it’s possible to pick up an ancient board on eBay/Craigslist for nearly nothing and mine with less than 6 video cards.
CPU / Processor
This one is easy: buy the cheapest CPU that works with whatever motherboard you pick. When it comes to mining, the GPUs do all the work. Your CPU will essentially sit idle, so there is no reason to waste money on anything other than the bare minimum.
All of the motherboards that I recommended based on Intel’s LGA 1151 socket, so that means the Celeron G3900 is probably the best choice.
If you go with an AMD motherboard, a Sempron CPU will do nicely.
Memory
4GB is fine. Overkill really, at least for Linux. If you have an old 2GB stick (or even 1GB!) sitting around and plan to run Linux, you’re good to go. If you want to run Windows, then 4GB is probably a realistic minimum.
While Ethereum mining is pretty memory-intensive, everything happens on the GPUs. System memory will be pretty much unused, so there is no reason to spend money here, especially with DDR4 prices so high.
PSU / Power Supply
The power supply is extremely important—don’t skimp on it! A good, efficient PSU will keep your electricity costs to a minimum and more than pay for itself over the long run. Seasonic, EVGA, and Corsair are all generally top brand choices. The 1200W unit that I’ve linked may seem like overkill, but power supplies are most efficient when they’re not running near their rated maximum load. A 6 GPU rig will draw about 750 watts (assuming 6x RX 570 cards, properly optimized), which means a 1200W PSU will have sufficient headroom to perform efficiently.
If you’re planning on running only 3-4 GPUs, you can save a bit of money and go for their 850 watt model instead.
GPUs / Video Cards
The top Ethereum mining choice is currently the Radeon RX 570 / RX 580 line*. The RX 570 delivers nearly the same performance as the RX 580 (within 4-7% or so) for a bit less power consumption—they’re essentially equal from an efficiency standpoint. The RX 570 is usually significantly cheaper than the 580, so generally the 570 is the best choice.
Which model to pick, though? While literally any RX 570/580 card will do, the most important thing to look for is memory speed if you want the best performance. Cards with a higher memory clock speed will generally perform a bit better while mining ETH (and can generally be overclocked more). Memory capacity isn’t really important beyond 4GB, so all other things being equal, there is no reason to shell out extra cash for the 8GB version of a card. It’s true that every GPU needs to be able to hold Ethereum’s DAG file in memory, and that file is slowly increasing in size—but it won’t surpass 4GB until late 2019 (and ETH’s switch to PoS will likely occur before then, anyway).
With all of that said, the 8GB versions of the cards tend to have faster-clocked memory than most of the 4GB cards, so if the price difference isn’t too large, spring for whatever is the fastest. Most of the cards fall between 1650 Mhz (6600 Mbps effective) to 2000 Mhz (8000 Mbps effective). The slower 1650 Mhz memory GPUs will hash at 21-23 Mh/s, and the fastest 2000 Mhz ones will do 25-28 Mh/s (both can potentially be pushed higher with BIOS mods and good luck).
The best advice is usually to just pick up whichever 570/580 card you can get your hands on for the least money, as mining speed differences between brands/models are pretty small after optimization. These 8GB MSI RX 570 cards are $220 each as of 11/29/2017, and I’m running mine at 28 Mh/sec without pushing them too hard.
If you can still find old RX 470/480 cards on the secondary market, they’re just as good the RX 570/580 cards that replaced them.
*While my guides deal with setting up and optimizing AMD’s GPUs, nVidia’s 1060 / 1070 video cards are also excellent for mining. Generally these days I tend to recommend whichever is cheaper (and right now, that’s AMD). But if you find a deal on some nVidia 1070 GPUs, don’t hesitate to grab them—they perform just as well as AMD’s offerings, and are arguably easier to set up (just remember to install nVidia drivers instead of AMD’s if you follow the rest of my guide!).
Boot Device
If you plan to run Linux, you can use pretty much anything, including a ~$5 16GB USB stick (we’ll be using Claymore miner, which doesn’t write Ethereum’s DAG file to disk, so we don’t need to worry about wearing a USB stick out due to constantly writing to it, like with the stock ethminer). With that said, SSDs are pretty cheap nowadays and it might be nice to have one in case you want to try Windows at some point.
If you plan to run Windows, then a cheap 60GB+ SSD is your best bet. If you have an old mechanical hard drive laying around, that’ll work fine too.
The Case
I highly recommend against trying to cram a bunch of GPUs into a conventional PC case. You have two realistic options here: buy a purpose-built mining frame, or build something yourself.
The first option is straightforward, if not a bit more expensive. Here is an example of an open-air frame that will accommodate up to 6 GPUs. Here’s another option. You’ll pay a premium going this route, but it’ll save you some time and effort.
Building your own is much cheaper, and (arguably) more fun! If you’re handy, you can put together a simple aluminium frame yourself for a fraction of the cost of buying one. If you don’t have the necessary skills or tools for that, I popularized building mining rigs inside plastic crates back in 2013, and that still works fine today (for up to 4 GPUs or so, anyway). At the bottom of this post, you’ll find instructions on how to build a plastic crate “case”.
Risers & Miscellaneous Stuff
If you’re building your own case (whether it’s from a plastic crate, or aluminium, or something else), you’ll need risers to connect your GPUs to your motherboard. If you’re buying a mining frame, most include risers. Risers tend to be pretty misunderstood among new miners, so here is what you need to know:
- Risers can be powered or unpowered. A riser is unpowered if it simply connects a GPU to a motherboard PCIe slot. A riser is powered if it additionally accepts power from the PSU (generally via a molex-type connector). Unpowered risers allow GPUs to receive up to 75 watts of power through the motherboard’s PCIe bus, just as if they were plugged in directly. Powered risers will take that additional power directly from the PSU instead, bypassing the motherboard.
- You may mix unpowered and powered risers, but the total number of unpowered risers should not exceed two (this includes GPUs plugged directly into the motherboard)! Motherboards are generally not designed to deliver more than 150 watts of total power through the PCIe bus, so two GPUs on unpowered risers is the safe maximum (2 x 75 watts).
- The newer USB-style powered risers often include SATA-to-molex power adapters. Throw these adapters away! SATA plugs are not designed to deliver 75 watts safely, and these can get hot enough to potentially be a fire risk (admittedly, 99% of the time you’ll be fine, but it’s not worth the risk). Instead, connect the molex plugs on the riser directly to your PSU (no more than two risers per PSU plug). Newer versions of these USB risers forego the molex adapter and instead use a PCIe connector for power.
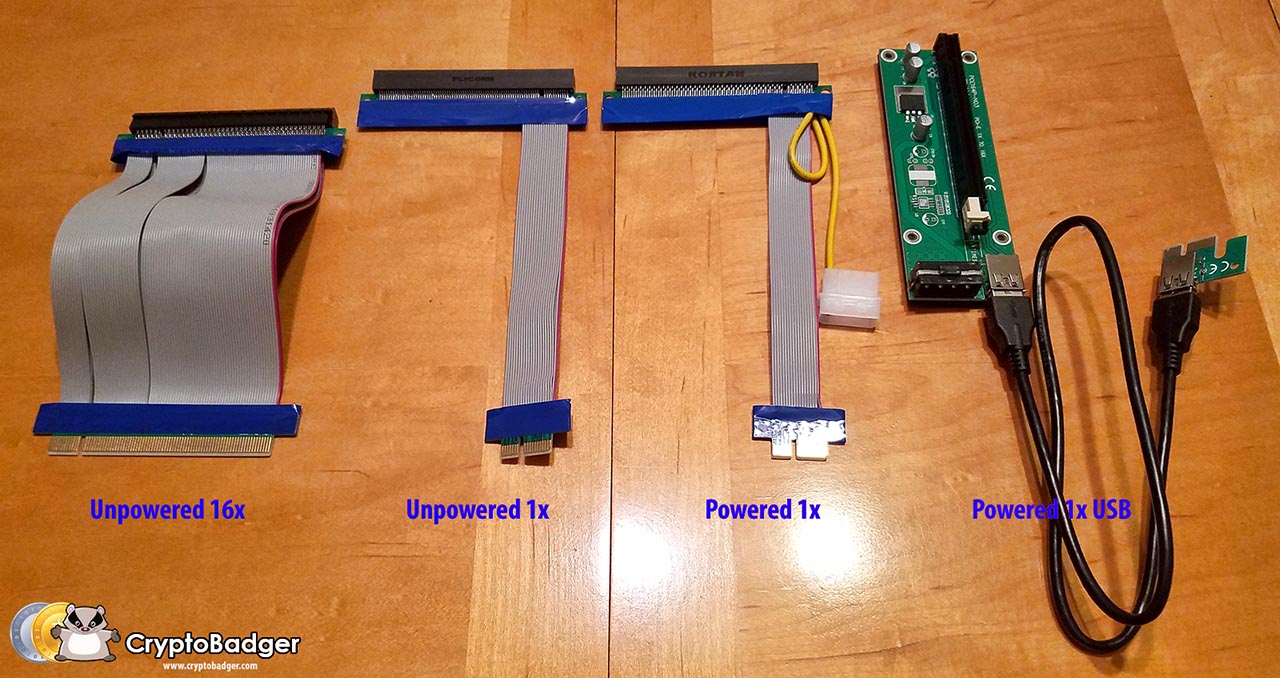
PCIe risers: click to enlarge.
I do think the newer USB-style risers are the way to go—they’re longer and easier to work with than the old ribbon-style cables. Here is a 6-pack of USB risers with the newest (and safest) PCIe connectors. It’s always smart to buy an extra or two, as defects are relatively common. If you have older ribbon-type risers laying around, or can get them cheaply, they’ll work just fine.
If you’re building or buying a large frame, you might need extenders for some of your molex plugs and PCIe power plugs.
You’ll also need a power button, unless your motherboard has one built in (which is fairly rare). This will do the trick, or you can build one into your plastic crate if you plan to go that route (see below).
Some people have reported that their rigs won’t boot unless they have a monitor connected, although this seems to be fairly rare (my own rig boots fine without a display attached). If this happens to you, you’ll need a dummy plug.
Building your Mining Rig “Case” from plastic milk crates
(I’ve copied the instructions from my original 2013 guide here and updated them slightly.)
Here is what you’ll need to create a simple DIY plastic crate housing for your miner:
| Plastic milk crate (can stack two and put your PSU in the lower one) | $10 each |
| Plastic stand-offs | $3 |
| 6 x #4 3/8″ wood or metal screws | $1 |
| Brace to rest GPUs on (1″ PVC pipe works great!) | $2 |
| a few cable ties (8″ or so) | $2 |
| power switch & LED (optional) | $5 |
You can get plastic crates in most home improvement stores if you don’t want to ship it from Amazon (it’ll be cheaper, too!). I picked mine up at Lowe’s for under $5 each. You should be able to get everything else on the list at Lowe’s if you happen to have one near you, too. As far as tools go, you’ll need a drill and a knife capable of cutting into whatever plastic crate you buy.
Assembly Steps:
First, attach your CPU & heatsink/fan to your motherboard, and place your RAM into the memory slot(s). Then follow the general steps below to mount everything into your plastic crate.
Click the images for a close-up look at each step.
 Place plastic standoffs on the bottom of your plastic crate, and rest your motherboard on top of them. Make sure that all of the essential ports are accessible (SATA, USB, keyboard, mouse, etc). Use your knife to cut away pieces of the crate if necessary so that all ports you plan to use are exposed. Then plug your riser cables into the PCI-E slots of your motherboard.
 Place your brace (1″ PVC pipe is really ideal and won’t flex over time) so that it is sitting above the motherboard, high enough for your GPUs to rest on. Cut the brace so that an inch or two sticks out on either end of the crate.
 Drill holes in your brace so that you can secure it with cable ties (see image). Do not simply rest the brace on the crate! An accidental bump can cause it to fall into the crate, along with ~$1000 worth of GPUs if you do that!
 Connect each GPU to it’s corresponding riser cable, resting the bracket end on the lip of the crate and the other end on your brace.
 Screw each GPU down into the lip of the crate. If you drill small pilot holes ahead of time (mark where to drill with a sharpie), this is much easier.
 If you have a power switch and LED, mount them into one of the crate’s corners. I was pretty sloppy with mine, but it’s functional.


You’re done! Simply connect everything to your power supply and you should be ready to power your rig on for the first time. If you have a second crate, you can put your power supply in there (along with your harddrive if you’re using Windows), and stack it under your main crate to save some space.
In the next part of this guide, I’ll show you everything you need to do to start mining under Linux (or skip to the Windows section if that’s more your thing)!
 Posted in
  Tags:
Tags: 


Hi all,
I have an Asus B150M-C it has 2 PCIex16 and a PCIex1 slot. I have recently bought two ribbon extenders in the hopes to add a third GPU via the PCIex1 and a powered riser.
My GPU’s are:
2x EVGA Geforce GTX 1060 6b (These are attached to the ribbons, attached to the 2 PCIex16 slots)
1x PNY Geforce GTX 1060 6b SC (THis is the GPU attached to the PCIex1 and the powered riser)
My PSU is an EVGA 850GQ
The issue:
When all three are connected my screen goes all wonky. Nothing really works. When just the two extenders are attached everything works fine. When just the single riser is attached everything works fine. But I can’t get all three to work at once.
Thoughts?
Does this miner also work for Litecoin purposes, or do you need different hardware for litecoin? Also, can this be set up to mine both/either litecoin/ethereum, at the same time or alternating? I really don’t want to be restricted to only one coin. Excellent guides, BTW
GPU’s
Is it ok to use
MSI VGA RX570 cards..
there seems to be a great difference in the memory clock speed, in the RX570/580 series that is displayed on amazon.
MSI GAMING Radeon RX 570 8GB GDDR5 256-Bit DirectX 12 Graphics Card (RX 570 ARMOR 8G OC) has a memory clock speed of 1268 Mhz versus
MSI VGA Graphic Cards RX 570 ARMOR 4G OC that has a memory clock speed of 7,000 Mhz.
Its my understand the faster the memory clock speed the faster the hash?
Great guide, thanks, will respond in kind!
i found the answer to my question.. not sure if it was that every knew or know one knew so.. In case the later is true
http://www.geeks3d.com/20100613/tutorial-gpu-tools-and-gpu-memory-clock-real-and-effective-speeds-demystified/
Thanks again CryptoBadger for your efforts!
PLEASE HELP:
I built my rig according to these exact specs – yet, for some reason every time I boot, I just get a BLACK screen.
I have tried booting with only 1 GPU – black screen
I have tried booting with no GPU – black screen
I am desperate – The build is perfectly built yet for some reason booting is no good.
If anyone here can solve my problem, I will pay them a bounty in Ethereum or Bitcoin, you choose.
Thanks,
Al
Try clearing cmos??
https://www.lifewire.com/how-to-clear-cmos-2624545
Forgot eth: 0xe7b4e268503f9c117e7f9b24a7a7ccab019e1cbf
Your mobo manual should have directions about pin settings to clear cmos if you can’t boot to bios
And coinmogul I have a mobo with 2 molex plugs beside the gpu slots and don’t use them…. didn’t know why they were there honestly
If you have a mining specific board, make sure you connect the molex adaptors on the motherboard. It probably has two, and each should have its own cable dedicated from the psu for it.
ETH: 0x0a7ab536f562bfba70b44956e5a65f762d578a1f
Where did you get the graphics cards bro? Include a link if you would please.
Gtx 1070ti or the 1080? That my dilemma right now.. any thoughts?
1080s are not great for ethereum mining since they use a different kind of memory. The 1070ti do use the DDR5 that the ethereum mining software is optimized for. Still, bang for your buck-wise, plain 1070s or 1060s 6gb are probably the way to go.
1070ti still is ddr4…
No. 1070ti are ddr5 just like 1070 and 1060. 1080 are ddr5x.
Noob here. Thanks for the tutorial, it was great! I built my first rig but have yet to power it up so ce i am very concerned with the way my risers would be powered after all the SATA burning we see on the internet.
I have a question: I am currently supplying power to 3 GPUs using one cable to the PCI-e port of the PSU for each (nothing else is plugged-in so I have one port hanging for each GPU).
1) Is it safe to use this extra hanging PCI-e plug to power the riser in addition to the GPU? (So each cable will power a 6-PIN riser and a 570 GPU).
2) if not what would be the safest alternative? I really don’t wNt to use those SATA plugs.
I have risers similar to the ones in the tutorial only in VER006.
Thanks in advance!
If I understand you correctly, you have 3 GPUs plugged into USB-style risers (like these), which are in turn connected to your motherboard. All of your GPUs have a single 6/8 pin PCIe connector, which is connected to the PSU. The PSU’s PCIe cables each have two 6/8 pin connectors, and you want to use one of these to power each riser (the other is connected to the GPU).
If I have it all correct, then yes, that’s absolutely fine. Throw away the intermediate SATA-to-PCIe plugs that came with the risers, they’re generally not safe for use.
Exactly, that is precisely my situation! Thank you very much for all the great help!
Why do you need yo use the powered risers with the B250 MB? If I need to use powered risers do I need to make sure each bank A/B/C GPU and riser is from same PS? Or all powered risers need to be on PS as MB?
Want to setup of mining servers 20 sets, required technically know how
I have a noob question regarding graphics card selection. Is it better to get RX580 graphics cards with 8+6pin power or the ones with only 8pin power?
I assume cards with 8+6pin would draw 150W+75W from the pcie cables so the powered riser may have less stress? But that would mean the riser needs its own power input cable which can be scarce depending on the PSU setup.
On the other hand, if I get a RX580 card with a single 8pin power input, and PCIe cable with 8pin+6pin then can I plug the same cable into both the card 8pin and riser 6pin sockets?
Thanks in advance!
I have ZERO computer skills, and I am sorry if this question come across as stupid but I truly don’t have a clue how this all works. Do you happen to have directions for putting this together? Also, when everything is put together do I just turn it on and start mining? I am sure that I will need software to work this but do you know where I can get the software needed to run these? I am so sorry that I am asking noob questions, but I seem to always have more questions that keep popping up.
Thank you
Hey guys
i wanted to build a 4 gpu rig
i ve 4x 580s with 4x 6pin pcie risers.
My problem:
i bought the evga supernova g2 850 watt
but i cant connect all gpus+risers to it
at the moment i am running only 2 cards.
the psu came with
-2x 6+2pin + 6pin PCI-E VGA Cables
-2x 6+2pin PCI-E VGA Cables
i could connect via sata but i want to avoid that, as u mentioned.
Really nice guide CryptoBadger it did help me alot
im sure i ll spend u a beer if i mined my first Eth-Coin.
greeetz
Buy Splitter cables newegg or ebay.
Can u suggest me one pls i only find crap on the internet and im rly afraid of burning my house down thank u man
I have 2 8 rig systems. Risers i use https://m.newegg.com/products/9SIA4RE6KD8226 i connect 6 to the molex and 2 to sata. Problem with sata is not so much the saftey issue it’s the ability to have a constant reliable power supply. My opinion anyway.
https://m.newegg.com/products/9SIA8SV6619421
Good luck bro. That should help. If i understood your question. Lol
Thank u man but Not rly my risers are 6pin
6+2pin + 6pin PCI-E VGA Cables
I really need to learn linux. My next build. Working on 8 1080ti for my next build.
This blog needs more activity. It has helped me a bunch.
im keen to build one. how much are we able to mine on a monthly basis..I’m guessing its a fraction of an etherium ?..can anyone give me a rough idea.
it consider to ur hasging power one card gives rougly 30Mh/s that
0.12 eth a month if u ve 10 gpus u mine 1.2 eth a month and so on
My rig is running 6 gtx 1060 6gb, mildly overclocked for stability at 135 MH/s total. Roughly getting 1/2 eth a month. I’ll get mt ROI in 4-5 months (depending on eth price) then rig is pure profit.
It’s true AMD cards will give you slightly more..it’s a shame that i built mine when there was a massive shortage of cards.
Would someone be willing to make this a youtube tutorial video?
You’re confusing. Considering risers in bullet no.3. you first say that SATA to 4-pin molex is unsafe because of SATA, and then you say that SATA to 6-pin PCIe molex is safe. WTH 🙂 The current goes though the same “unsafe” SATA cable.
Think you must have misunderstood me somewhere. *All* of the SATA-to-molex cables that are often packaged with USB-style risers are potentially unsafe.
Where did you get that plastic clips for the bottom of the GPU’s to sit in?
Are they for 1” square tubing?
How much money would this unit generate a day?
What I say below is purely my opinion after working with mining for only 1 month. Take it as that only.
1) Motherboard. I do not like the Asus B250 Mining Expert. Sure it supports 19 cards on one board which sounds great like it will save you $$ on additional memory, cpu, hard drive etc. However, to get it running with 19 cards you have to have 32GB of memory and use specific Nvidia P106 mining cards which don’t even seem to be available. I haven’t used the ASRock so I can’t comment, however I really like the Biostar TB250 motherboard. The Biostar will run 10 cards using Linux without any special cards or endless tweaking and technical knowledge. I currently have 2 Rigs of 10 Nvidia 1060s each running stable, 24 hours a day using mainly the directions found on this website.
2) Risers. I use the most current UBIT risers using the supplied 6 pin to SATA adaptor. Easy to attach and stable.
3) Mining Rig Case. No need to purchase a specific mining rig for 100’s of $$$. They are nice and well made but a waste of money. Buy a three tier Metal Storage Rack from Walmart for about $30. Good air flow, stable and easy to move. Put your motherboard and power supply’s on the middle shelf, 5 GPUs top shelf and 5 GPUs bottom shelf. Can easily attach everything and shelf is stable yet easy to move. For the GPUs they won’t sit upright themselves, however if you get a dowel from walmart (sold in the craft area) (1/4″???) you can hook each of the GPUs to the dowel using a small binder clip and they will sit perfectly straight and support each other from falling.
4) Remote reboot and power management. There is a device called an iCoostor. It will monitor your power usage and give you the opportunity to cut power to your rig remotely. This can be important 1) to know your power costs 2) if your rig hangs you can cut power using the iCoostor and then when you restore power (all remotely) you can have the BIOS set to automatically reboot your rig. That combined with the automated startup scripts provided on this site will have you back up and mining in minutes from anywhere you have an internet connection using only your smartphone.
5) Spend the extra $ and get a CPU that supports hyperthreading. It will cost you $80 instead of $50 but I have 1 rig that uses a 2 core 2 thread processor and I can’t do anything else on it effectively while its mining. Not that you’ll use it for much else but sometimes you want to research on the web using the machine you are trying to tweak and not having a fast enough CPU makes that frustrating.
6) Use this site!!! 85% of all the information you need to have an effective mining operation is on this site. Its well written, well thought out and a great starting point to get you up and running with the least amount of headaches. The linux step by step instructions are awesome and easy to use.
7) Don’t be afraid of Linux. I never used it before I started mining but this site makes it easy for mining. Very stable, easy, fast and free. Whats not to like.
Guys, I tried turning in my miner again and my monitor is black – not even the bios screen pops up on my B250 motherboard.
This is a miner I have had running since December – I just turned it off because of a move.
Has this happened to you before? Any recommendations
Please let me know.
Thank you
All good info…I’ll be sorting thru some gpu at scrap yard looking fo 4g or bigger then test and referb..to build a mining rig for Expanse, good idea or wasted time all else for rig mb, cpu, psu will be new. OS lunix from USB stick.. only issue electric cost .13 kilowatt. Wish cheaper but screwed in SC. Ran numbers on profit calc. But don’t have true hard numbers…any estimate ideas?
I’m in Mt Pleasant Mike.. Power for 11 card setup is $160 a month. That whole debacle with SCE&G is a killer for power use.
I’m mining BTG and ZCASH converting them to ETH with decent monthly profit. Profit is Not like it was late 2017 early 2018. Good luck.
I’m in Trident area NChs. SCEG too ugh.
Wanted to cut ties with them for years, cosiderd solar off grid with grid tie inverter but no more buy back programs.
I received 8 cointerra miners in 2017 but not of any value at the moment.
So leaning heavy twords altcoins to convert to ether or hodl just looking to cut costs to justify elec cost..lol
June 2018 and your article is still being read ! congrats 🙂 (and thanks for putting it together).
Quick question (for which I can’t seem to find a clear answer) : if I have 2 PSU. Let’s say the first one if first to power the motherboard, SSD, etc. Then the second one is mostly to power the GPU’s. With which of those 2 should I power the riser ? (in my particular case : USB powered riser)
Thanks for your time if you can answer to this newbie noob question 🙂
Do you have a video on how to build this?
[…] Build your own Ethereum Mining Rig, part 1: Hardware […]